Let Me Tell You About These Cookies…
You ever bake something new, and suddenly you’re everyone’s favorite person at the Christmas party? Yeah, that happened to me with these Eggnog Snickerdoodle Thumbprint Cookies. There was a time (not too long ago, mind you) when the only thumbprint I cared about was the one I left on my phone, but honestly — after these buttery, spiced beauties? I think I’ve found my true medium. I still remember my nephew trying to "help" by, uh, making thumbprints with the *entire* palm of his hand. We called those the "egg nog crater cookies." Now it's just tradition. Isn't holiday baking just controlled chaos anyway?
Why I Keep Coming Back to This Recipe
I make these cookies whenever I've gone a little overboard with the eggnog (yes, that's a thing in my house), or when the usual gingerbread just isn't cutting it anymore. My family goes totally bonkers for them — maybe it’s the cinnamon sugar on the outside, maybe it’s the ridiculously creamy centers, or it could just be the bit of Christmas mischief in every batch. Oh, and honestly: I used to mess these up, like, every time by using cold butter. (Don't be like old me. Room temp, please!)
What You’ll Need (But Not Everything Is Life or Death)
- 2 ¼ cups all-purpose flour (sometimes I swap out a handful for almond flour if I’m feeling wild)
- ½ teaspoon baking powder (I once forgot this—cookies tasted fine, just...different?)
- ½ teaspoon fine sea salt (table salt works, but sea salt gives that little oomph)
- 1 teaspoon ground cinnamon (or pumpkin pie spice, when that’s all I have handy)
- ¾ cup unsalted butter, softened to room temperature (I’ve used salted butter in a pinch and just omitted extra salt, works okay!)
- 1 cup granulated sugar (my grandma insisted on C&H, but, like, any sugar is sugar here)
- ¼ cup eggnog (homemade or even the store-bought stuff that tastes like melted ice cream)
- 1 large egg yolk (save the white for breakfast maybe?)
- 2 teaspoon vanilla extract (I've used the fake stuff. I lived to tell the tale)
- ½ teaspoon ground nutmeg (fresh is fancy, preground is fine – trust me here)
- For rolling: extra ¼ cup granulated sugar mixed with ½ teaspoon ground cinnamon
- For the filling: 1 cup powdered sugar, 2-3 tablespoon eggnog, pinch nutmeg, and a dribble of vanilla (totally optional, but so gooey and right)
Let’s Make Them (Don’t Overthink It)
- First, preheat your oven to 350°F/175°C — or a shade below if your oven runs hot like mine does. Line a couple baking sheets with parchment or nonstick mats (I just use whatever I find first).
- In a bowl, whisk flour, baking powder, salt, and cinnamon. (If you spill some, just scoop it back. Who’s watching?)
- Get a big bowl — or your stand mixer, if you’re fancy — and cream the butter and sugar together till it’s light and fluffy. Takes me maybe 2-3 min if I can keep from sampling it. Beat in the eggnog, egg yolk, vanilla, and nutmeg. Don’t freak if it looks curdled; it all comes back together once flour gets involved.
- Gradually add in the dry stuff. Go easy, I’ve sent flour flying more than once. Mix til a soft dough forms.
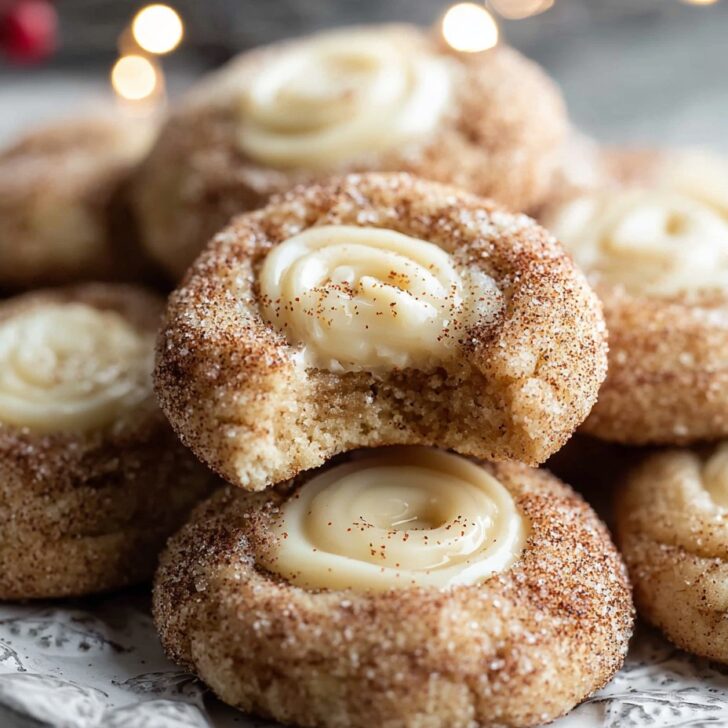
- Now, scoop tablespoon-ish balls of dough, roll in your cinnamon sugar mixture, and line them up on your prepared sheets. A little spacing is good; these can spread (but honestly not much unless your kitchen is boiling — I blame the radiators).
- Here’s the thumbprint magic: Press a thumb (or a spoon handle — actually, that gets you more uniform craters) gently into the center of each ball. If they crack, no biggie — makes 'em look rustic.
- Bake for 9-11 minutes, until the edges are just barely golden and the centers look soft. If you overbake ’em, they get dry, so keep an eye out. (This is usually when I start cleaning up, but then get distracted watching cookie TikToks.)
- Cool on pans for a couple minutes, then move to racks. If you try to fill them too soon, the centers kind of droop, but hey, still delicious.
- Whisk up your eggnog filling: powdered sugar, eggnog, pinch of nutmeg, splash of vanilla. Drizzle or spoon into those thumbprints. Sometimes mine run over — I call that extra frosting.
- Let the filling set a bit, or just eat ‘em gooey. I never have the patience to wait (and neither should you).
Notes from Real Life Baking (AKA My Oops List)
- If your dough is super sticky, chill it 15 minutes. Or just dust your hands with a little flour.
- I tried making these mega-sized once — they fell apart. Keep ‘em bite-sized. Trust me.
- Use a measuring cup if you want perfect cookies; I just eyeball it. Life’s too short for perfectly even cookies anyway.
Variations (Some Winners, Some Not So Much!)
- I swapped the eggnog for coffee creamer once, because I ran out. They actually tasted great, just less "noggy."
- Once I put raspberry jam instead of eggnog icing in the thumbprint — was...not festive, but definitely interesting!
- If you like more crunch, bake for 12 min — for softer, go short. I like a mix. Because why not?
Equipment (And What If You’re Missing Stuff?)
- Stand mixer or hand mixer — but honestly, a wooden spoon and biceps can get you there (though, prepare for a workout)
- Baking sheets
- Parchment paper helps for easy cleanup, but so does a well-buttered sheet pan
- Wire rack is handy for cooling, except when there’s a dish mountain — then I use a clean cutting board


Storing—If They Last Long Enough
Store them in an airtight tin (or, a big plastic bag if you forgot the tin, like I usually do) for up to four days. But honestly, in my house, they never last more than a day before someone “samples” the whole batch. You can freeze them, but the centers get a bit weird upon thawing — just a heads up.
How I Like to Serve These Cookies
This is straight from my family: we line them up on a platter, dust them with more nutmeg, and put them right next to the cocoa pot. Sometimes, we eat them with a scoop of vanilla ice cream (not traditional, but why not mix things up?). I think they're even better the next day with coffee, but not everyone in my family can wait that long. Your call.
Pro Tips (AKA How I Learned the Hard Way)
- Do NOT rush creaming the butter and sugar. Once, I tried with melting butter. Flat as pancakes, still tasty, but not quite right.
- Be gentle with the thumbprint. Hulk smashes make for broken cookies. Go easy — let the dough do the work.
- Let ‘em cool before icing. I say this every time, then ignore my own advice. It runs everywhere, but oh well, still tastes great.
FAQ (You Ask, I Answer…Kind Of)
- Can I use store-bought eggnog?
- Absolutely. In fact, I barely ever make my own. Just grab what's on hand! If you want to get fancy, here's a homemade eggnog tutorial from Simply Recipes I've used exactly once.
- Can you make these gluten-free?
- Yes, my friend Sally swears by Bob’s Red Mill 1-for-1 gluten free blend (here), though I've yet to try it personally.
- Do I have to use nutmeg?
- No way — if you hate it, skip it. Cinnamon works fine. Or try cardamom if you’re feeling zippy.
- Can I make the dough ahead?
- Yep, wrap it tight and chill for up to 48 hours. Actually, I think they taste better from chilled dough anyway.
- Why did my cookies spread too much?
- Could be warm butter, or maybe too much eggnog. Chill dough if it gets sticky — solved my problem!
Oh — one quick thing before you run off and bake! Did you know people have been making eggnog since medieval times? Wild. Sometimes I wish my kitchen had a roaring hearth and a jolly minstrel instead of a Spotify playlist and six loads of laundry waiting, but hey… at least it smells fantastic in here once these cookies come out.
Give these a try and let me know — which variation worked best for you? I’m just hoping someone out there tries peanut butter in the filling...though, on second thought, maybe that’s a step too far.


Ingredients
- 2 ¼ cups all-purpose flour
- 1 teaspoon cream of tartar
- ½ teaspoon baking soda
- ½ teaspoon salt
- 1 teaspoon ground cinnamon
- ¾ cup unsalted butter, softened
- 1 cup granulated sugar
- 1 large egg
- ½ teaspoon vanilla extract
- ¼ cup eggnog
- ½ cup powdered sugar
- ¼ teaspoon ground nutmeg
Instructions
-
1Preheat the oven to 350°F (175°C). Line a baking sheet with parchment paper.
-
2In a medium bowl, whisk together flour, cream of tartar, baking soda, salt, and cinnamon.
-
3In a large bowl, cream together butter and granulated sugar until light and fluffy. Beat in egg and vanilla extract.
-
4Gradually add the dry ingredients to the wet mixture and mix until just combined.
-
5Roll tablespoon-sized portions of dough into balls and place them on the prepared baking sheet. Use your thumb or the back of a spoon to make an indent in the center of each ball.
-
6Bake for 12 minutes or until lightly golden. Let cool slightly, then fill the centers with a mixture of powdered sugar, eggnog, and nutmeg to create the eggnog thumbprint.
Approximate Information for One Serving
Nutrition Disclaimers
Number of total servings shown is approximate. Actual number of servings will depend on your preferred portion sizes.
Nutritional values shown are general guidelines and reflect information for 1 serving using the ingredients listed, not including any optional ingredients. Actual macros may vary slightly depending on specific brands and types of ingredients used.
To determine the weight of one serving, prepare the recipe as instructed. Weigh the finished recipe, then divide the weight of the finished recipe (not including the weight of the container the food is in) by the desired number of servings. Result will be the weight of one serving.
Did you make this recipe?
Please consider Pinning it!!