
Let Me Tell You, These Brownies Fix Just About Any Day
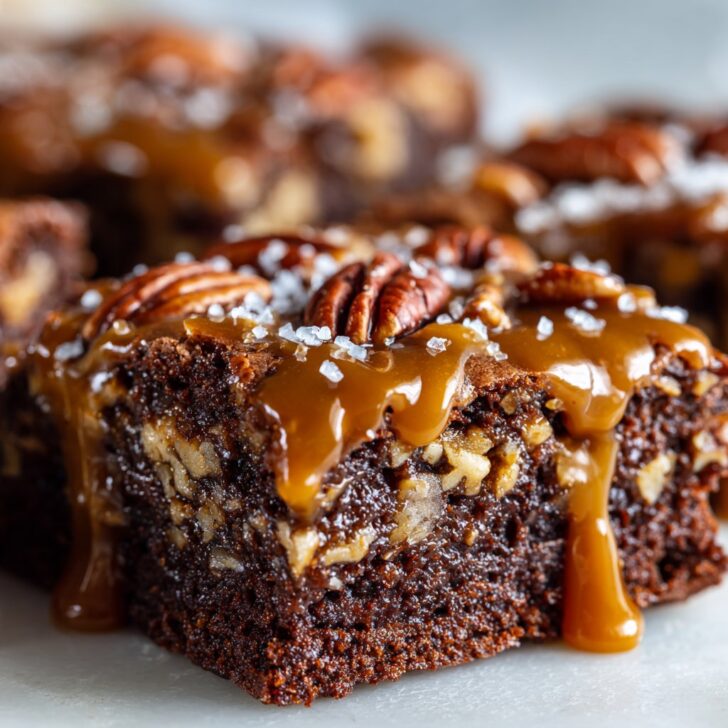
There’s something about turtle brownies that just makes people smile. Maybe it’s the gooey caramel, the crunchy pecans, or the way the chocolate sort of hugs everything together. Anyway, the first time I made these, it was a total improvisation after a stressful Tuesday; I’d forgotten I promised dessert for my neighbor’s game night (oof), and the only thing I had was a brownie mix, some leftover pecans, and a random jar of caramel sauce. It wasn’t fancy, but everyone acted like I’d baked them in Paris. My neighbor still asks, “You making those turtle brownies again?”
So, here’s the deal: these brownies are my back-pocket recipe. They never last long. If you’re the type who likes to nibble on the corners before anyone else gets a piece, you’re in good company.
Why You (And Everyone You Know) Will Love Them
I make these when I want people to think I’ve spent hours in the kitchen, even though, honestly, half the time I’m just using a box mix. My family goes absolutely bonkers for these—my sister once hid the last three pieces at the back of the veggie drawer. (Didn’t fool me, but points for effort.) And you know what? They’re the only brownies I don’t get bored of halfway through mixing. The messier the caramel, the better.
Oh, and if you’re worried about caramel sticking everywhere—yeah, me too, until I figured out a little trick (keep reading, I’ll spill it!).
What You’ll Need (And What Might Work in a Pinch)
- 1 box brownie mix (about 18 oz; I usually grab Ghirardelli, but honestly, anything will do—my grandma was loyal to Duncan Hines, but I can’t always find it!)
- Ingredients for the brownies (eggs, oil, water—whatever your mix calls for; sometimes I swap the water for coffee if I’m feeling fancy)
- ¾ cup chopped pecans (pecans are classic, but walnuts work in a pinch; I even tried roasted hazelnuts once. Not bad!)
- 1 cup caramel sauce (the squeeze-bottle kind is less messy, but if you’ve only got the thick stuff, microwave it a bit—careful, it gets hot)
- ½ cup chocolate chips (optional, but I never skip them; dark or milk is fine, or whatever you find at the back of your cupboard)
- Pinch of flaky sea salt (optional; I started adding this because I saw it online and now I can’t stop)
How I Actually Make These (With All My Little Quirks)
- Preheat your oven to 350°F (or whatever your mix says—sometimes it’s 325, but I usually just wing it). Line an 8x8-inch pan with parchment paper. If you don't have any, foil works, or just grease the pan well. I’ve used the wrapper from a stick of butter in a pinch.
- Mix up the brownie batter according to the box directions. Sometimes I add an extra splash of vanilla. And if you want to toss in a handful of chocolate chips now, go for it.
- Pour about half (maybe a bit more, maybe a bit less—no one’s grading you) of the brownie batter into the pan. Smooth it out, but don’t stress if it’s not perfect.
- Drizzle half of your caramel sauce all over that layer. It’ll look like a sticky mess, but that’s kinda the point. Sprinkle half the pecans too. I usually sneak one or two here.
- Dollop the rest of the brownie batter on top. It won’t cover everything—don’t worry. Perfection is overrated. Swirl it a little if you like, or just let it be.
- Drizzle the remaining caramel and sprinkle the rest of the pecans and the chocolate chips over the top. If your caramel is super thick, put little blobs and then swirl them with a knife.
- Bake for 32–36 minutes. But here’s the thing: my oven is a bit of a diva, so I check at 28 minutes. You want a toothpick to come out with a few fudgy crumbs, not totally clean.
- Let cool completely. This is the hardest part. If you cut too soon, it’ll be a lovely mess—I mean, still delicious, just less photogenic. Sprinkle the flaky salt now if you like.
Bits I’ve Learned Along the Way
- Once I tried using homemade caramel—honestly, just made a bigger mess and no one noticed the difference. Store-bought is fine. Actually, it’s probably better here.
- If you only have a 9x13 pan, you can double the recipe or just make thinner brownies (though they bake a bit faster, so keep an eye on them).
- I used to obsess over getting clean layers, but messy is best. The caramel kind of finds its own way.
What Happens If You Want to Tweak Things?
- I once swapped out the pecans for crushed pretzels thinking I was a genius. Weirdly, it turned out saltier than expected. Not my proudest moment, but hey, live and learn.
- Subbed dulce de leche in for caramel once—wow. A bit richer, but no complaints. Peanut butter swirl? Also a win.
- Oh, and if you’re feeling extra wild, stir in some chopped up dark chocolate bars instead of chips. It’s fancy-ish.
Do You Really Need All The Equipment?
I use my trusty 8x8 metal baking pan (ceramic works too). But, honestly, I’ve made these in a disposable foil tray at a friend’s house, and they turned out just fine. Mixing bowl, spatula, and a spoon are all you need. Don’t have a spatula? Use a big spoon—I do half the time.


How To Store (But Will You Even Need To?)
Technically, you can store these in an airtight container at room temp for up to 3 days. Or the fridge for a week. But, truth be told, in my house they never last more than a day—so I can’t say for sure what happens after that! If you really want to make them last, they freeze surprisingly well. Wrap individual squares in foil. They thaw out in about half an hour (or in 10 minutes if you’re as impatient as me and zap them in the microwave—just a smidge, not too much).
How I Like To Serve These (Opinionated, I Know)
We usually plop a big square in a bowl, slightly warm, with a scoop of vanilla ice cream. My uncle puts whipped cream and a cherry on top (I think he just likes making things look like sundaes). My oddball cousin eats them straight from the fridge—says they’re chewier that way. Do what you like! Sometimes, if I’m feeling fancy, I’ll dust a little cocoa on top, but that’s just me pretending to be on TV.
Some Things I’ve Learned (The Hard Way)
- One time I rushed slicing them while they were still hot. Yeah, don’t do that. You get a chocolate-caramel lava situation. It’s tasty, but...not great for serving at a party.
- Actually, giving them a bit of chill time in the fridge makes them easier to cut. Patience is not my strong suit but it pays off.
- Don’t skimp on the parchment or foil if you want to get them out neatly. I once had to chisel brownies form a pan. Never again.
You Asked, I Answered (For Real)
- Can I make these gluten-free? Yep! Grab a GF box mix. I like King Arthur’s blend, it works a treat.
- What’s the best caramel sauce? I’ve used Smucker’s Sundae Syrup and also made my own, but really, anything you like the taste of is fair game. If it pours, it works.
- Can I double this? For sure. Use a 9x13 pan and keep an eye on baking time—maybe add 5–8 minutes, but check early just in case. Ovens are tricksters.
- Help! My caramel sank to the bottom? Happens sometimes if the batter is too thin or warm. Just roll with it—those pieces are extra oozy.
- Can I add more nuts? Of course. No such thing as too many nuts in my book. I mean, unless you actually don’t like them, in which case, skip them.
- Are these better the next day? I tend to think so, but like I said, they rarely survive that long. If you have the willpower, let me know!
- Can I make these with homemade brownie batter? Absolutely. If you have a favorite recipe, go wild. I’m just lazy most days, to be honest.
Little digression here—I was once so distracted making these, I accidentally swapped the oil for applesauce. It was...interesting. Not terrible, but not turtle brownies either. Anyway, don’t stress. These are the forgiving, crowd-pleasing, stress-busting brownies you need in your dessert rotation. If you need more chocolate inspiration, Sally’s Ultimate Fudgy Brownies are worth checking out too. Let me know how yours turn out!


Ingredients
- 1 box (18 oz) brownie mix
- 2 large eggs
- ½ cup vegetable oil
- ¼ cup water
- 1 cup chopped pecans
- 1 cup caramel sauce
- ½ cup semi-sweet chocolate chips
- ¼ teaspoon sea salt (optional)
Instructions
-
1Preheat oven to 350°F (175°C). Grease a 9x13-inch baking pan or line with parchment paper.
-
2In a large bowl, combine brownie mix, eggs, vegetable oil, and water. Mix until well blended.
-
3Pour half of the brownie batter into the prepared pan and spread evenly. Bake for 10 minutes.
-
4Remove from oven and pour caramel sauce evenly over the partially baked brownies. Sprinkle with chopped pecans.
-
5Spread the remaining brownie batter over the caramel and pecans. Sprinkle chocolate chips on top.
-
6Bake for an additional 20 minutes, or until a toothpick inserted in the center comes out with a few moist crumbs. Cool completely before cutting. Sprinkle with sea salt if desired.
Approximate Information for One Serving
Nutrition Disclaimers
Number of total servings shown is approximate. Actual number of servings will depend on your preferred portion sizes.
Nutritional values shown are general guidelines and reflect information for 1 serving using the ingredients listed, not including any optional ingredients. Actual macros may vary slightly depending on specific brands and types of ingredients used.
To determine the weight of one serving, prepare the recipe as instructed. Weigh the finished recipe, then divide the weight of the finished recipe (not including the weight of the container the food is in) by the desired number of servings. Result will be the weight of one serving.
Did you make this recipe?
Please consider Pinning it!!