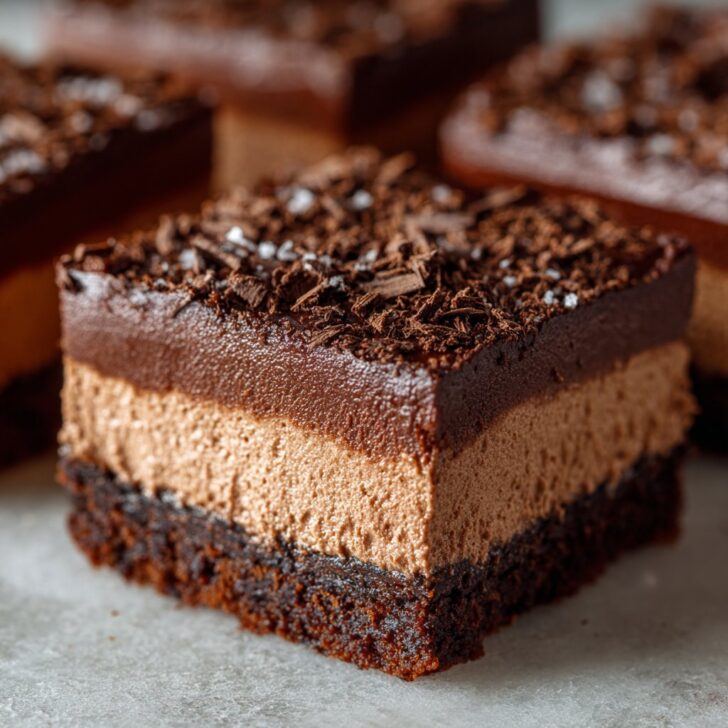
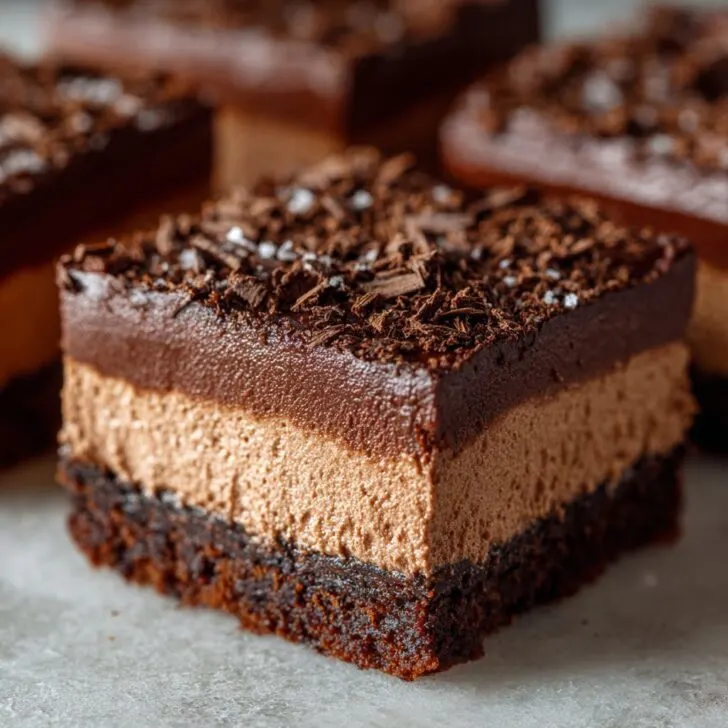
Let's Talk Brownies—The Chocolate Mousse Kind
Alright, so you know those days where you just need chocolate—like, must have it or else? Well, that's how these Easy Chocolate Mousse Brownies became a fixture in my kitchen. I started making this recipe after a disastrous attempt at a "fancy" mousse cake that literally flopped (as in, it collapsed while cooling on my counter). My youngest declared, "Mom, this is like cake pudding," and honestly, that was not a compliment. So, I went back to the drawing board and turned that mousse into a topping for brownies and voilà—magic happened. (Also, I burned my first batch because I got distracted watching Bake Off. It happens.)
Why You’ll Love These (Or at Least, Why I Do)
I make these when it’s a rainy Sunday or when someone turns up unannounced and I want to look like I’ve got it all together (I absolutely do not). My teenagers go ballistic for these—seriously, the pan barely lasts an hour. And the mousse topping? It’s fluffy but not so light it disappears. Sometimes I get impatient with the whisking, but honestly, if you follow my lazy shortcut (keep reading), it’s a breeze. Oh, and if you’ve ever tried those store-bought mousse snacks, this is like their grown-up, fancier cousin, except it won’t judge you for eating three pieces at midnight.
What You’ll Need (Substitutions Welcome)
- Brownie base:
- 1 cup (225g) unsalted butter, melted (I sometimes use salted and skip the extra salt)
- 2 cups (400g) granulated sugar (brown sugar works too, gives it a bit of caramel flavour)
- ¾ cup (75g) unsweetened cocoa powder (I’ve used Dutch-process and regular—couldn’t really tell a difference)
- 1 cup (125g) all-purpose flour (I swap in gluten-free blend if my friend Kelly is coming over)
- ½ teaspoon salt
- 4 large eggs
- 1 teaspoon vanilla extract (my grandmother always insisted on Nielsen-Massey, but I just grab whatever’s in the cupboard)
- Chocolate mousse layer:
- 1 ½ cups (350ml) cold heavy cream (double cream if you’re in the UK)
- 1 cup (170g) semi-sweet chocolate chips (milk chocolate chips are a bit too sweet for me, but my sister swears by them)
- 2 tablespoon powdered sugar (or icing sugar or even regular sugar in a pinch)
- Optional: A handful of chocolate chunks or walnuts for the brownie batter
How I Actually Make These – Step by Step(ish)
- Preheat your oven to 350°F (175°C). Grease an 8-inch square baking pan. Sometimes I just line it with parchment because I’m too lazy to scrub out sticky corners later. Up to you.
- Mix the melted butter and sugar together in a big bowl—make sure it’s properly combined, like, no sneaky sugar pockets hiding at the bottom.
- Toss in the cocoa powder, flour, and salt. Stir until just combined. Don’t overmix; trust me, I've made bricks out of brownies before. Not ideal.
- Add the eggs and vanilla, mixing until smooth. This is where I usually sneak a taste (I know, raw eggs, but old habits die hard…)
- Tip in any extras—chocolate chunks, walnuts, whatever makes you happy. Pour the batter into your pan and smooth the top with the back of a spoon (or your finger if nobody’s watching).
- Bake for about 27-32 minutes, until a toothpick comes out with a few moist crumbs. It always looks a bit underdone in the very centre, but it will set as it cools. Don’t panic.
- Let the brownies cool fully before you even think about the mousse. Seriously, don’t rush it or you get a melty mess. I learned that the hard way.
- Meanwhile, for the mousse: Melt the chocolate chips in a heatproof bowl—microwave in short bursts or use a double boiler if you’re feeling posh. Let it cool, but not so much that it goes solid again (I’ve done that; you have to start over).
- Whip the cold cream and powdered sugar until you get soft peaks. (If you don’t have a mixer, you can do it by hand, but wear something sleeveless. It’s a workout.)
- Gently fold the melted chocolate into the whipped cream. It might look weird at first, just keep folding and it’ll all come together.
- Spread the mousse over the cooled brownies. I like a messy, rustic look. Chill in the fridge for at least 1 hour before slicing, but honestly, sometimes I just can’t wait that long.
Notes (Learned the Hard Way)
- If you add the mousse before the brownies are totally cool, you wind up with chocolate soup. Still tasty, but not quite brownies.
- Use good chocolate for the mousse if you can—cheap chips work, but better chocolate really does make a difference (shocking, I know).
- I tried doubling the mousse layer once; it was too much, even for me. Moderation, who knew.
Variations I’ve Tried (Some Worked, Some Didn’t)
- Swapping peanut butter chips for chocolate chips in the mousse—actually pretty good, but the texture gets a bit odd.
- I once tried a white chocolate mousse. It tasted fine but looked a bit like mashed potatoes on top of the brownies—my family still teases me about it.
- Mint extract in the mousse: A small drop is nice; more than that and it starts tasting like toothpaste. You’ve been warned.
Do You Really Need Special Equipment?
I use a hand mixer for the mousse, but I’ve made it with just a whisk and determination on days when I couldn’t be bothered to dig out the mixer. If you don’t have an 8-inch pan, a 9-inch works—just watch the baking time, as they might bake a bit faster.


How to Store These (If They Survive That Long)
Pop leftovers (ha!) in an airtight container in the fridge. They keep for up to 4 days, though honestly, in my house it never lasts more than a day! I think they taste even fudgier the next morning, but maybe that's just me.
How We Serve It (Traditions, Sort Of)
We usually cut them into generous squares, pile them on a plate with a dusting of cocoa powder, and occasionally plop a scoop of vanilla ice cream alongside (sometimes breakfast, if it’s the weekend, don’t judge). They’re also lovely with a pot of strong coffee or a glass of milk—depends on the mood.
Pro Tips (Also Known as Things I’ve Messed Up)
- I once tried to chill the brownies in the freezer to speed things up—bad idea. The mousse slid right off. Just wait for them to cool, trust me.
- If the mousse gets grainy, it probably means the chocolate was too hot when you added it. Let it cool a bit next time (ask me how I know...)
- Cut with a hot knife for cleaner slices. Or, just embrace the mess—it tastes great either way.
FAQ – Real Questions I’ve Actually Gotten
- Can I use boxed brownie mix? Totally, if you’re in a rush. I’ve used Ghirardelli mix before and nobody complained (in fact, some said it was better, but I choose to ignore that part).
- Is there a way to make it dairy-free? You can use plant-based butter and coconut cream for the mousse. It changes the flavour a bit, but still delicious.
- Can I freeze them? Eh, technically yes, but the mousse can get a bit weird. I’d say eat them fresh if you can.
- What’s the best chocolate to use? I like Lindt or Callebaut for the mousse, but honestly, supermarket chocolate chips are fine. If you want to nerd out about chocolate, Serious Eats has a great guide.
- Can I add booze? Oh, absolutely—a splash of Baileys or Kahlua in the mousse is chef’s kiss. Just don’t overdo it or the mousse won’t set.
- Do I need to use room temperature eggs? I usually forget and use them straight form the fridge; it’s never ruined the brownies, so don’t stress about it.
Oh, before I forget, if you want to level up your baking game, King Arthur’s baking resources are brilliant. Or just wing it, like me half the time. Happy baking!


Ingredients
- ½ cup (115g) unsalted butter, melted
- 1 cup (200g) granulated sugar
- 2 large eggs
- 1 teaspoon vanilla extract
- ⅓ cup (40g) unsweetened cocoa powder
- ½ cup (65g) all-purpose flour
- ¼ teaspoon salt
- 1 cup (180g) semi-sweet chocolate chips
- 1 cup (240ml) heavy cream
- 3 oz (85g) semi-sweet chocolate, chopped
Instructions
-
1Preheat the oven to 350°F (175°C). Line an 8x8-inch baking pan with parchment paper.
-
2In a large bowl, whisk together melted butter and sugar until combined. Add eggs and vanilla extract, mixing well.
-
3Sift in cocoa powder, flour, and salt. Stir until just combined, then fold in chocolate chips.
-
4Pour the batter into the prepared pan and bake for 25-30 minutes, or until a toothpick inserted in the center comes out with a few moist crumbs. Let cool completely.
-
5For the mousse, heat heavy cream in a small saucepan until just simmering. Pour over chopped chocolate and let sit for 2 minutes, then stir until smooth. Let cool to room temperature.
-
6Whip remaining heavy cream until stiff peaks form. Gently fold the whipped cream into the cooled chocolate mixture. Spread mousse over cooled brownies and refrigerate for at least 1 hour before serving.
Approximate Information for One Serving
Nutrition Disclaimers
Number of total servings shown is approximate. Actual number of servings will depend on your preferred portion sizes.
Nutritional values shown are general guidelines and reflect information for 1 serving using the ingredients listed, not including any optional ingredients. Actual macros may vary slightly depending on specific brands and types of ingredients used.
To determine the weight of one serving, prepare the recipe as instructed. Weigh the finished recipe, then divide the weight of the finished recipe (not including the weight of the container the food is in) by the desired number of servings. Result will be the weight of one serving.
Did you make this recipe?
Please consider Pinning it!!