Double-Crumb Sourdough Coffee Cake: Let Me Tell You About This Cake!
Listen, every family’s got that one cozy recipe they drag out for birthdays, lazy Saturdays, and that weird in-between time during the holidays. For us, it’s this Double-Crumb Sourdough Coffee Cake. The crumb situation here is, frankly, outrageous—my sister calls it 'more crumble than cake', which is... accurate. And the sourdough? Oh, it pulls its weight by making everything tangy, plush, and basically impossible for anyone to stop eating.

I first made this by accident, which seems to be how most of my better ideas get started—some leftover sourdough starter was staring me down and honestly, I was feeling a bit rebellious about following recipes by the book that day. Now it’s become something I bake whenever I want to fill the house with the smell of butter and cinnamon (best air freshener ever, right?).
Why You'll Love This Cake (According to My Family... and Me)
I whip this up when we’ve got overnight guests, because it makes them think I run a B&B, but mostly because it’s so low-stress. My family goes wild for it—especially my dad, who pretends he’s leaving some for others but somehow half the pan is gone before brunch. (We don’t really talk about it at this point—just tacit acceptance.)
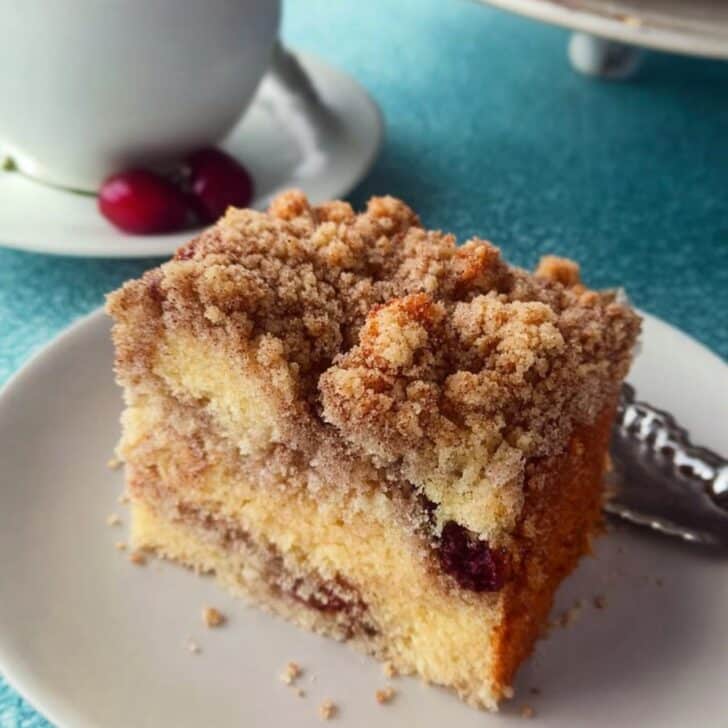
One thing: You get to smash a thick layer of buttery crumble onto the batter—twice. If you’ve ever wished the crumb on a coffee cake was double-thick or even a bit over-the-top, you’re my people. Also, if you forget to feed your sourdough starter, this is a sneaky way to use the discard so nobody’s the wiser. And should you be someone who gets nervous baking with yeast or sourdough, don’t panic; honestly, this is one of those recipes that’s pretty forgiving even if you guess on the mixing order (not that I ever do that—except last Thursday...).
Here’s What You’ll Need (and a few ideas!)
- 1 cup (about 225g) active sourdough starter (I sometimes scrape in the discard, and it still turns out)
- ½ cup (120ml) whole milk (or oat milk for my lactose-averse cousin—works fine!)
- ½ cup butter, melted (Grandma swears by salted, she’s onto something)
- 2 large eggs
- 1 cup (200g) granulated sugar
- 2 cups (250g) all-purpose flour (I’ve swapped in up to ½ cup whole wheat, for a bit of virtue)
- 1 teaspoon baking powder
- ½ teaspoon baking soda
- ½ teaspoon salt
- 1 teaspoon vanilla extract (I slosh a little extra for good luck)
- For the double crumb:
- 1 cup (150g) light brown sugar, packed
- 1 cup (125g) all-purpose flour
- 2 teaspoons cinnamon
- ¼ teaspoon salt
- 6 tablespoons (85g) butter, melted and cooled (honestly, I sometimes eyeball the last bit, no shame)
How I Make It—Step By Step, Sort Of
- Mix up the double crumb: Combine brown sugar, flour, cinnamon, and salt in a roomy bowl. Pour in the melted butter and mush it all up with a fork—or your cold hands, if you’re in a rush. It should sort of look like damp sand with a few little lumps (in a good way).
- Prep the pan: Butter a 9x13-inch pan, or line it with parchment if you hate scrubbing pans (me).
- The cake batter: In a big bowl, whisk the sourdough starter, milk, melted butter, eggs, sugar, and vanilla together until it’s basically smooth. It’ll smell a bit yeasty, and honestly, the color looks weird at this stage—but keep going, promise.
- In a smaller bowl, whisk together the flour, baking powder, baking soda, and salt. Pour the dry stuff into the wet bowl, stir it together, but just until no flour streaks—don’t beat it to death or your cake will sulk and get tough. (I learned this the hard way... cake turned brick-like!)
- Build the layers: Scrape half the batter into the pan. Top with half the crumb mixture. Spread the rest of the batter over (this bit can be tricky—do your best, and if it swirls together, that’s kind of pretty actually). Finish with the rest of the crumb, patting gently so it stays in place.
- Bake at 350 F (180 C) for about 40-45 minutes—rotate it halfway if your oven has hot spots, like mine does. A toothpick poked in the center should come out with just a crumb or two hanging on, not goo.
- Let it cool a bit before cutting, but honestly, good luck with that. We usually eat it still warm.

Notes From My (Slightly Chaotic) Kitchen
- Try not to overmix your batter—once I did and the cake was a little chewy. Not the end of the world, but chewy coffee cake is a bit like rubber bands for breakfast.
- If your starter is a bit sleepy, add an extra pinch of baking powder. Actually, I find it works better if the starter is bubbly, but I’ve gambled with sluggish starter and survived.
- If you’re out of brown sugar, half white sugar and a spoonful of molasses does the trick in a pinch (thanks to my somewhat frazzled week-before-payday self for that one).
Variations That’ve Gone Well (and One That Didn’t...)
- Sprinkling in a handful of blueberries or raspberries between the layers is fantastic, makes it almost like a buckle.
- I tried swirling in a bit of cocoa powder to the crumb once. It was fine—not mind-blowing, but if you’re craving chocolate, go for it.
- Don’t try swapping all the flour for almond meal. Trust me. Came out more like crumb soup than cake—nearly had to fish it out with a spoon!

Equipment I Use (But You Can Improvise!)
- 9x13-inch baking pan (if you’ve only got a round cake pan, you can squeeze it in—might need to watch the bake time though)
- Big bowl and a smallish one
- Fork (or your hands) for crumbly bits
- Whisk or wooden spoon for mixing—don’t stress about electric beaters; this one’s all elbow grease (and, okay, a bit of patience)
How to Store (If There Are Leftovers... Rarely In My House!)
Keep it in a tin or sealed container at room temp for a good 2-3 days. The cake stays soft because of the sourdough, and honestly, I think it tastes even better the next day. Freezes pretty well too (if you somehow avoid eating it all). If you zap a slice in the microwave for 10 seconds, it’s nearly as good as fresh out the oven. Truthfully, though, this has never survived longer than Sunday around here.
Serving: Here’s How We Like it
Big, chunky slices. A mug of strong coffee, obviously, or a cup of black tea if you’re feeling proper. Sometimes we put a scoop of plain Greek yogurt on top—cuts the sweetness and somehow makes it feel a bit breakfast-y (or am I just kidding myself?). Bonus: My niece crumbles hers over vanilla ice cream for dessert, which is genius if a bit decadent.
Lessons From My Baking Blunders (Pro Tips... Ish)
- Let the cake cool before whacking it out of the pan. I tried to rush once—ended up with half on the plate, half on the counter. Just... have a cuppa and wait.
- Related: Don’t skip the parchment if you’re a neat freak—it really does save you a world of pain come cleanup time.
- If your crumb feels a bit dry, add a little bit more melted butter (but don’t drown it; I once did that and had a greasy swimming-pool situation).
Questions I Actually Get About This Cake (FAQ... Warts and All)
- Help! My starter’s not super active. Will it still work?
Yeah, totally. The cake gets plenty of rise from baking powder and soda. If it’s really sluggish, add a smidge extra of each just for good measure. - Can I make it ahead?
Oh absolutely—I think this is one of those rare things that gets better after a night, the crumb melds into the cake a bit so it’s extra-moist (might be unpopular, but I like it slightly stale, just me?). - Is this actually sour?
No, not aggressively. It’s got this subtle, tangy, almost buttery note—that’s the sourdough playing nice. Even the kids like it. - Gluten-free version, maybe?
Honestly, I tried once with a blend from the store. Came out OK, but the crumb didn’t hold together right. If you’re experimenting, I salute you—just be ready for an adventure (and have a spoon handy!). - Do I need to serve it with butter?
Strictly speaking, no. But my dad always does, and… who am I to argue with that?
Okay, that’s the whole story! If you try it, let me know how it goes—or if you come up with a wilder variation. (Someone suggested caramel once—tempted, but I’m not brave enough yet!)
Ingredients
- 1 cup (about 225g) active sourdough starter (I sometimes scrape in the discard, and it still turns out)
- ½ cup (120ml) whole milk (or oat milk for my lactose-averse cousin—works fine!)
- ½ cup butter, melted (Grandma swears by salted, she’s onto something)
- 2 large eggs
- 1 cup (200g) granulated sugar
- 2 cups (250g) all-purpose flour (I’ve swapped in up to ½ cup whole wheat, for a bit of virtue)
- 1 teaspoon baking powder
- ½ teaspoon baking soda
- ½ teaspoon salt
- 1 teaspoon vanilla extract (I slosh a little extra for good luck)
- 1 cup (150g) light brown sugar, packed
- 1 cup (125g) all-purpose flour
- 2 teaspoons cinnamon
- ¼ teaspoon salt
- 6 tablespoons (85g) butter, melted and cooled (honestly, I sometimes eyeball the last bit, no shame)
Instructions
-
1Mix up the double crumb: Combine brown sugar, flour, cinnamon, and salt in a roomy bowl. Pour in the melted butter and mush it all up with a fork—or your cold hands, if you’re in a rush. It should sort of look like damp sand with a few little lumps (in a good way).
-
2Prep the pan: Butter a 9x13-inch pan, or line it with parchment if you hate scrubbing pans (me).
-
3The cake batter: In a big bowl, whisk the sourdough starter, milk, melted butter, eggs, sugar, and vanilla together until it’s basically smooth. It’ll smell a bit yeasty, and honestly, the color looks weird at this stage—but keep going, promise.
-
4In a smaller bowl, whisk together the flour, baking powder, baking soda, and salt. Pour the dry stuff into the wet bowl, stir it together, but just until no flour streaks—don’t beat it to death or your cake will sulk and get tough. (I learned this the hard way... cake turned brick-like!)
-
5Build the layers: Scrape half the batter into the pan. Top with half the crumb mixture. Spread the rest of the batter over (this bit can be tricky—do your best, and if it swirls together, that’s kind of pretty actually). Finish with the rest of the crumb, patting gently so it stays in place.
-
6Bake at 350 F (180 C) for about 40-45 minutes—rotate it halfway if your oven has hot spots, like mine does. A toothpick poked in the center should come out with just a crumb or two hanging on, not goo.
-
7Let it cool a bit before cutting, but honestly, good luck with that. We usually eat it still warm.
Approximate Information for One Serving
Nutrition Disclaimers
Number of total servings shown is approximate. Actual number of servings will depend on your preferred portion sizes.
Nutritional values shown are general guidelines and reflect information for 1 serving using the ingredients listed, not including any optional ingredients. Actual macros may vary slightly depending on specific brands and types of ingredients used.
To determine the weight of one serving, prepare the recipe as instructed. Weigh the finished recipe, then divide the weight of the finished recipe (not including the weight of the container the food is in) by the desired number of servings. Result will be the weight of one serving.
Did you make this recipe?
Please consider Pinning it!