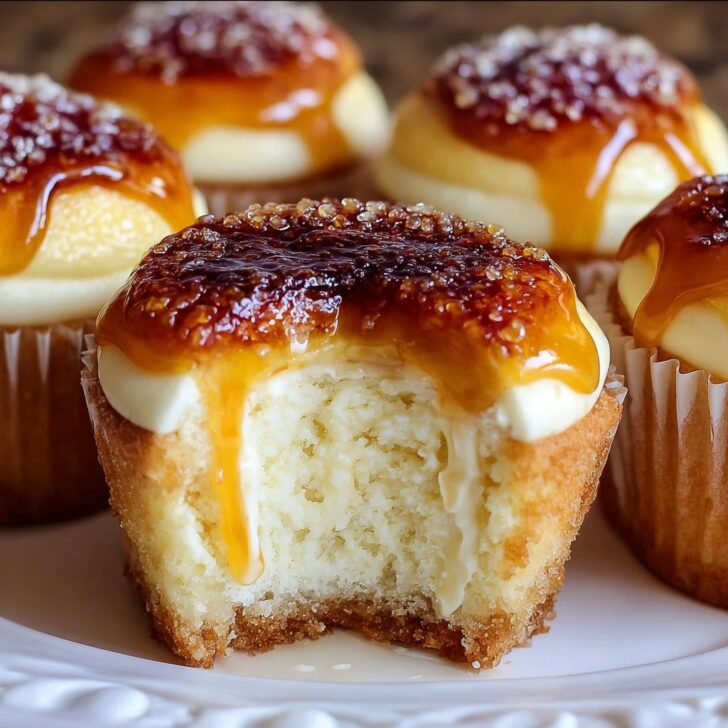

A Little Story to Start (Or, Why My Kitchen Still Smells Like Vanilla)
Okay, so the first time I made these Delicious Vanilla Bean Crème Brûlée Cheesecake Cupcakes, I was actually trying to impress my cousin at a family get-together. You know how families can be—there's always that one person who arrives with a pie that looks like it belongs in a fancy bakery window. Anyway, I thought I'd take a swing at these little beauties, and while I probably sprinkled half the sugar on the floor (oops), we all agreed they were a massive hit (even if my cousin still gloated about her pie crust). I promise, your kitchen will smell like a vanilla cloud for days—and is there really anything better?
Why I Keep Making These (and So Should You, Probably)
I make these when I want that "oh wow" reaction from friends—there's something about the torched sugar on top that feels, well, a bit magical. My family goes wild for these, but I’ll admit that getting the sugar glaze just right kind of drove me bananas the first few attempts (don’t worry, I’ll walk you through it). Also: I secretly love sneaking one for breakfast. Is it dessert? Is it breakfast? That's the magic.
Sometimes, when I'm having one of those long weeks, I’ll just make the cheesecake part and eat it straight. But don't tell anyone. Also, these are brilliant for lazy bakers (like me) because the cupcakes are more forgiving than a full-on cheesecake—no water bath drama!
What You Need (But Honestly, Improvise a Bit!)
- 18 vanilla wafer cookies (I use Nilla Wafers—my gran swears by them, but you could use graham crackers if that’s what’s in the cupboard)
- 2 packs (8 oz each) cream cheese, softened (I've even used neufchâtel when my shop was out; nobody noticed)
- ⅔ cup granulated sugar
- 2 teaspoon vanilla bean paste (okay, real vanilla beans are great, but let’s be honest, that paste is cheaper and pure magic. Extract works too, if you must)
- 2 large eggs
- ¼ cup sour cream (or Greek yogurt if you’re feeling healthy-ish)
- Pinch of salt
- About ⅓ cup more sugar for topping (I kinda eyeball this but that's about right)
- Fresh berries for topping (totally optional but highly encouraged by my kids)
Making the Magic Happen (a.k.a. Directions)
- Start by heating up your oven to 325°F (yeah, preheating is annoying, but it matters—learned that the hard way). Line a muffin tin with paper liners.
- Stick a vanilla wafer into each cup—don’t overthink it; just plop it in.
- Grab a bowl (I use my trusty old hand mixer for this, but a stand mixer is fine—or a super-strong arm and a whisk if you’re feeling wild). Beat the cream cheese and sugar together until fluffy. If it’s a bit lumpy, that’s okay. It smooths out, sort of.
- Add the vanilla bean paste, eggs, sour cream, and salt. Mix until mostly smooth—this is where I usually sneak a fingerful but, you know, raw eggs so maybe don't. (Do as I say, not as I do.)
- Spoon the batter into the cups, about ¾ full. Try not to eat too much straight off the spoon. Or do—no judgement.
- Bake for 19-22 minutes, until set but still a bit wobbly in the centre. Don’t panic if they look weird—they settle down as they cool.
- Cool in the tin 10 minutes (otherwise, they get sad and droopy). Then chill in the fridge at least 2 hours, but overnight’s best. Actually, I think they taste better the next day.
- Just before serving, sprinkle about a teaspoon of sugar over each cupcake. Use a kitchen torch to brûlée the tops (here’s where I usually call my partner to come watch—the sugar bubbling is weirdly hypnotic). Don’t have a torch? See the notes below.
- Let cool a couple minutes until the sugar hardens, then top with a berry or two if you fancy.
Random Notes That Might Save the Day
- I used to mix everything in one bowl and wondered why it came out clumpy; actually, letting the cream cheese soften (a smidge warmer than room temp) helps.
- Brûlée sugar can burn fast—don’t get too distracted. (Easier said than done when my dog’s begging underfoot.)
- Used too much sugar once, ended up with a thick, glassy layer—not the good crisp I was hoping for. Lighter dusting wins!
Experiments and (One Slight Fail)
- I’ve swapped out vanilla paste for almond extract before—tastes good, but honestly, not the wow I was after.
- Once tried adding lemon zest to the cheesecake mix. Wasn’t bad, but I felt like the lemon bullied the vanilla and took over.
- Chocolate wafer cookies as the base? It’s a bit much for me, but my son disagrees (it’s his favourite).
What If I Don't Have All the Fancy Equipment?
I know, everyone says a kitchen torch is a must. I thought so too... until mine broke and I just popped the cupcakes (sugar on top) under a very hot broiler for about 2 minutes. It’s fiddly, and you can’t look away or they go from golden to, well, charcoal—fast. So, not ideal, but possible.


Storing These Beauties (If You Actually Have Leftovers)
I’d say keep them in an airtight container in the fridge for up to three days, but honestly, in my house, it never lasts more than a day—or a night if you count midnight fridge raids.
Serving: My Favourite Traditions (and a Bit of Nonsense)
These make a killer dessert for dinner parties. Sometimes I serve them with a tiny espresso cup on the side—feels very Paris café, even if I’m still in my slippers. If it’s just family, we kind of squabble over who gets the extra berries. Once, we ate them on a blanket in the backyard. Mosquitoes were included, no extra charge.
Pro Tips Learned from Mild Catastrophes
- Once, I tried to skip chilling to save time—do not recommend. The texture was, um, tragic.
- Measure the vanilla bean paste. I once eyeballed it and it was honestly overwhelming, not in the good way.
- Don’t be stingy with the paper liners. Cleaning the pan is a nightmare otherwise. Trust me, learned this one the hard way, too.
FAQ I Actually Have Been Asked
- Can these be made gluten free? Yep! Use gluten free vanilla wafers (I like the ones from Kinnikinnick—no relation, I just use them when my mate comes over).
- What if I can’t find vanilla bean paste? Just use extract or scrape out half a vanilla pod. Actually, that’s a splurge I reserve for special occasions!
- Can I freeze these cupcakes? Kind of? I have, but the texture goes a bit off (like ice crystals in the creamy bit), so I’d say best eaten fresh(er). If you want more tips on cheesecakes and freezing, this article from Sally's Baking Addiction is super useful.
- Is the torch totally essential? Nah, as above, a broiler works with watchful eyes. And don’t try a candle—it doesn’t work (ask me how I know).
Okay, you’ve got all my secrets. If you need one more excuse to try these, just remember: if you mess up the brûlée, nobody complains about more caramelized sugar! Wishing you smitten taste buds and a slightly sticky kitchen counter.


Ingredients
- 1 cup graham cracker crumbs
- 3 tablespoons unsalted butter, melted
- 16 oz cream cheese, softened
- ¾ cup granulated sugar, plus more for topping
- 2 large eggs
- 1 vanilla bean, seeds scraped
- 1 teaspoon pure vanilla extract
- ⅓ cup sour cream
- ⅛ teaspoon salt
Instructions
-
1Preheat oven to 325°F (163°C). Line a standard muffin tin with 12 paper liners.
-
2Combine graham cracker crumbs and melted butter in a bowl. Press about 1 tablespoon of the mixture into the bottom of each muffin liner.
-
3In a large bowl, beat cream cheese and ¾ cup sugar until smooth. Blend in eggs, vanilla bean seeds, vanilla extract, sour cream, and salt; mix until combined.
-
4Divide cheesecake batter evenly among prepared liners. Bake for 25-30 minutes, or until centers are set. Cool completely, then chill in the refrigerator for at least 2 hours.
-
5Before serving, sprinkle a thin layer of granulated sugar over each cupcake. Caramelize the sugar with a kitchen torch until golden and crisp. Allow the topping to cool and harden before serving.
Approximate Information for One Serving
Nutrition Disclaimers
Number of total servings shown is approximate. Actual number of servings will depend on your preferred portion sizes.
Nutritional values shown are general guidelines and reflect information for 1 serving using the ingredients listed, not including any optional ingredients. Actual macros may vary slightly depending on specific brands and types of ingredients used.
To determine the weight of one serving, prepare the recipe as instructed. Weigh the finished recipe, then divide the weight of the finished recipe (not including the weight of the container the food is in) by the desired number of servings. Result will be the weight of one serving.
Did you make this recipe?
Please consider Pinning it!!