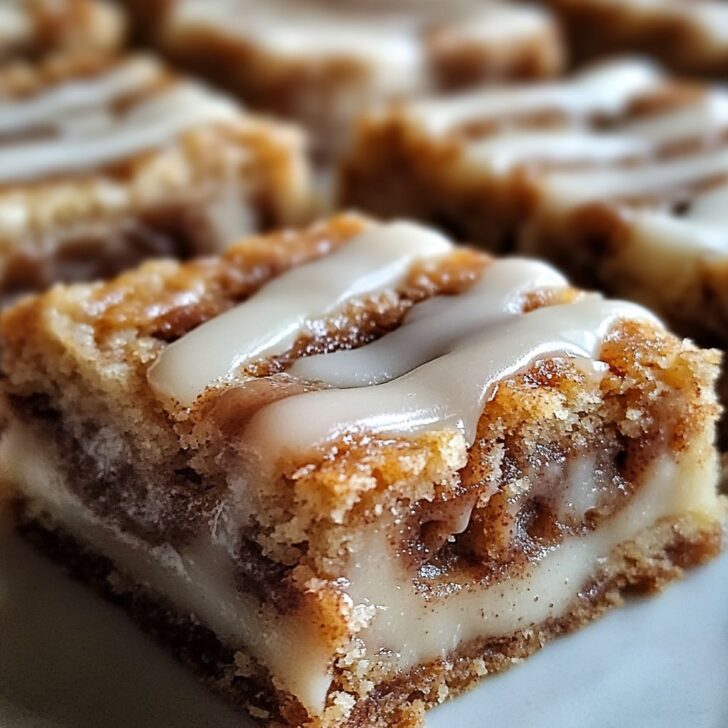

Let Me Tell You About Cinnamon Roll Bars...
Alright, before we get into the nitty gritty, let me just say: these cinnamon roll bars are the reason my kitchen smells like a tiny, happy bakery at least once a month. The first time I whipped these up was on a rainy Sunday when I was craving cinnamon rolls but couldn't be faffed with all the waiting and rolling and fuss. So, I figured, why not just bake the whole thing flat and slice it up? (Honestly, it was a bit of a gamble, but hey, it worked!) Plus, there's something about the way these fill the house with that warm, cinnamony cloud—it's basically an edible hug. And if you accidentally eat, say, half the pan straight out of the oven... Well, who's counting?
Why You’ll Love This (Or: Why I Make These All Too Often)
I make these when I want cinnamon rolls but can't be bothered, or when the weather is crummy and I need a pick-me-up (or, you know, when the bananas for banana bread are too green). My family goes totally bonkers for these, partly because they're soft and gooey, but also because you can just grab a bar and run—no plates or forks required unless you’re feeling fancy. (Did I mention they’re crazy fast to throw together? Well, except for that one time I forgot to soften the butter first... learn form my mistakes, friend.)
What You’ll Need (Plus My Swaps & Shortcuts)
- 1 cup (225g) unsalted butter – Softened. But honestly, I’ve melted it in a hurry and it’s fine.
- 1 ½ cups (300g) brown sugar – Light or dark, both work; sometimes I do half and half if that’s what’s in the cupboard.
- 2 large eggs – Room temp if you remember, straight from the fridge if you don’t (I usually don’t).
- 2 teaspoon vanilla extract – My gran swore by Nielsen-Massey, but my wallet’s okay with store brand.
- 2 ½ cups (315g) all-purpose flour – If you’re out, I’ve done 2 cups flour and ½ cup oat flour and it’s ace.
- 1 teaspoon baking powder
- ½ teaspoon baking soda
- ½ teaspoon salt
- 1 ½ tablespoon ground cinnamon – I sometimes up this to 2 if I’m feeling bold.
- For the glaze:
- 1 cup (120g) powdered sugar
- 2-3 tablespoon milk – Or just enough to make it drizzly. I’ve used oat milk, works fine.
- ½ teaspoon vanilla
Let’s Get Baking (Don’t Stress—It’s Supposed to be Messy)
- Preheat your oven to 350°F (180°C). Grease a 9x13 inch pan. Or line it with parchment if you hate scrubbing pans as much as I do.
- In a big bowl, cream the butter and brown sugar together till it’s fluffy—ish. I use a hand mixer, but a wooden spoon and some elbow grease works if you need the workout.
- Add eggs and vanilla, beat it in. (This is where I sneak a taste and instantly regret it, because raw eggs, but what can I say?)
- Toss in the flour, baking powder, baking soda, salt, and cinnamon. Mix until just combined, don’t overdo it. The dough will look thick and a bit sticky. If it looks weird at this stage—it always does. Trust the process.
- Spread the dough in your prepared pan. It’ll fight you, but use your hands or the back of a spoon. Or wet your hands a bit; that helps with the sticky situation.
- Bake for 22–25 minutes, or until the top is set and just starting to look golden at the edges. I usually check at 20 minutes—sometimes it’s done early, and sometimes I get distracted and it goes a bit too brown (still tasty, though!).
- Let the bars cool for about 15 minutes. Mix up your glaze and drizzle it over the top (or pour, if you’re having one of those days). Slice and enjoy, ideally with a mug of tea or proper filter coffee (here’s how I learned).
Notes I Wish Someone Had Told Me
- Don’t panic if the middle looks a little underbaked when you pull it—it sets as it cools. (I’ve thrown out perfectly good bars before, rookie move.)
- The glaze sometimes soaks in if you do it too soon. But honestly, I think it makes them gooier, which isn’t a bad thing.
- I tried chilling the dough overnight once; actually, it made it taste a bit deeper. So if you can plan ahead, give that a go.
If You Feel Like Experimenting (Or, What Worked & What Was a Flop)
- I’ve swapped out half the butter for applesauce. It made them lighter, but you lose a bit of that indulgent vibe.
- Chopped pecans on top? Chef’s kiss. Walnuts, less so—felt a bit bitter to me, but maybe that’s just me.
- Once I tried adding raisins. Look, I love a good raisin, but here they just felt out of place. Wouldn’t do again. But if you’re into that sort of thing, you do you!
Gear You’ll Need (and, Maybe, Won’t)
- 9x13 inch baking pan – If you’ve only got an 8x8, halve the recipe. Or, pile it in and bake a little longer. Won’t be perfect, but hey, neither am I.
- Hand mixer or sturdy spoon – I say hand mixer’s easier but honestly, a whisk and some patience gets the job done.
- Parchment paper – I run out all the time. Buttering the pan works fine in a pinch.


How to Store Your Cinnamon Roll Bars (Assuming There’s Any Left)
Store these bars in an airtight container at room temp. They’re best the day you make them but still lovely on day two. You can freeze them for about a month if you’re the kind of person with that kind of self-control (I am not). Though honestly, in my house it never lasts more than a day!
How I Like to Serve Them (Or: Family Traditions)
I love these warm, with a little extra glaze and a mug of milky tea. My partner likes to nuke his in the microwave for 10 seconds till it’s gooey. If it’s brunch time, sometimes I serve them with fresh berries and a dollop of Greek yogurt. My cousin dunks hers in coffee, which is, well, a choice! But it’s surprisingly good.
Things I’ve Learned the Hard Way (Pro Tips)
- Don’t rush creaming the butter and sugar. I once tried to skip this, thinking it’d be fine, but the bars came out dense as a brick.
- Actually, I find it works better if you let the bars cool almost completely before glazing. The glaze sits prettier, trust me.
- Use fresh cinnamon. I know, sounds silly, but I used some old stuff once and the bars tasted like, well, cardboard.
FAQ (Because People Actually Ask)
- Can I make these gluten free? – Yep! I’ve tried with a 1:1 gluten free blend (like Bob’s Red Mill) and it’s decent, just a bit more crumbly.
- Do these taste like true cinnamon rolls? – Kind of! They have the same comforting flavor, but the texture is more like a chewy blondie. (And less faff, let’s be honest.)
- What if I don’t have brown sugar? – White sugar plus a splash of molasses works in a pinch—or just use white sugar. I’ve done it, it’s not the end of the world.
- Can I double the recipe? – You can, but use two pans. Learned that the hard way; you don’t wanna try to bake it all in one giant pan. Trust me.
- Why do my bars sink in the middle? – Probably overmixing, or maybe too much liquid. Or maybe you just live somewhere humid, who knows? If they taste good, don’t stress it.
Okay, I think that covers it! If you want more baking shenanigans, Sally’s Baking Addiction has some wild ideas (I get lost there for hours).

