
If we’re being totally real, I only started baking Chocolate Mint Cookies because I lost a holiday cookie exchange bet (long story; involves a badly timed sneeze and a plate of gingerbread men). But now—hand on heart—these are my go-to whenever I want to bribe my family or just need a taste of chocolatey, minty comfort. The first batch was a comedy of errors, with mint extract everywhere (even in my coffee) and little bits of chocolate chipped off the counter for days. But now? Smooth sailing, mostly. Oh, and if you’re into the whole cozy kitchen aroma thing—boy, you’re in for a treat.
Why You'll Probably End Up Making These More Than Once
I make this Chocolate Mint Cookie recipe literally every time my nephew Sam comes over (he claims they give him 'superpowers' for video games—no promises though), or when I can’t decide between my chocolate and After Eight cravings. My friends request them for movie night all the time, probably because the warm cookies turn a regular Thursday into a bit of a party. And here's a confession: sometimes the dough comes out a bit stickier than it should and I wonder if I messed up the flour (again), but they always disappear so fast I guess it doesn't really matter. No one's checked the official texture, right? (Except that one friend… but we don't talk about that.)
What You’ll Need: The Ingredients (+ a Few Cheeky Substitutes)
- 1 cup (225g) unsalted butter, softened (okay, salted works if that's all you've got—just skip the extra pinch later)
- 1 cup white sugar (granulated is best, but I've tried brown sugar when the jar was empty and it was still alright, just a bit fudgier)
- 2 large eggs (I’ve even used a flaxseed sub once, when we had a vegan joining in, but the texture is, let's say... different)
- 1 and ⅔ cup (210g) all-purpose flour (plain flour in the UK—my granny always insisted on King Arthur brand but honestly, any decent flour's fine)
- ⅔ cup cocoa powder (Dutch-processed for that dark, rich taste, or whatever’s on hand—I've been known to use the fancy stuff when it’s on sale)
- ½ teaspoon baking soda
- Pinch of salt (unless you already used salted butter, then maybe skip—unless you live dangerously)
- 1 teaspoon pure peppermint extract (but my aunt swears by using crème de menthe liqueur when she’s feeling bougie)
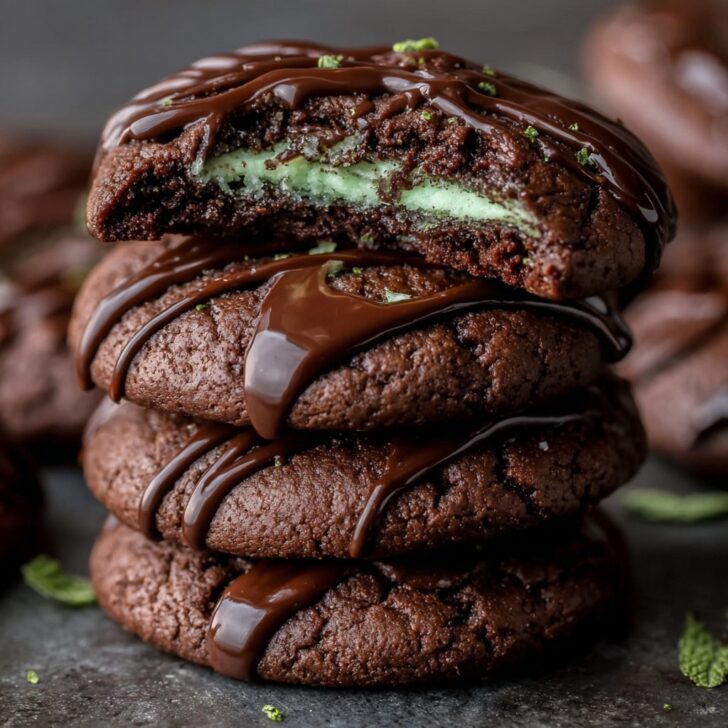
- 1 to 1.5 cups chocolate chips, mint or semi-sweet (I usually just mix what’s left at the bottom of several bags)
How To Make Chocolate Mint Cookies (with a Few Side Notes)
- Cream the butter and sugar: In a big bowl (bigger than you think; I've learned this the hard way!), beat softened butter and sugar together until it’s light and fluffy. Sometimes I pretend this is enough of a workout to justify licking the beaters. Your call.
- Add eggs one at a time: Mix in the eggs, one at a time—crack ‘em in a small dish first if you’re nervous (you know, ‘just in case’ like my mum says). Splash in the peppermint extract now, too.
- Mix dry ingredients: In another bowl, stir together flour, cocoa, baking soda, and salt with a fork or—you know—the same spatula you just used because who wants to wash extra dishes?
- Combine wet and dry: Gradually stir the dry mix into your buttery mixture. It might look a little stiff but that's okay! Don’t panic if it feels weirdly thick—mine usually looks not quite right until the chips go in.
- Add chocolate chips: Fold in the chocolate/mint chips. This is the point where I ‘taste-test’ for that perfect mint-to-chocolate ratio (purely scientific reasons, of course).
- Chill (kind of optional): Pop the dough in the fridge for at least 30 minutes if you can stand it. Sometimes I'm too impatient; the cookies just spread a bit more but still taste dreamy.
- Bake: Scoop heaping tablespoons onto a lined baking tray (or just a greased one—no fuss over here) and bake at 350°F (175°C) for about 9-11 minutes. They should look set at the edges but a tad soft in the center.
- Cool: Let them rest on the tray for a couple of minutes before moving them to a rack—except, I admit, I usually eat one hot and burnt-my-tongue style. Worth it.
Stuff I’ve Learned Along The Way (A.K.A. Notes)
- If you’re out of peppermint extract, here are some substitutes. Also, if your cookies are super flat, chances are your butter was more lava than room temp—fixable, but also, kinda delicious anyway.
- Using parchment makes your life easier, but if you skip it (I forget half the time), just scrape off the little stuck bits—bonus snack.
Variations I've Actually Tried (Some More Successful Than Others!)
- Once, I put in chopped Andes mints—they melted and made legit gooey pockets. Highly recommended.
- Tried adding crushed candy canes for Christmas, but they sorta melted weird and got sticky. Probably wouldn't do that again, unless you like having your teeth pulled out.
- You could swap half the butter for coconut oil for a little twist—though the taste is a bit, uh, unexpected; my partner loved it though!
Don’t Sweat The Equipment (For Real)
Look, fancy mixers are great, but a wooden spoon and some elbow grease do the trick. If you don't have a cookie scoop, just use a regular ol' spoon—nobody cares. And if you don't have a wire rack for cooling? Just let 'em chill on the tray or even a cutting board. They've survived worse.


Keepin’ Them Fresh (Or Trying To Anyway)
Store in an airtight container at room temp, and supposedly they’ll last 3 days... although, in my house, you’re lucky if there’s any left after the first evening. If you don't finish them (ha), pop them in the freezer—I've even eaten them frozen and they're basically like mini ice cream treats.
How We Eat ‘Em (But Do You)
These are epic warm with a big glass of milk (classic), but sometimes I sandwich a scoop of ice cream between two cookies and call it dessert for dinner. Shhh. My cousin dunks hers in coffee—we don’t judge.
Things I Wish I’d Known The First Time (Pro-ish Tips)
- Don’t skip chilling the dough if you can help it—I used to, and my cookies would become flying saucers instead of chewy pillows.
- Baking too long? The cookies seem fine in the oven, then you blink and they go from gooey to hockey puck before you know it. Close is good enough!
Questions People Actually Have (And I’ve Answered More Than Once)
- Can I double this recipe?
- Totally! I do it for potlucks. Just be sure to use a big enough bowl, or you'll be sweeping flour for days (ask me how I know).
- Why do my cookies go flat sometimes?
- Could be super soft butter, or not enough flour—or maybe you were too generous with the chips (guilty here). Chill the dough if in doubt!
- Can I make these gluten-free?
- You bet. Use your fave 1:1 GF flour mix. A friend recommended the King Arthur gluten-free flour and it worked a treat.
- Is it possible to overbake them?
- Yup. I did last week—distracted by a phone call. Still edible, but they were more of a dunk-in-milk situation. Watch your oven!
So that’s my unfiltered, home-cook take on the infamous Chocolate Mint Cookies. If you try them, let me know, or just drop by and we’ll bake a batch together—bring your best gossip! Or, if you need more cookie inspiration, I sometimes flip through Sally's Baking Addiction—her site is a goldmine (even if she never drops dough on her shirt like I do).


Ingredients
- 1 cup all-purpose flour
- ½ cup unsweetened cocoa powder
- ½ teaspoon baking soda
- ¼ teaspoon salt
- ½ cup unsalted butter, softened
- ½ cup granulated sugar
- ½ cup packed brown sugar
- 1 large egg
- 1 teaspoon pure mint extract
- 1 cup semisweet chocolate chips
Instructions
-
1Preheat the oven to 350°F (175°C). Line a baking sheet with parchment paper.
-
2In a medium bowl, whisk together the flour, cocoa powder, baking soda, and salt.
-
3In a large bowl, beat the butter, granulated sugar, and brown sugar together until light and fluffy. Beat in the egg and mint extract until well combined.
-
4Gradually add the dry ingredients to the wet ingredients, mixing just until combined. Fold in the chocolate chips.
-
5Drop rounded tablespoons of dough onto the prepared baking sheet, spacing them about 2 inches apart. Bake for 10 minutes or until the edges are set.
-
6Allow cookies to cool on the baking sheet for 5 minutes before transferring to a wire rack to cool completely.
Approximate Information for One Serving
Nutrition Disclaimers
Number of total servings shown is approximate. Actual number of servings will depend on your preferred portion sizes.
Nutritional values shown are general guidelines and reflect information for 1 serving using the ingredients listed, not including any optional ingredients. Actual macros may vary slightly depending on specific brands and types of ingredients used.
To determine the weight of one serving, prepare the recipe as instructed. Weigh the finished recipe, then divide the weight of the finished recipe (not including the weight of the container the food is in) by the desired number of servings. Result will be the weight of one serving.
Did you make this recipe?
Please consider Pinning it!!