
Let's Talk About Chocolate Espresso Cinnamon Rolls (And My Weird Obsession With Them)
Alright, confession time: I first made these chocolate espresso cinnamon rolls on a snowy Saturday when I was bored, a bit hungry, and—let's be honest—craving both chocolate and caffeine in a single bite. My sister was visiting, and she still teases me for running around the kitchen like a headless chicken trying to find espresso powder. (Spoiler: I ended up using instant coffee, which worked just fine.) Anyway, these have become my ultimate comfort bake, especially when I need a pick-me-up or, you know, when I want to impress people without actually working too hard.
Also, side note: The first time I tried to make the dough, I accidentally used bread flour instead of all-purpose. It didn't really ruin anything, just made them chewier—which, depending on your mood, might be a happy accident.
Why You'll Love These (Or, Why I Keep Making Them)
I whip these up when I'm trying to bribe my family into doing household chores. Seriously, if I say "Cinnamon rolls are in the oven," the trash magically takes itself out. My partner loves the chocolate swirl (he keeps sneaking extra bites), and the espresso kick is, well, what gets me out of bed on a Sunday. Sometimes the dough sticks to the counter and I curse under my breath; other times, I get distracted and leave them in a bit too long. They're still devoured. So, basically, they're pretty forgiving. (And let's face it, we all need recipes like that.)
Ingredients (And Some Lazy Substitutions)
- 2 ¾ cups all-purpose flour (I've used bread flour when I'm out, makes it chewier but not bad)
- 1 packet (7g) instant yeast (or active dry, just let it sit a bit longer)
- ¼ cup granulated sugar
- ½ teaspoon salt
- ½ cup warm milk (I usually microwave it for 30 seconds, but don't let it get too hot—the yeast is dramatic)
- ¼ cup unsalted butter, melted (honestly, I've used margarine in a pinch and lived to tell the tale)
- 1 egg
- ¼ cup warm water
- 1 tablespoon instant espresso powder (instant coffee if you can't find espresso; my friend swears by this King Arthur espresso powder)
- ¾ cup brown sugar
- 2 tablespoon ground cinnamon (sometimes I use a bit more if I’m feeling wild)
- ½ cup mini chocolate chips (or just chop up a chocolate bar; my gran always insisted on Cadbury, but any will do)
- 2 tablespoon unsalted butter, softened (for spreading)
- Pinch of nutmeg (optional, but you know, it's nice)
How I Make These (With Some Detours)
- Activate the yeast. In a big mixing bowl, combine warm milk, warm water, and sugar. Sprinkle the yeast on top and let it sit for 5 minutes until it looks foamy. If nothing happens, either your yeast is dead or your liquids were too hot (I've done both, don't worry).
- Make the dough. Add the melted butter, egg, salt, and about two cups of flour. Mix with a wooden spoon until it gets awkward to stir. Then dump in the rest of the flour. Knead by hand for 5-7 minutes, or just until it looks smooth-ish. (I always get flour everywhere—just embrace the mess.)
- Let it rise. Plop the dough in a greased bowl, cover with a tea towel, and let it rise somewhere warm for about an hour. Mine sometimes gets ignored for longer if I start cleaning and forget. Whoops.
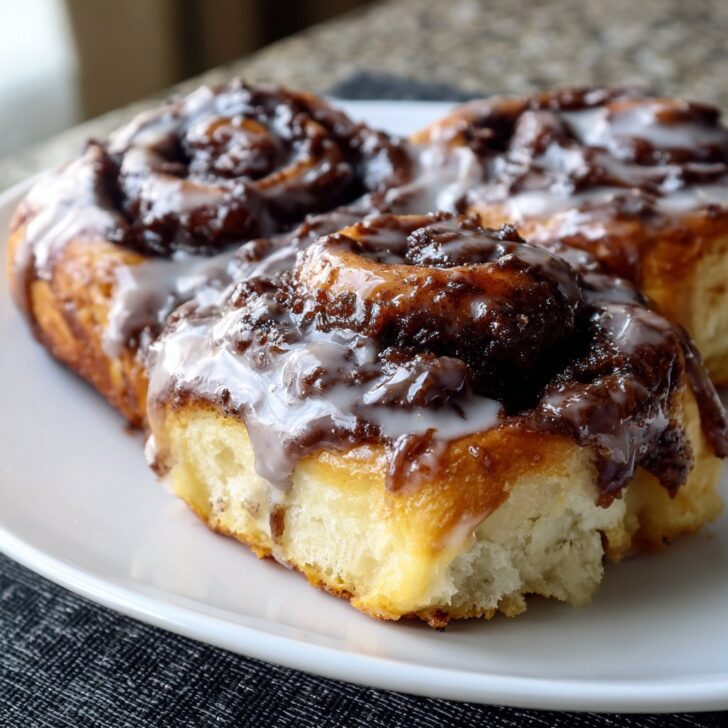
- Mix up the filling. In a small bowl, stir together brown sugar, cinnamon, espresso powder (or instant coffee), nutmeg, and chocolate chips. This is where I sneak an extra chocolate chip. Or three.
- Roll it out. On a floured counter, roll the dough into a rectangle. Honestly, I never measure it. It’s usually about as big as a baking sheet. Spread the softened butter all over—sometimes I use my hands because it's faster.
- Sprinkle the filling. Scatter the sugar-espresso-chocolate goodness evenly. Then roll it up (from the long edge, trust me), and pinch the seams closed. Sometimes it looks lumpy—totally fine.
- Slice and second rise. Cut into 12ish equal pieces (I use dental floss to slice—here’s why that's genius). Place rolls in a greased baking dish. Cover and let them rise while the oven preheats—about 30 minutes. Or until they look puffy.
- Bake. Pop them into a 350°F (180°C) oven for 20–25 minutes, until golden and the kitchen smells like happiness. Sometimes the chocolate oozes out a bit; don’t panic.
- Make a quick glaze (totally optional). Mix 1 cup powdered sugar with a tablespoon or two of milk. Drizzle over warm rolls. Or skip it if you want to keep things less sweet.
Notes From My (Messy) Kitchen
- The dough will look kind of sticky before it rises. It’s fine, just don’t add too much extra flour or the rolls get dry. Ask me how I know.
- If the filling spills out while rolling, just scoop it up and shove it back in the ends. No one will notice.
- I sometimes stick extra chocolate chips on top before baking if I'm feeling extra. This is actually my nephew's idea.
- Once, I left them to rise overnight in the fridge—worked great, but they needed an extra 10 minutes in the oven.
Variations I've Tried (For Better or Worse...)
- Swapped dark chocolate for white chocolate—actually, a bit too sweet for my taste, but my neighbor loved it.
- Added toasted nuts (pecans or walnuts)—gives a nice crunch but, honestly, my family picks them out, so I usually skip.
- Tried making them vegan by using almond milk and vegan butter—totally worked! Egg replacer was...meh. Maybe you'll have better luck.
- Tried adding orange zest to the filling. Not my favorite, but if you love a Terry’s chocolate orange vibe, go for it.
Equipment I Use (And How I Improvise)
- Mixer with dough hook—except when I can't be bothered to drag it out, then it's all about elbow grease.
- Big mixing bowl—my trusty old Pyrex, but any bowl will do, even that old salad bowl from the back of the cupboard.
- Rolling pin—although, one time I used a wine bottle (empty, of course). Worked just fine.
- Baking dish—9x13 is about right but I've crammed them into round pans before. They end up a bit squished, but that means more gooey middle pieces.


How I Store These (If There Are Any Left...)
Technically, you can keep them in an airtight container at room temp for 2-3 days, or freeze them (unglazed) for up to a month. Pop in the microwave for 20 seconds to rewarm. Though—between you and me—they never survive more than a day in my house. Not even joking.
Serving Suggestions (How We Do It at My Place)
I love these warm with a mug of strong coffee, obviously. Sometimes we do a little brunch spread with fruit and yogurt, but honestly, these are the star. My mom likes a dollop of whipped cream on top, which is slightly over the top, but hey—treat yourself. Oh, and I think they actually taste better the next day, but that's just me (maybe because I'm less greedy by then).
Pro Tips (AKA My "Oops" Moments)
- If you rush the dough rising, they end up dense instead of fluffy; I once tried to bake them after just 20 minutes and, yeah, they were basically hockey pucks.
- Don’t overbake—seriously, even 5 minutes too long and they dry out. Check early if your oven runs hot.
- Actually, I find it works better if you let them cool just a bit before glazing, unless you like your glaze totally running off. But if that happens, just grab a spoon and scoop it back on.
FAQ (Because People Actually Ask Me These)
- Can I make these ahead?
Oh, absolutely! You can assemble them the night before, cover, and pop in the fridge. Next morning, let them sit out while the oven preheats and then bake. I've even frozen the unbaked rolls and they turned out fine (maybe a touch less fluffy, but still yum). - I don’t have espresso powder—what now?
No stress. Just use instant coffee or even skip it, but they won’t have that mocha punch. Or check out the Medaglia D’Oro powder if you’re feeling fancy. - Can I make these gluten-free?
Probably, but I haven't nailed it yet. I tried once with a 1:1 gluten-free flour and, well, let’s just say they were more like scones. If you figure it out, let me know? - How do I know when they’re done baking?
Look for golden tops and a bit of bubbling chocolate. If you poke the side gently and it springs back, you’re golden. Or just trust your nose—when the kitchen smells like a chocolate shop, they’re probably ready.
And there you have it—my slightly chaotic, but always delicious, chocolate espresso cinnamon rolls. If you make them, let me know how it goes (or what disasters you encounter). Happy baking!


Ingredients
- 2 ¼ cups all-purpose flour
- ¼ cup granulated sugar
- 2 ¼ teaspoon active dry yeast
- ½ cup warm milk
- ¼ cup unsalted butter, melted
- 1 large egg
- ½ cup semi-sweet chocolate chips
- 2 tablespoon unsweetened cocoa powder
- 2 teaspoon instant espresso powder
- 1 tablespoon ground cinnamon
- ⅓ cup brown sugar
- ¼ teaspoon salt
Instructions
-
1In a large bowl, combine warm milk, yeast, and 1 tablespoon of sugar. Let sit for 5 minutes until foamy.
-
2Add melted butter, remaining sugar, egg, and salt. Gradually mix in flour until a soft dough forms. Knead for 5-7 minutes, then cover and let rise for 1 hour.
-
3Roll out the dough into a rectangle. Spread with melted butter, then sprinkle with a mixture of brown sugar, cinnamon, cocoa powder, espresso powder, and chocolate chips.
-
4Tightly roll up the dough and slice into 8 rolls. Place in a greased baking dish, cover, and let rise for 20 minutes.
-
5Bake at 350°F (175°C) for 25 minutes or until golden brown. Let cool slightly before drizzling with chocolate glaze, if desired.
Approximate Information for One Serving
Nutrition Disclaimers
Number of total servings shown is approximate. Actual number of servings will depend on your preferred portion sizes.
Nutritional values shown are general guidelines and reflect information for 1 serving using the ingredients listed, not including any optional ingredients. Actual macros may vary slightly depending on specific brands and types of ingredients used.
To determine the weight of one serving, prepare the recipe as instructed. Weigh the finished recipe, then divide the weight of the finished recipe (not including the weight of the container the food is in) by the desired number of servings. Result will be the weight of one serving.
Did you make this recipe?
Please consider Pinning it!!