
The Backstory: Chocolate, Strawberries, and Occasional Chaos
Alright, so let’s be real—this Chocolate Covered Strawberry Cheesecake is honestly the only cake my little brother ever bothers to request (other than those boxed brownies he eats straight from the pan, but we don’t talk about that). I first tried making it for Valentine’s Day, thinking it’d be romantic; it turned into a full-on rescue mission when the middle sank and the dog ate two strawberries. Still, after a couple more attempts — and, okay, at least one minor tantrum over lumpy cream cheese — it became a house favorite. The fancy bakery vibe, with the strawberries all glossy and dramatic-looking? It makes you look much more put together than you probably feel. Not that I know from experience. Ahem.


Why You'll Love This Cheesecake (According to Me):
I make this when the family is coming over and I want something that looks impossibly extra. (It’s not.) My family goes a bit bonkers for the combo—cheesecake with a proper whack of creaminess and that chocolate-strawberry crackle on top. Secret: I used to struggle getting the base to set (curse the soggy middle), but chilling it longer really helps. Also, when strawberries are actually good (hello, June), it steals the show. To be honest, I usually eat my slice straight from the fridge, fork in one hand, coffee mug in the other.
What You’ll Need: Ingredients (and a Few Cheeky Substitutions)
- 200g digestive biscuits (or, Graham crackers are fine—my gran swore by McVitie’s, but any crumbly thing works)
- 80g unsalted butter, melted (I sometimes just eyeball ‘til it’s soggy enough)
- 3 x 225g packs full-fat cream cheese, room temp – don’t skimp on the full-fat unless you absolutely have to
- 150g caster sugar (granulated works in a pinch, but you might get a tiny crunch)
- 3 large eggs
- 100ml sour cream (Greek yogurt works if you’re in a pinch; I’ve done it)
- 1 teaspoon vanilla extract (imitation is totally fine, I promise!)
- 250g fresh strawberries (plus a few extra if your family “samples” like mine)
- 150g dark chocolate, chopped (milk choc if you like it sweeter — no judgment!)
- 1 tablespoon neutral oil (I usually use sunflower or canola)
How To Make This (Sometimes Chaotic) Dessert
- First, blitz the biscuits in a food processor until they’re crumbs. Or the old ziplock bag and a rolling pin trick! Mix in the melted butter until it looks like damp sand (but don’t eat it yet, even though I always want to). Press this into the bottom of a 23cm springform tin – if you don’t have one, just use a regular cake tin lined with plenty of parchment. Pop in the fridge while you faff about with the rest.
- Preheat the oven to 160°C/320°F (I always forget this bit until too late, so... just try to remember!)
- In a big bowl, whack together the cream cheese and sugar until smooth-ish; don’t worry if there’s a lump or two, nobody’s perfect. Add the eggs one by one, beating just ‘til they disappear. Stir in the sour cream and vanilla. Don’t overmix or it’ll go a bit weird. Pour this luscious goo over your chilled base.
- Bake for 50–60 minutes, or until it’s mostly set but still has a wobble in the middle (think: like a good mattress). If the top craters, join the club — it’ll get covered anyway.
- Cool completely at room temp (no shortcuts here, trust me — I tried the freezer trick, it got weird), then chill at least 4 hours (overnight is best, though good luck not sneaking a slice before then).
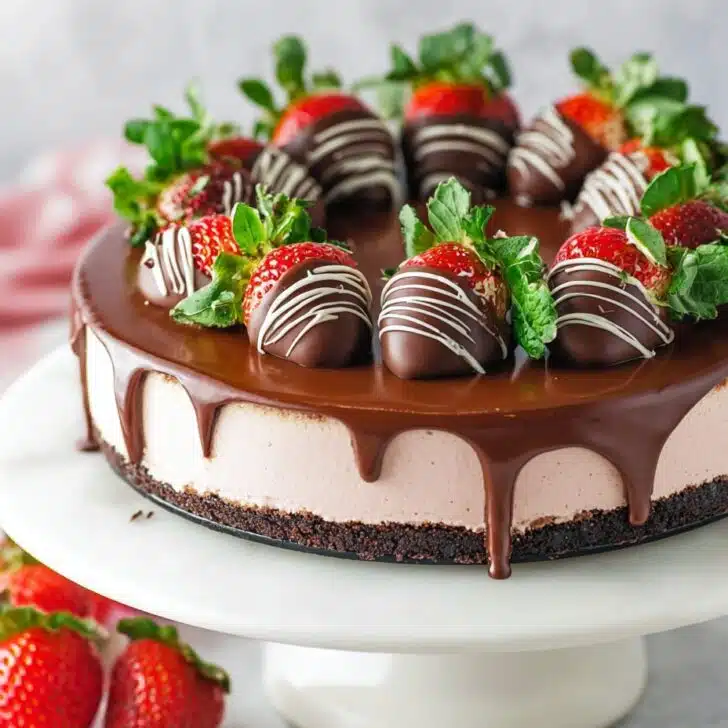
- Wash and slice up about half the strawberries; arrange in whatever pattern you like over the cold cheesecake. I just scatter ‘em on and call it good.
- Now, melt the chocolate and oil together gently — I use a microwave in short bursts, but double-boiler works if you’re feeling posh. Stir ‘til glossy. Dunk or drizzle the rest of the strawberries with this mixture and plop them on top (or make little hearts if you’re feeling luridly romantic).
- Let the choco-topped berries set a bit. Slice, serve, and brace yourself for the applause (or, in my case, the inevitable argument over the last piece).


Notes (Learn net Some Experience Here)
- If you want the base extra thick, just add another handful of biscuits. Or if you like a thinner crust (not me!), use less.
- Seriously, let it chill for real. I once served it after 2 hours and the middle tried to make a run for it when cut.
- Don’t feel wedded to strawberries. Raspberries = equally divine, but I find they’re best left whole if you don’t want red streaks everywhere.
Variations I’ve Tried (Some Good, Some...Not)
- Swapping in white chocolate for the drizzle? Actually great, though it’s a bit sweet for me.
- I once tried making this with a brownie base. Looked amazing, collapsed spectacularly. Fun, but messy.
- Lemon zest in the filling? Surprisingly fresh hit (just don’t overdo it, or it starts competing with the strawberries!)


Equipment: What You Need (And Don’t Panic If You Don’t Have…)
- 23cm (9-inch) springform pan — but honestly, I’ve bodged it with a loaf tin (messier, but slices still come out!)
- Electric beaters are handy, but I sometimes just use elbow grease and a whisk
- Mixing bowls, spatula (or, a regular spoon if all else fails)
How to Store This (If You Even Get the Chance)
Keep leftovers (ha!) in the fridge, covered or in an airtight box, for up to three days — though honestly, in my house, it never lasts more than a day! The chocolate sets up lovely and the texture gets fudgier on day two…if it sticks around.
Serving: How We Eat It In My House
I’m big on serving this after Sunday lunch, but, sometimes I sneak a little sliver with a morning coffee. Pile extra strawberries on the side, or scatter some crushed biscuits over for a bit more crunch. My uncle likes his with extra sour cream on top, but that’s up to you (sounds odd but isn’t half bad).
Pro Tips (All Earned the Hard Way)
- I once tried to speed-cool in the freezer. Don’t! The texture went all sad and icy, like someone left the cheesecake outside at a bonfire.
- If you overbake and crack the top, ignore it. It’ll hide under berries and chocolate — or call it “rustic”, and who can argue with that?
FAQ – You Ask, I Ramble
- Can I use frozen strawberries? Sure, but thaw and drain them well – otherwise, you’ll get a puddle. I prefer fresh, though. They just look…happier!
- Can I make it ahead? Absolutely. Actually, I think this tastes better the next day (beats the frantic day-of prep, too).
- What if I don’t have a springform pan? I mean, it’s ideal, but don’t let it stop you. Lined cake tin works, though you’ll have to improvise getting it out. A friend once used a casserole dish — which was a bit odd, but, you do you.
- Is low-fat cream cheese fine? If you must. But your cheesecake might weep a bit (like my cousin on Christmas Day)
- Can I freeze leftovers? You could, but the texture goes a bit strange. I usually don’t bother — there’s never any left.
And there you have it! If you come up with any genius tweaks (or disasters), let me know — bonus points if your dog tries to steal a strawberry. Happens here almost every time.
Ingredients
- 200g digestive biscuits (or Graham crackers are fine — my gran swore by McVitie’s, but any crumbly thing works)
- 80g unsalted butter, melted (I sometimes just eyeball 'til it’s soggy enough)
- 3 x 225g packs full-fat cream cheese, room temp
- 150g caster sugar (granulated works in a pinch, but you might get a tiny crunch)
- 3 large eggs
- 100ml sour cream (Greek yogurt works if you’re in a pinch; I’ve done it)
- 1 teaspoon vanilla extract (imitation is totally fine, I promise!)
- 250g fresh strawberries (plus a few extra if your family “samples” like mine)
- 150g dark chocolate, chopped (milk choc if you like it sweeter — no judgment!)
- 1 tablespoon neutral oil (I usually use sunflower or canola)
Instructions
-
1First, blitz the biscuits in a food processor until they’re crumbs. Or the old ziplock bag and a rolling pin trick! Mix in the melted butter until it looks like damp sand (but don’t eat it yet, even though I always want to). Press this into the bottom of a 23cm springform tin – if you don’t have one, just use a regular cake tin lined with plenty of parchment. Pop in the fridge while you faff about with the rest.
-
2Preheat the oven to 160°C/320°F (I always forget this bit until too late, so... just try to remember!)
-
3In a big bowl, whack together the cream cheese and sugar until smooth-ish; don’t worry if there’s a lump or two, nobody’s perfect. Add the eggs one by one, beating just ‘til they disappear. Stir in the sour cream and vanilla. Don’t overmix or it’ll go a bit weird. Pour this luscious goo over your chilled base.
-
4Bake for 50–60 minutes, or until it’s mostly set but still has a wobble in the middle (think: like a good mattress). If the top craters, join the club — it’ll get covered anyway.
-
5Cool completely at room temp (no shortcuts here, trust me — I tried the freezer trick, it got weird), then chill at least 4 hours (overnight is best, though good luck not sneaking a slice before then).
-
6Wash and slice up about half the strawberries; arrange in whatever pattern you like over the cold cheesecake. I just scatter ‘em on and call it good.
-
7Now, melt the chocolate and oil together gently — I use a microwave in short bursts, but double-boiler works if you’re feeling posh. Stir ‘til glossy. Dunk or drizzle the rest of the strawberries with this mixture and plop them on top (or make little hearts if you’re feeling luridly romantic).
-
8Let the choco-topped berries set a bit. Slice, serve, and brace yourself for the applause (or, in my case, the inevitable argument over the last piece).
Approximate Information for One Serving
Nutrition Disclaimers
Number of total servings shown is approximate. Actual number of servings will depend on your preferred portion sizes.
Nutritional values shown are general guidelines and reflect information for 1 serving using the ingredients listed, not including any optional ingredients. Actual macros may vary slightly depending on specific brands and types of ingredients used.
To determine the weight of one serving, prepare the recipe as instructed. Weigh the finished recipe, then divide the weight of the finished recipe (not including the weight of the container the food is in) by the desired number of servings. Result will be the weight of one serving.
Did you make this recipe?
Please consider Pinning it!