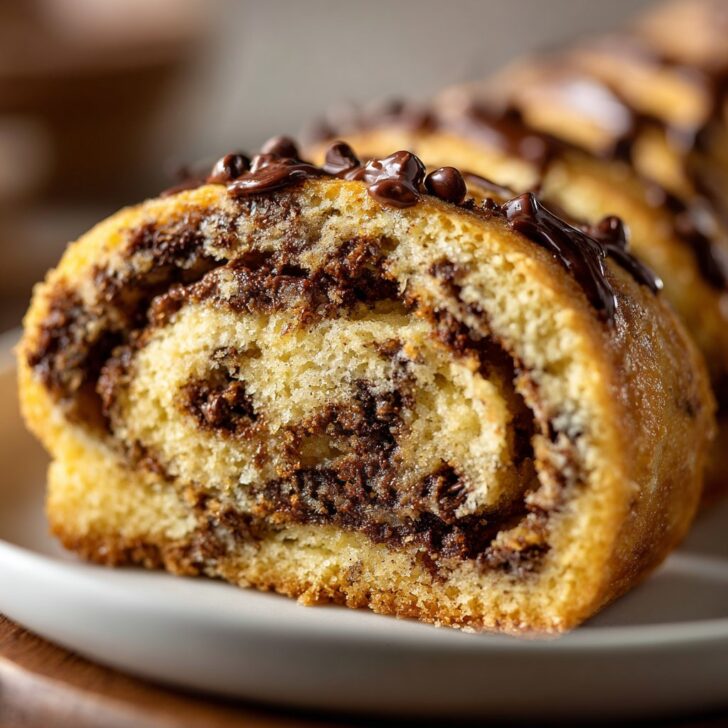
Hey, You Hungry? Let Me Tell You About Cookie Rolls
Alright, friend, settle in—because I’ve got a story about Chocolate Chip Cookie Rolls. So, last winter, I was stuck inside during this wild cold snap (you know those days when you can see your breath in the kitchen?). I was rummaging around for something that screamed comfort food but also didn’t feel like making another batch of boring chocolate chip cookies. That’s when the idea hit—why not roll 'em up? I mean, cinnamon rolls get to have all the fun. And let me tell you: this recipe was born out of a craving and a stubborn streak. Plus, my kids now request these so often, I should probably buy chocolate chips by the kilo.
Why You’ll Fall Head Over Heels (Like I Did)
I make these Chocolate Chip Cookie Rolls when I need something a bit fancier than the everyday cookie, but I’m not in the mood for an epic baking session. And honestly? My family goes wild for these because they’re crispy on the outside, gooey in the middle, and look kinda impressive at, say, Sunday brunch (everybody thinks you’ve got it all together, but they don’t know about the flour on your shirt). I used to get frustrated when regular cookies spread too much, but rolling them up keeps all that melty chocolate tucked in. Win!
What You’ll Need (And a Few Swaps I’ve Tried)
- 2 cups all-purpose flour (though I sometimes use 1 cup whole wheat if I’m pretending to be healthy—nobody has ever noticed)
- ½ teaspoon baking soda
- ½ teaspoon salt (my Nan insisted on Maldon, but sea salt from the supermarket works a charm)
- ¾ cup unsalted butter, melted (if I’m out, I’ll use margarine, but it’s just not quite as rich)
- 1 cup brown sugar, packed
- ¼ cup white sugar
- 1 large egg (or two small ones, if that’s what’s on hand—just use your judgement!)
- 2 teaspoons vanilla extract
- 1 ¼ cups chocolate chips (semi-sweet is my fave, but milk or even dark works—heck, throw in some chopped up Easter eggs if it’s April)
Let’s Get Rolling! (Sorry, I Had To)
- Prep your dough: Mix the flour, baking soda, and salt in a biggish bowl. In a separate bowl, beat together the melted butter and both sugars. Add the egg and vanilla—give it a good stir (or a lazy one, I’ve definitely cut corners here on a busy school night). Combine the wet and dry stuff just until it comes together—don’t go wild with the mixing or you get tough rolls. I learned that the hard way.
- Chocolate time: Fold in those chocolate chips. This is where I usually sneak a few right outta the bag. If you don’t, are you even baking?
- Roll it out: Plop the dough onto a well-floured bit of parchment; roll it into a rectangle—around ½ inch thick. Don’t worry if yours looks like the state of Texas, not a perfect rectangle. It’ll taste great regardless.
- Roll it up: Starting from the long edge, roll that sucker up gently into a log. If the dough sticks, just coax it with a bit more flour. Chill in the fridge for 30 minutes (I once skipped this and ended up with more of a cookie puddle, but it was still tasty!).
- Slicing: Cut the log into 1-inch slices and arrange them on a lined baking sheet. Don’t pack them too close—give them some room to rise and expand. They like their space, trust me.
- Bake: 350°F (180°C) for 12-14 minutes, until the edges are golden and the centers look just a bit underdone. Pull them out—don’t overbake! They’ll finish cooking on the sheet. (Actually, I find it works better if you let them sit for 5 minutes before moving—otherwise, they fall apart. Ask me how I know.)
Notes From My Not-So-Perfect Kitchen
- Overchilling the dough makes it super hard to slice. If you forget it in the fridge (been there), just let it sit a bit at room temp.
- Sometimes I sprinkle a little cinnamon sugar on top before baking. Not traditional, but oh, the smell!
- I once tried using coconut oil—it tasted okay, but the texture was kinda strange. Wouldn’t recommend unless you’re feeling adventurous.
If You Fancy Mixing It Up (Or Not...)
- Try adding chopped nuts—pecans are brilliant.
- I swapped in peanut butter chips once. It was... fine? Maybe too rich for me, but you might love it.
- One disaster: I tried swirling in raspberry jam. Looked gorgeous, tasted weirdly medicinal. Avoid unless you adore raspberry cough syrup. Just sayin’.
What If I Don’t Have All the Gear?
You’ll want a rolling pin, but I’ve used an empty wine bottle in a pinch (it’s clean, promise). Parchment paper is handy, though regular foil works too—it just sticks a bit more. Don’t stress if your knife isn’t super sharp—just saw gently through the dough log.


Storing Your Rolls (If They Even Last That Long)
Keep these in an airtight container on the counter. They’re best the first two days, but honestly, in my house, they never last more than a day! If you want to freeze them, do it after slicing but before baking—then bake ’em fresh, straight from the freezer (just add a couple extra minutes).
Serving: Our Family’s Take
I like mine warm with a scoop of vanilla ice cream. My eldest dunks his in cold milk—classic. And Christmas morning? We set them out with hot chocolate (extra marshmallows, fight me). You do you.
Lessons Learned—Don’t Make My Mistakes
- I once rushed the chilling step—never again. The rolls melted into each other. Still edible, but ugly as sin.
- If you overmix, they get dense. Stir until just combined, even if you’re tempted to keep going—resist!
- Check your oven temp with a thermometer. Mine runs hot, so things get crispy fast (here’s a good guide on oven thermometers if you want to geek out).
FAQ (Because You Actually Ask!)
- Can I make these gluten-free? Yep! Swap in your fave GF all-purpose blend (I like the King Arthur one), but maybe add a splash of milk since the dough can get crumbly.
- Do I need to chill the dough? You really should, but if you’re in a rush, just pop it in the freezer for 10ish minutes. It won’t be perfect, but it works.
- Can I use white chocolate chips? Sure thing. I’ve done it—honestly, a bit sweet for me, but my neighbor’s kids go bonkers for them.
- How can I tell when they’re done? Centers should look set but still soft. If they’re crispy all over, you’ve gone too far. (But they’re still good dunked in coffee!)
- What if my rolls look weird? Don’t sweat it. Tastes the same, and besides, I think the wonky ones have more character. Or maybe I just tell myself that.
Oh, and if you want to see a step-by-step photo breakdown (sometimes words don’t cut it), I really like the guides on Sally's Baking Addiction. She’s got the knack.
Let me know if you give these a go—or if you find a new twist that beats mine! Happy rolling, mate.


Ingredients
- 2 cups all-purpose flour
- ½ teaspoon baking soda
- ½ teaspoon salt
- ¾ cup unsalted butter, softened
- ½ cup granulated sugar
- ½ cup brown sugar, packed
- 1 large egg
- 1 teaspoon vanilla extract
- 1 cup semi-sweet chocolate chips
Instructions
-
1Preheat the oven to 350°F (175°C) and line a baking sheet with parchment paper.
-
2In a medium bowl, whisk together the flour, baking soda, and salt.
-
3In a large bowl, cream the butter, granulated sugar, and brown sugar until light and fluffy. Beat in the egg and vanilla extract.
-
4Gradually add the dry ingredients to the wet ingredients, mixing until just combined. Stir in the chocolate chips.
-
5Roll out the dough into a rectangle about ¼ inch thick. Starting from the long side, roll the dough into a log and slice into 12 equal pieces.
-
6Place the rolls cut side up on the prepared baking sheet and bake for 12-15 minutes, or until golden brown. Cool slightly before serving.
Approximate Information for One Serving
Nutrition Disclaimers
Number of total servings shown is approximate. Actual number of servings will depend on your preferred portion sizes.
Nutritional values shown are general guidelines and reflect information for 1 serving using the ingredients listed, not including any optional ingredients. Actual macros may vary slightly depending on specific brands and types of ingredients used.
To determine the weight of one serving, prepare the recipe as instructed. Weigh the finished recipe, then divide the weight of the finished recipe (not including the weight of the container the food is in) by the desired number of servings. Result will be the weight of one serving.
Did you make this recipe?
Please consider Pinning it!!