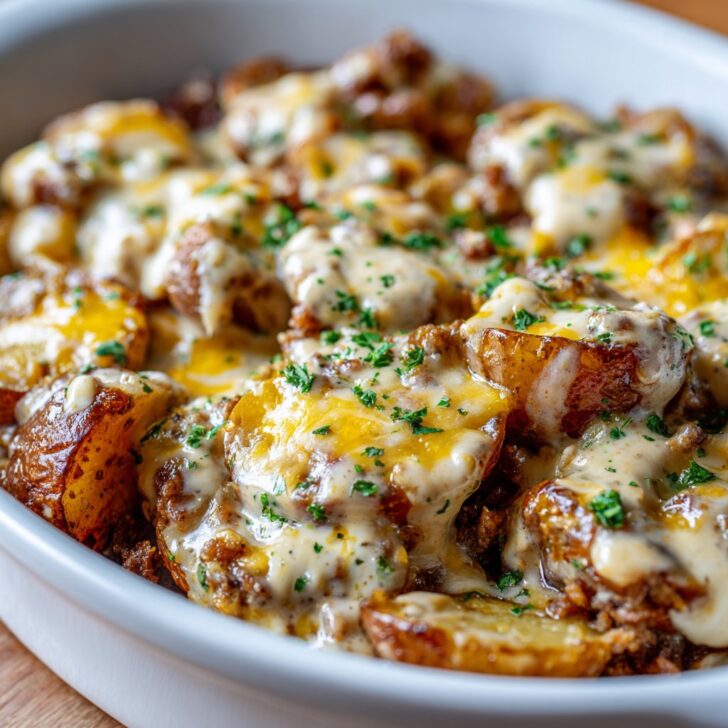
Let Me Tell You About These Cheesy Mississippi Mud Potatoes
Alright, friend, settle in. If you’ve ever been to one of my backyard cookouts, you’ve probably already been coaxed into taking a second helping of these Cheesy Mississippi Mud Potatoes (Baked). I swear, they disappear faster than sweet tea on a hot day. The first time I made these, I tried to follow my neighbor’s recipe (shoutout to Mrs. Patsy, who still claims hers are better), but of course I lost her exact measurements halfway through and just winged it. Turns out, a little chaos makes ‘em even tastier. True story—my cousin showed up once with his fancy truffle oil as a joke and, well, let’s just say stick with the basics here.
Why I Keep Making These (And Why You Might, Too)
I make this when I want something that’ll get my kids to actually pause their video games and come eat—no small feat. My family goes crazy for the crispy-cheesy edges (especially that one corner piece…you know the one!). Plus, when I’m not in the mood for fussing with complicated recipes or just need a big hearty dish to fill up a crowd, this is my old reliable. Sometimes I curse peeling potatoes (seriously, one day I’m just going to leave the skins on), but honestly, that’s about the hardest part.
What You’ll Need (And a Few Substitutes I’ve Tried)
- 2 to 2.5 pounds russet potatoes (sometimes I use Yukon Golds if that’s what’s rolling around in the bin—tastes just fine)
- ½ cup (1 stick) salted butter, melted (my grandmother always insisted on Land O’Lakes, but honestly any butter does the trick)
- 1 and ½ cups shredded cheddar cheese (I’ve mixed in Monterey Jack or even a bit of pepper jack when I’m feeling wild)
- 1 cup sour cream (Greek yogurt in a pinch—don’t tell my husband I said that)
- ½ cup cooked and crumbled bacon (bacon bits from a bag also work, but won’t win you any blue ribbons)
- ½ cup sliced green onions (I skip these if I can’t be bothered, but they add a nice zip)
- Salt and black pepper (just to taste, but don’t skimp; potatoes need the love)
- Optional: A handful of chopped jalapeños or bell peppers (my kids protest, so I usually leave ‘em out)
How I Actually Make These (Step by Step-ish)
- Set your oven to 400°F (205°C if you’re feeling fancy). Grease up a 9×13 baking dish. Doesn’t have to be pretty, just slippery enough so nothing sticks.
- Peel and dice the potatoes into bite-sized hunks. Sometimes I leave a bit of skin on—adds character. Toss ‘em in a big bowl.
- Pour in the melted butter and give those spuds a good toss so they’re all glossy (this is where I usually sneak a taste…raw potato is weirdly satisfying, though I wouldn’t serve it to guests).
- Add salt and pepper. I usually do a couple big pinches, but you do you. Mix in half of the cheese, all the sour cream, most of the bacon, and those green onions (or not; see above).
- Scrape everything into the dish. Spread it out, then sprinkle the rest of the cheese and bacon on top. If it looks messy, you’re doing it right. Don’t worry if it seems too thick, it’ll settle as it bakes.
- Bake uncovered for about 35-45 minutes, or until the top is golden and you can poke a fork through the potatoes easily. Sometimes I broil it for a couple minutes at the end if I want extra crispy cheese (just watch it like a hawk or you’ll be scraping off blackened bits later).
- Let it cool a few minutes before serving so you don’t burn your tongue. Not that I’ve done that—okay, I totally have.
A Few Notes From the Trenches
- If you’re making this ahead, actually, I find it works better if you mix it all up but wait to add the last layer of cheese until just before baking.
- I’ve tried using low-fat cheese and, well, don’t. It goes weirdly rubbery.
- Don’t stress if the sour cream looks a little curdled after baking; it all comes together once you scoop it out.
Variations I’ve Messed With (Some Winners, Some Not)
- Once swapped in sweet potatoes—honestly, not my favorite, but my neighbor loved it. Guess it’s a matter of taste.
- Add a handful of roasted garlic when I want to get fancy (makes your kitchen smell amazing for hours).
- Sometimes toss in leftover ham instead of bacon after a holiday—pretty sure half the charm is just clearing out the fridge.
- Tried it with vegan cheese once. It…sort of melted. Not my best move, but yeah, live and learn.
Equipment (But Don’t Sweat it Too Much)
- 9×13 baking dish (any casserole dish will do—once I used a big oven-safe skillet and it was just fine)
- Mixing bowl
- Potato peeler (hey, if you don’t have one, a regular knife works; just takes a bit longer and you might lose a knuckle, so be careful)
- Spoon or spatula (I’ve used my hands in a pinch, but it does get messy)
")
")
How to Store, But Honestly…
In theory, you can stash leftovers in an airtight container in the fridge for up to 3 days. Reheat in the oven or microwave; add a splash of milk if it’s gone a bit dry. But honestly, in my house it never lasts more than a day! And, weirdly, I think this tastes even better cold the next morning—breakfast potatoes, anyone?
How We Like To Serve It (You Do You)
We usually plop giant spoonfuls right onto plates alongside BBQ chicken or burgers, but I’ve also scooped it into bowls and topped with a runny egg for breakfast (don’t knock it till you try it). At a potluck, I just set out the whole pan with a serving spoon—done and done. Sometimes, someone (usually my uncle) pours hot sauce all over his portion, which is fine by me, but not for the faint of heart. Oh, and if you need a good BBQ chicken recipe, Simply Recipes has a classic one.
Pro Tips (Learned the Hard Way)
- I once tried rushing the baking and took it out after 25 minutes—big mistake. Potatoes were still half raw. Give it time; trust me.
- If you really want those crispy edges, don’t overcrowd your pan. Or, just eat all the corner pieces yourself (not that I’ve ever done that, ahem).
- Try not to use pre-shredded bagged cheese if you can; it’s got that weird powder on it. But, when I’m in a hurry, I just go for it. No shame.
FAQ (Answering What Folks Actually Ask Me)
- Can I prep this the night before? Yup! Mix everything, cover, and stash in the fridge. But add the last bit of cheese just before baking. Otherwise, it gets a bit crusty.
- Can I freeze it? Ehh, I’ve tried. Potatoes get mushy, but if you’re not picky, it’s edible. I prefer it fresh though.
- What if I want it spicier? Toss in diced jalapeños, or a sprinkle of cayenne. Or just let folks add hot sauce (like my uncle does—see above).
- Do I have to peel the potatoes? Nah, but the texture’s a bit more rustic. Sometimes I do, sometimes I don’t. Depends if I’m feeling lazy.
- What else can I serve with this? Oh, all sorts. Pulled pork, a simple green salad, sometimes even just a big heap of these and call it a meal. Oh, and if you want a killer coleslaw to go with it, I use this recipe from Bon Appetit on lazy Sundays.
Anyway, if you give these Cheesy Mississippi Mud Potatoes (Baked) a whirl, let me know how it turns out—or if you discover a genius tweak! And if you figure out an easier way to peel potatoes, I’m all ears. Happy cooking, y’all.
")
")
Ingredients
- 2 pounds russet potatoes, scrubbed and diced
- 1 cup sour cream
- 1 ½ cups shredded cheddar cheese, divided
- 6 slices bacon, cooked and crumbled
- ½ cup chopped green onions
- ¼ cup unsalted butter, melted
- 1 teaspoon garlic powder
- ½ teaspoon salt
- ½ teaspoon black pepper
Instructions
-
1Preheat the oven to 375°F (190°C). Grease a 9x13-inch baking dish.
-
2In a large bowl, combine diced potatoes, sour cream, 1 cup of cheddar cheese, crumbled bacon, green onions, melted butter, garlic powder, salt, and black pepper. Mix until well coated.
-
3Spread the potato mixture evenly into the prepared baking dish.
-
4Cover with aluminum foil and bake for 45 minutes. Remove foil, sprinkle remaining ½ cup cheddar cheese on top, and bake uncovered for an additional 15 minutes, or until potatoes are tender and cheese is bubbly.
-
5Let cool for 5 minutes before serving. Garnish with extra green onions if desired.
Approximate Information for One Serving
Nutrition Disclaimers
Number of total servings shown is approximate. Actual number of servings will depend on your preferred portion sizes.
Nutritional values shown are general guidelines and reflect information for 1 serving using the ingredients listed, not including any optional ingredients. Actual macros may vary slightly depending on specific brands and types of ingredients used.
To determine the weight of one serving, prepare the recipe as instructed. Weigh the finished recipe, then divide the weight of the finished recipe (not including the weight of the container the food is in) by the desired number of servings. Result will be the weight of one serving.
Did you make this recipe?
Please consider Pinning it!!