
When You Want the Comfort of Apple Pie But You're Craving Cheesecake
Alright, let me tell you—these cheesecake stuffed baked apples started as a sort of happy accident one autumn when I had leftover cream cheese and a pile of apples from the orchard (you know how you suddenly end up with a sack of apples because they look so lovely at the market?). I was aiming for classic baked apples, but then got distracted by a block of cream cheese staring at me from the fridge door. So, out went my plans for regular apples, and in came this slightly over-the-top, super comforting mashup. My kids say it's like eating cheesecake and apple pie in one go. I say it's got fruit, so that's healthy-ish, right?
Why You're Gonna Want to Make This (Trust Me)
I make this whenever I want something that looks like I put in loads of effort, but really, I just wanted to sit down with a cup of tea and something a little fancy. My husband calls these "fancy apple bombs" (he's not wrong). My family goes a bit wild for these on chilly evenings—especially with a scoop of vanilla ice cream on top. Also, confession: I used to stress about getting the filling just right, but honestly, even if it looks a bit lumpy, no one's ever complained. Oh, and if you're not a fan of fussy desserts, this one is forgiving. Trust me, I’ve burned a few and they were still eaten!
What You'll Need (and What I Sometimes Swap In)
- 4 large apples (Honeycrisp or Fuji are my go-tos, but I’ve used Granny Smith in a pinch. My aunt swears by Pink Lady. Up to you!)
- 1 block (about 225g) cream cheese, softened (Philadelphia is classic, but store brand is honestly fine)
- ¼ cup sugar (brown or white—I use whatever’s closest at hand)
- 1 egg (medium or large, really doesn’t matter)
- 1 teaspoon vanilla extract (I sometimes splash in a bit extra, especially when I spill some… which happens a lot)
- ½ teaspoon ground cinnamon (or more if you’re a spice fiend)
- A handful of graham cracker crumbs (digestive biscuits also work—no shame in using up leftover cookies!)
- Pinch of salt
- Butter, for topping (I usually eyeball it, but a tablespoon total is fine)
- Optional: A drizzle of honey or maple syrup for serving
- Optional: Chopped nuts, raisins, or even some dark chocolate chips (never tried milk, actually, no idea if that'd be good...)
So Here's How I Make Cheesecake Stuffed Baked Apples
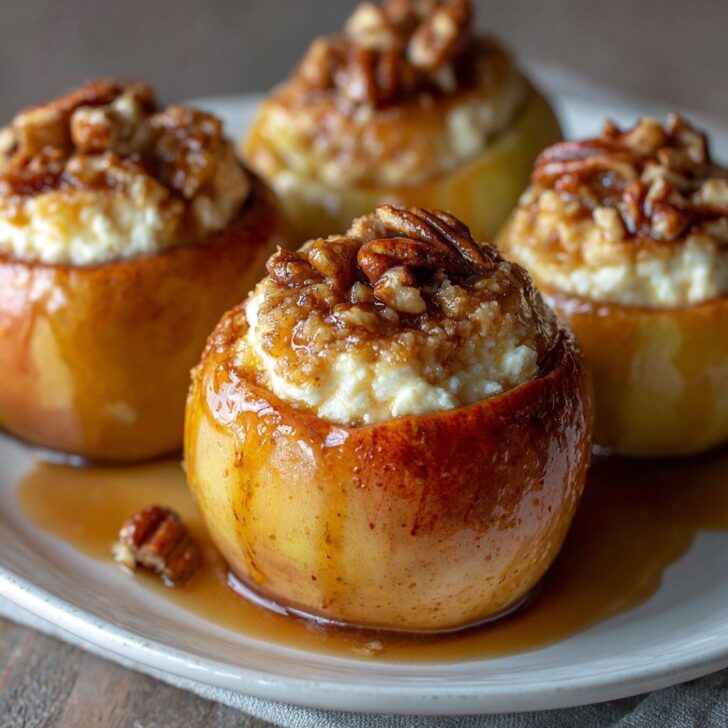
- First off, prep your apples. Wash ‘em and slice off the tops (keep them for a cute lid, or eat them now if you’re peckish). Use a spoon or melon baller to scoop out the core and seeds, leaving enough apple flesh so they don’t collapse in the oven. Don’t stress if the inside looks jagged—it’ll be covered by cheesecake filling anyway.
- Mix the cheesecake filling. In a bowl, blend the cream cheese and sugar until smooth. This is where I occasionally get impatient and just use a fork. Add the egg, vanilla, cinnamon, salt, and beat until creamy. I do sneak a taste here—quality control, obviously.
- Fill your apples. Place the apples in a baking dish (snug is better so they don’t topple). Sprinkle a spoonful of graham cracker crumbs in the bottom of each apple—grandma’s trick for soaking up juice. Fill each apple with the cheesecake mixture, mounding it up a bit. Sprinkle more crumbs on top, then dot with tiny bits of butter.
- Bake! Add a splash of water to the baking dish so things stay steamy (probably about half an inch, but I never measure). Bake in a preheated oven at 180°C (350°F) for 30–40 minutes. Keep an eye on them—if they start to slouch, you’re nearly done. The tops should be slightly golden and a bit wobbly. Don’t worry if they crack a little—it’s rustic.
- Let ‘em cool. I know it’s hard, but give them 10–15 minutes to cool. The filling sets up as it sits. Or eat one warm and embrace the gooeyness. Your call.
What I’ve Learned Along the Way (Notes and Goofs)
- I once forgot the egg—still tasty, just less fluffy. So don’t panic if you’re out.
- If you overbake, the apples go mushy. Underbake: still delish, just a little firmer. Honestly, both work.
- Sometimes I throw in a handful of chopped pecans or even a bit of lemon zest for zing.
- Brushing the outside of the apples with melted butter before baking looks fancy, but I forget half the time.
How I Tinker With This (Variations Both Good and… Not So Much)
So, I tried swapping the cream cheese for ricotta once—didn’t love it, kinda grainy. But mascarpone works, if you’re feeling flush. A friend adds a spoonful of apple butter to the filling (genius, actually). I’ve done a crumble topping instead of graham crackers once, and my kids went nuts. If you want to go wild, a sprinkle of sea salt and caramel sauce on top is outrageous, in a good way.
Equipment You’ll Probably Use (But Don’t Sweat It)
- Spoon or melon baller (honestly, a regular spoon and a little patience is fine—just don’t use a knife, trust me)
- Mixing bowl
- Baking dish or tray
- Electric mixer if you want, but I usually use elbow grease and a fork
- Oven, obviously (I know someone who microwaved these once. It wasn’t great, just FYI)


If There's Leftovers (Storage Stuff)
Store any extras in the fridge—loosely covered is best so the tops don’t get soggy. They’re good cold or you can warm ‘em up in a low oven for a few minutes. But honestly, in my house these never last more than a day. I think they taste even better the next day, but I rarely get the chance to prove it.
How We Serve 'Em at My Place
Big scoop of vanilla ice cream or a dollop of whipped cream—sometimes both if we’re feeling bold. My brother likes them with a sprinkle of extra cinnamon. On bonfire night, we carry these outside wrapped in foil (they hold the heat for ages, just saying). You do you.
Tough-Love Tips I’ve Learned (The Hard Way)
- Don’t try to rush the cooling step—once I tried serving immediately and the filling just oozed everywhere. Still delicious, but very messy.
- If your apples are wobbly in the dish, just squish a bit of foil around them to prop them up.
- Actually, I find it works better if the apples are room temp before filling—cold apples don’t cook as evenly.
FAQ: Real Questions I've Actually Been Asked
- Can I make these ahead of time?
- Yep! You can prep the apples and filling, stuff them, and keep in the fridge (uncooked) for up to 6 hours. Bake just before serving. Or bake them and rewarm gently; they keep alright. Not perfect, but good enough.
- What’s the best apple to use?
- I go for Honeycrisp or Fuji, but honestly, whatever’s not too soft. Granny Smith is a bit tart, but I kinda like the zing. One time I used Red Delicious… wouldn’t recommend, kinda mealy.
- Do I have to use graham cracker crumbs?
- Nope. I’ve crushed up digestive biscuits, shortbread, even ginger snaps (that was a bit strange, honestly). Use what you have.
- Can I leave out the egg?
- Sure! The filling will be denser, but it works. Or swap in a spoonful of Greek yogurt if you’re feeling experimental.
- Any tips for a crowd?
- Double everything, use a big roasting pan, and rope in someone to help with the apple coring. Or just make a few and cut into wedges. Not elegant, but tasty.
- Where do you get your vanilla?
- Actually, I usually grab a bottle online; King Arthur Baking has a nice one. Or local supermarket stuff is fine too. Oh, and if you’re stuck, a dash of maple syrup sometimes works (not the same, but close enough for jazz).
- Can I freeze these?
- I’ve tried it. Not my favorite—the apples get a weird texture. But if you must, wrap tightly and don’t expect miracles.
By the way, if you want more apple dessert ideas, I’ve used a bunch from Sally’s Baking Addiction. She’s a total apple dessert wizard.
So there you go—cheesecake stuffed baked apples in all their slightly chaotic, homey glory. If you give them a go, let me know how you tweak yours. And if you find a new twist, I’m all ears. Happy baking!


Ingredients
- 6 large apples (such as Honeycrisp or Fuji)
- 8 oz cream cheese, softened
- ¼ cup granulated sugar
- 1 large egg
- ½ teaspoon vanilla extract
- ¼ teaspoon ground cinnamon
- ¼ cup graham cracker crumbs
- 1 tablespoon melted butter
Instructions
-
1Preheat the oven to 350°F (175°C). Line a baking dish with parchment paper.
-
2Cut the tops off the apples and carefully scoop out the cores and some flesh, leaving about ½-inch thick walls to form a shell.
-
3In a medium bowl, beat together the cream cheese, sugar, egg, vanilla extract, and ground cinnamon until smooth and creamy.
-
4Spoon the cheesecake filling evenly into the hollowed apples. Place the stuffed apples in the prepared baking dish.
-
5In a small bowl, mix the graham cracker crumbs with melted butter. Sprinkle the mixture over the tops of the stuffed apples.
-
6Bake for 30 minutes, or until the apples are tender and the cheesecake filling is set. Allow to cool slightly before serving.
Approximate Information for One Serving
Nutrition Disclaimers
Number of total servings shown is approximate. Actual number of servings will depend on your preferred portion sizes.
Nutritional values shown are general guidelines and reflect information for 1 serving using the ingredients listed, not including any optional ingredients. Actual macros may vary slightly depending on specific brands and types of ingredients used.
To determine the weight of one serving, prepare the recipe as instructed. Weigh the finished recipe, then divide the weight of the finished recipe (not including the weight of the container the food is in) by the desired number of servings. Result will be the weight of one serving.
Did you make this recipe?
Please consider Pinning it!!