
Let Me Tell You About These Caramel Apple Cinnamon Rolls
I’ll never forget the first time I made these caramel apple cinnamon rolls. It was a drizzly Sunday in October; leaves were crunching underfoot, and I was feeling a little too big for my britches because I’d just bought a stand mixer on sale. (On second thought, probably didn’t need it. But you know how it goes when you wander down the kitchen gadget aisle.) Anyway, these rolls have become my fall favorite—partly because my family starts circling the kitchen like hungry raccoons as soon as I pull out the apples, but mostly because they make the whole house smell like a cider mill. And hey, I’ve burned my fair share of caramel over the years, so if you’re a bit nervous, believe me, I’ve been there. The first batch even ended up a rather sticky science experiment, but honestly, that’s half the fun.
Why You'll Love This Recipe (Or, Why I Keep Making It)
I make these whenever I want to bribe my kids out of bed on a chilly weekend. My family goes wild for them because there’s just something unbeatable about gooey caramel, soft apples, and that warm cinnamon aroma that sticks to your shirt all day (no complaints here). Sometimes the dough sticks to my counter—okay, often—but it’s worth it for the first bite. Also, if you have a random extra apple knocking about, you can absolutely chuck it in. Oh, and don’t get me started on the caramel; I used to be intimidated, but the secret is patience. Or a distraction, like scrolling through old photos while you stir.
What You’ll Need (Ingredients & Some Substitutes)
- 3 cups all-purpose flour (I’ve swapped in 1 cup whole wheat before—heartier, but a bit more rustic)
- 1 packet instant yeast (or 2 ¼ tsp—my grandmother used the kind in the jar, but honestly, packets are just less fussy)
- ½ cup warm milk (I sometimes use oat milk if that’s what’s open)
- ¼ cup granulated sugar
- 1 egg (room temp is best, but I’ve been impatient and used cold—works fine)
- ¼ cup melted butter (unsalted, or salted if you like a bit of a punch; I won’t tell)
- ½ teaspoon salt
- 2 apples, peeled and diced (Granny Smith is what I usually use, but Honeycrisp or even Pink Lady is fine—no drama)
- 1 teaspoon ground cinnamon (sometimes I do a half scoop extra, I won’t lie)
- ¼ cup brown sugar
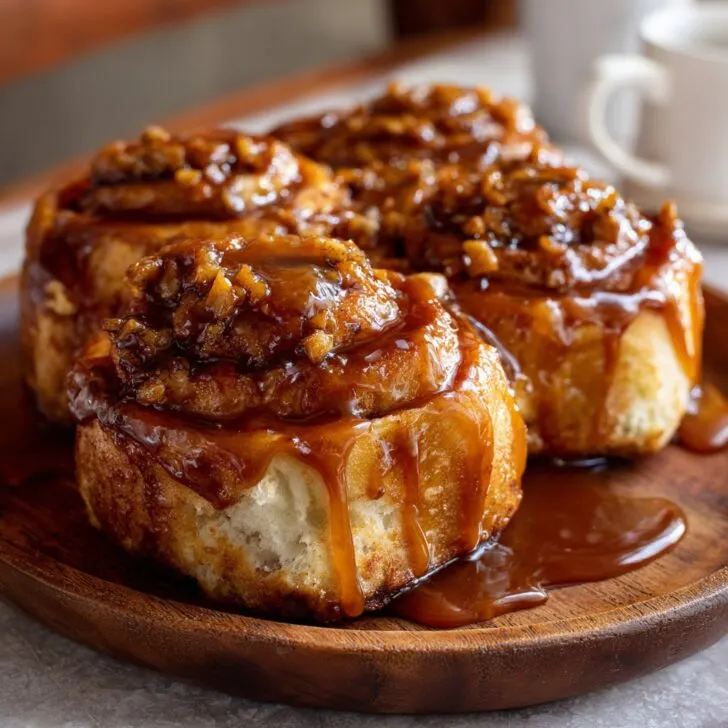
- For the caramel sauce: ½ cup brown sugar, 3 tablespoon butter, 2 tablespoon heavy cream, and a pinch of salt. Store-bought works in a pinch—Trader Joe’s has a decent one
How To Make 'Em (Directions, More or Less)
- Mix & Rise: In a big bowl, combine warm milk, yeast, and a pinch of sugar. Let it sit till it gets frothy (about 5 minutes—this is where I usually check my phone). Add in the sugar, melted butter, egg, and salt. Then gradually stir in the flour. When it gets shaggy, I switch to hands. Knead until it’s smooth-ish, about 5-8 minutes. Cover with a towel and let it rise somewhere warm until doubled—usually an hour, but who’s counting?
- Apple Filling: While the dough is rising, toss your diced apples with brown sugar and cinnamon. I sometimes nibble a piece or two just to "test" if I’ve got the spice right. Set aside.
- Roll Out & Fill: Punch down the dough (my favorite part), then roll it out on a floured surface into a rectangle—roughly 12x16 inches, but honestly I rarely measure. Scatter the apple mixture over the top. (Don’t worry if it looks a bit uneven. Rustic is in.)
- Roll Up & Cut: Roll it up from the long end. Slice into 9 fat rolls (or 12 if your pan is smaller—you do you). Place into a greased baking dish.
- Second Rise: Let ‘em puff up while the oven heats to 350°F (180°C), usually 20-30 minutes. Sometimes I get impatient and bake them a smidge early; they still turn out fluffy enough.
- Bake: Bake 25-30 minutes, until golden and the apples are bubbling a bit. This is where I peek through the oven window like a kid.
- Caramel Sauce: In a small saucepan, melt butter, then add brown sugar and heavy cream. Stir constantly over medium heat until it thickens—about 3-5 minutes. If it clumps, just keep stirring; it’ll smooth out, promise. Pour over the warm rolls. (Or do what my cousin does and dunk each roll directly—messy but fun.)
Some Notes from the School of Experience
- If your dough feels a bit sticky, add just a bit more flour, but not too much—otherwise your rolls will be more bricks than clouds.
- I once left these in the oven too long while answering a text. The house smelled amazing, but the rolls… let’s just say we ate a lot of caramel that day.
- Let the caramel cool just a smidge before drizzling, or it’ll run right off. Learned that one the hard way.
Variations I’ve Tried (And a Few That Flopped)
- Tried adding chopped pecans—pretty good, but my son picked them all out.
- Swapped in pears for apples once. Still tasty, but honestly, apples just work better.
- Once attempted a cream cheese frosting instead of caramel. It was... fine, but the flavors kind of fought with each other. Wouldn’t repeat.
- If you want to go wild, a dash of ginger in the filling adds a little zing.
What You’ll Need in the Kitchen (Equipment & Honest Cheats)
- Mixing bowl (big enough for a dough baby to rise in)
- Rolling pin (or a wine bottle—don’t judge, it works in a pinch)
- Baking dish (8x8 or 9x13 works fine; I’ve used a cake tin in a moment of desperation)
- Small saucepan for caramel (or a microwave and a sturdy bowl if you’re feeling rebellious)
")
")
How to Store Your Rolls (Not That They’ll Last)
These keep in an airtight container at room temp for up to 2 days. But honestly, in my house they rarely last more than a day. If you want them for breakfast the next day, hide a couple in the breadbox. (Learned that the hard way!) They freeze fine, but I find the apples get a bit mushy after thawing—just a heads up.
Serving Time! (And a Family Quirk)
Best served warm, obviously. We have a tradition of eating them with big mugs of hot cider (sometimes spiked, if it’s just the grownups). Leftovers, if any, make a killer midnight snack—I’d swear they taste better the next day, though maybe that’s just the post-bedtime peace talking.
Lessons I’ve Learned (Pro Tips, or What Not to Do)
- I rushed the rising once (thinking who really waits an hour??), and the rolls turned out tough as shoe leather. Don’t do that.
- Prepping apples too far ahead means they get brown and a bit sad—slice them right before filling.
- Forgot to grease my pan once and spent 15 minutes chiseling rolls out. Never again. Grease it like you mean it.
FAQ (Because People Always Ask)
Can I make these ahead?
Yep! You can assemble the rolls, cover, and let them rise overnight in the fridge. In the morning, let them come to room temp for 30-40 minutes before baking. Actually, I find it works better if you do a slow rise anyway.
What kind of apples are best?
I get this one a lot. I use Granny Smith because they’re tart and hold up, but honestly, whatever’s rolling around the fruit bowl usually ends up in there. It’s all good.
Can I use store-bought caramel?
Of course! Life’s too short to make caramel every time. Trader Joe’s or Bon Appétit’s salted caramel are solid. Just warm it up so it drizzles easily.
No stand mixer, is that okay?
Absolutely. I didn’t have one for years—just use your hands and a wooden spoon. Good for the biceps, too.
Can I make it vegan or gluten-free?
I haven’t tried a GF version (yet), but Minimalist Baker has a great GF cinnamon roll base you could start with. Vegan? Swap in your favorite plant milks and vegan butter. I think it’d work!
One Last Thing (A Tiny Digression)
Oh, before I forget—if your kitchen ends up dusted in flour and sticky with caramel, you’re doing it right. These rolls aren’t about perfection; they’re about cozy fall mornings, sticky fingers, and the sweet hum of people you love gathering around. And hey, if all else fails, there’s always ice cream, right?
")
")
Ingredients
- 2 ¼ teaspoons active dry yeast
- ¾ cup warm milk
- ¼ cup granulated sugar
- ¼ cup unsalted butter, melted
- 1 large egg
- 3 cups all-purpose flour
- ½ teaspoon salt
- 2 medium apples, peeled and diced
- ½ cup packed brown sugar
- 2 teaspoons ground cinnamon
- ¼ cup unsalted butter, softened (for filling)
- ½ cup caramel sauce (plus more for drizzling)
Instructions
-
1In a large bowl, dissolve yeast in warm milk and let sit for 5 minutes until foamy. Add sugar, melted butter, egg, flour, and salt. Mix until a soft dough forms.
-
2Knead the dough on a floured surface for 5-7 minutes until smooth. Place in a greased bowl, cover, and let rise for 1 hour or until doubled in size.
-
3While the dough rises, cook diced apples with brown sugar and 1 tablespoon butter in a skillet over medium heat for 5 minutes until softened. Stir in cinnamon and set aside to cool.
-
4Roll out the dough into a rectangle. Spread softened butter over the surface, then evenly distribute the caramelized apples. Drizzle with caramel sauce.
-
5Roll up the dough tightly and slice into 12 rolls. Place in a greased baking dish, cover, and let rise for 20 minutes. Bake at 350°F (175°C) for 25-30 minutes until golden brown.
-
6Drizzle warm rolls with additional caramel sauce before serving.
Approximate Information for One Serving
Nutrition Disclaimers
Number of total servings shown is approximate. Actual number of servings will depend on your preferred portion sizes.
Nutritional values shown are general guidelines and reflect information for 1 serving using the ingredients listed, not including any optional ingredients. Actual macros may vary slightly depending on specific brands and types of ingredients used.
To determine the weight of one serving, prepare the recipe as instructed. Weigh the finished recipe, then divide the weight of the finished recipe (not including the weight of the container the food is in) by the desired number of servings. Result will be the weight of one serving.
Did you make this recipe?
Please consider Pinning it!!