
Nothing Beats a Batch of Brownie Sundae Cookies (Trust Me!)
You know that rare moment everyone gets quiet at the table because they’re just too busy devouring dessert? Yeah, that happened the first time I slapped a scoop of vanilla ice cream on top of these warm, fudgy Brownie Sundae Cookies. Honest truth—I almost hid the last two for myself but my niece caught me and, well, now I offer to make these every family get-together. (Except the time I tried to double the batch and forgot I’d run out of baking powder. Oops. Crunchy disappointment, but I digress.)
Why You'll Want to Try These Immediately
Honestly, I whip up these cookies whenever I want to impress folks without really fussing. My family goes crazy for them because they're these perfect bite-sized mashups of brownies (that chewy edge!) and classic sundae toppings. I don’t know about you, but there’s just something about gooey chocolate with a puddle of ice cream that screams "eat me now." Also, whenever I’m feeling less than patient (which is most days), these come together faster than messing with a full pan of brownies. If you're iffy on mixing cookie dough by hand, don't fret. I used to loathe creaming butter, but swapping to melted works here. Who needs extra arm workouts?
The Stuff You'll Need (and How I Sometimes Cheat)
- 1 cup semi-sweet chocolate chips (Or honestly, I’ll use that mystery bag of mixed chocolate bits lurking in the cupboard. Even butterscotch throws in a fun twist!)
- ½ cup unsalted butter—melted (My grandmother used to swear by salted butter, but either one works. Just lay off the extra pinch of salt if you go that route.)
- ¾ cup brown sugar, packed (Light or dark—I've swapped in coconut sugar in a pinch and no one noticed!)
- 2 large eggs
- 1 teaspoon pure vanilla extract (That cheap vanilla “flavor” works if that’s all you’ve got. No shame.)
- ½ cup all-purpose flour (Tried it with whole wheat once—ehh, bit heavy but still edible!)
- ¼ cup unsweetened cocoa powder
- ½ teaspoon baking powder
- ¼ teaspoon salt
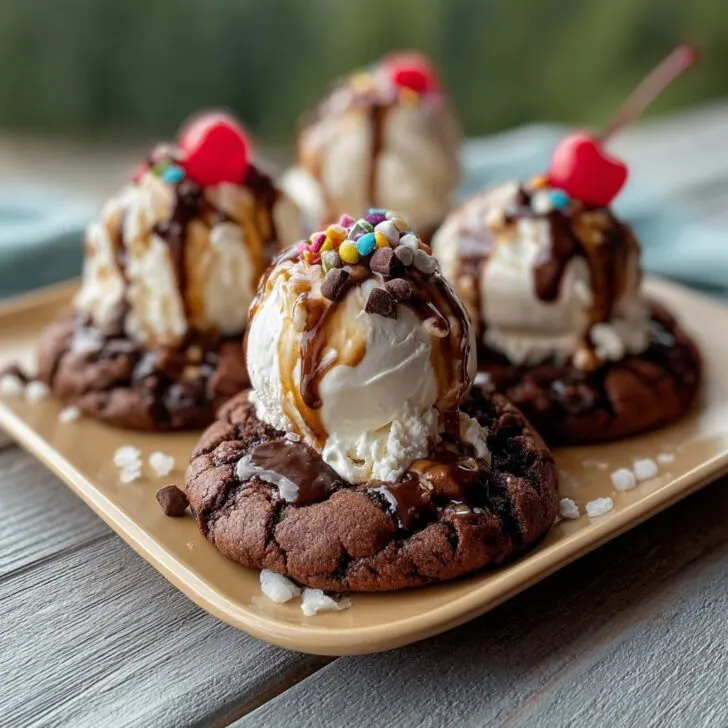
- Toppings: ice cream (vanilla is the classic but rocky road? Game changer!), sprinkles, chopped nuts, maraschino cherries, hot fudge, whipped cream
How It Comes Together: Step by Step (with Mishaps)
- First thing: crank the oven to 350°F (about 180°C if you speak metric). Some days I forget, so just put a sticky note if you’re scatterbrained like me.
- Line a baking sheet with parchment paper—unless you like stuck-on cookie bits. (Once, I tried wax paper, not the same thing. Don’t do it.)
- Melt the butter and chocolate chips together. Microwave in 20-second blasts, stirring each time, until it’s mostly melted. If you're on the hob, keep it low and slow; I’ve scorched chocolate before and I do not recommend that smell.
- Let that cool off a bit (otherwise, it'll cook your eggs and that’s... less than ideal). Then whisk in the sugar, eggs, and vanilla until it all looks smooth and glossy. This is usually where I taste test, because why not?
- In a separate bowl, mix together flour, cocoa powder, baking powder, and salt. Sometimes I just dump it in one bowl (I know, rebel). But supposedly it makes them more even?
- Add your dry stuff to the wet mix. Stir until just combined. Overmixing might make them tough; learned that the hard way.
- Drop hefty tablespoons (or use a cookie scoop, if you have one—though I just use two spoons most days) onto the baking sheet. Give them a bit of social distancing room.
- Bake about 10 to 12 minutes. The edges should be set but the middles a little gooey—don’t panic if they look underdone. They'll firm up as they cool, promise.
- Cool on the tray a few minutes before transferring. Or eat one warm if you can’t resist (I've scorched my tongue more than once, but c’est la vie).
Random Notes That Might Save Your Cookies
- If your dough seems weirdly runny, pop it in the fridge for 10 minutes. I learned this after a summer batch turned into one big edible cookie slab.
- I think these actually taste better the next day, but realistically, who waits that long?
- Feeling adventurous? I’ve stirred in chopped walnuts, peanut butter chips—you name it. Reese’s pieces? Dangerous (in a good way).
When I Got Creative (And Sometimes Regretted It)
- Tried tossing in a swirl of Nutella. Unreal but messy.
- Subbed gluten-free flour blend once for my mate with allergies—turned out pretty close (here’s a good guide on that over here).
- Did a batch with instant coffee powder. Tasty, but maybe skip if you’re giving these to kids. Learned that the hard way when my nephew did laps around Gran’s house all night.
- Oh, and trying them with banana instead of eggs? Strange texture. Won't do that again.
Don’t Have Fancy Gear? Neither Did I
A cookie scoop is handy, but honestly two regular spoons work just fine. If you don’t have a stand mixer, don’t sweat it—just a bowl and good ol’ elbow grease does the trick. If the oven’s being used for Sunday roast, I’ve even baked these in my little toaster oven (took less time, though, so keep an eye out).


How To (Try To) Store These, Though They Disappear Fast
Store cooled cookies in an airtight container, room temp; they’re good for about 3 days (though honestly, in my house, they last one). If you somehow have leftovers, I’ve frozen extra dough balls, which bake up just fine straight from the freezer—though I probably eat more of the dough than I should. Oh, and here’s a handy freezer chocolate storing tip I found: Sally’s Baking Addiction explains that better than I could.
You Have To Try Serving Them Like This
Straight out of the oven with vanilla ice cream on top—always. Then hot fudge, sprinkles if you like a bit of color, and, if you’re feeling wild, a dash of sea salt. In summer, we set up a “build your own cookie sundae” bar; chaos, but totally worth it. I think these could only get better if they came with a side of someone else doing all the cleanup. Just an idea.
Some “Wish I Knew That Sooner” Pro Tips
- I tried rushing the cooling step once because, well, impatience—and ended up with melty ice cream soup. So, yeah, cool ’em at least 5 minutes.
- If you’re doubling, don’t double the baking powder exactly; things get a bit odd texturally. Maybe one and a half's enough.
- Don’t use low-fat cocoa powder. Ask me how I know. (It’s weirdly flat and kind of sad tasting.)
Brownie Sundae Cookie Q&A—'Cause Everyone Asks
- What if I don’t have cocoa powder?
- Well, I’d probably just melt a bit more chocolate and cut back a smidge on the butter. Or, honestly, sub in some instant coffee for a mocha vibe (but it’s not the same, I’ll warn you).
- Can I make these ahead?
- Yep—dough stores in the fridge for like 2 days, freezer even longer. Baked cookies stay good for a few days, if you can hide them!
- Can kids help out?
- Oh for sure. My little cousin “helped” with the sprinkles and we’re still finding rainbow sugar under the fridge. So, supervision is a good idea.
- Why do mine spread too much?
- Usually too much butter, or maybe the dough was a bit too warm. Next time, chill it for a sec—and don’t skip the parchment!
- Any vegan version?
- I haven’t mastered that yet, but Nora Cooks has a great vegan brownie base—I bet you could cookie-fy it with a bit of trial and error.


Ingredients
- 1 cup semisweet chocolate chips
- ½ cup unsalted butter, melted
- 1 cup granulated sugar
- 2 large eggs
- 1 teaspoon vanilla extract
- ¾ cup all-purpose flour
- ¼ cup unsweetened cocoa powder
- ½ teaspoon baking powder
- ¼ teaspoon salt
- ⅓ cup chopped walnuts
- ⅓ cup rainbow sprinkles
- ¼ cup maraschino cherries, chopped
Instructions
-
1Preheat oven to 350°F (175°C) and line a baking sheet with parchment paper.
-
2Melt the chocolate chips and butter together in a microwave-safe bowl, stirring until smooth. Let cool slightly.
-
3Whisk in sugar, eggs, and vanilla extract until combined.
-
4In a separate bowl, sift together flour, cocoa powder, baking powder, and salt. Gradually fold into the wet mixture.
-
5Gently fold in walnuts, sprinkles, and chopped maraschino cherries.
-
6Drop tablespoons of dough onto the prepared baking sheet. Bake for 10-12 minutes, until the edges are set. Let cool before serving.
Approximate Information for One Serving
Nutrition Disclaimers
Number of total servings shown is approximate. Actual number of servings will depend on your preferred portion sizes.
Nutritional values shown are general guidelines and reflect information for 1 serving using the ingredients listed, not including any optional ingredients. Actual macros may vary slightly depending on specific brands and types of ingredients used.
To determine the weight of one serving, prepare the recipe as instructed. Weigh the finished recipe, then divide the weight of the finished recipe (not including the weight of the container the food is in) by the desired number of servings. Result will be the weight of one serving.
Did you make this recipe?
Please consider Pinning it!!