
So There Was This One Autumn Afternoon…
Alright, gather 'round, because let me tell you about the dish that’s weirdly saved more of my weeknights than I’d like to admit: Brown Sugar Roasted Butternut Squash. You know how some people have family secret recipes, like written on fading cards with mysterious measurements? Yeah, this isn’t one of those. I started making it one rainy Tuesday when my brain felt like mashed potatoes, and somehow it’s become a regular fixture. There was pumpkin soup simmering away on the stove (spoiler, it never thickened), and the squash was left staring at me accusingly, so it went in the oven with whatever was on hand. Sudden magic. Now my son acts like he invented it—teenagers, right?
Why You'll Love This (Or At Least Tolerate It!)
I whip this up mostly when actual meal prep feels like too much or when I’ve got a squash slowly shriveling in the fruit bowl (do they really belong there? I still don’t know). My family pretty much inhales it because the caramelized brown sugar does that thing where it forms chewy edges you wish you could bag like candy. And honestly, it makes the house smell like some sort of fancy bakery, even though you barely did anything. When I'm not feeling organized enough for a proper vegetable side, this is my "eh, why not?" go-to. Also, if you have picky eaters who've previously wrinkled their noses at anything orange, brown sugar works wonders.
What You'll Need (Don't Fret If You're Missing One Or Two)
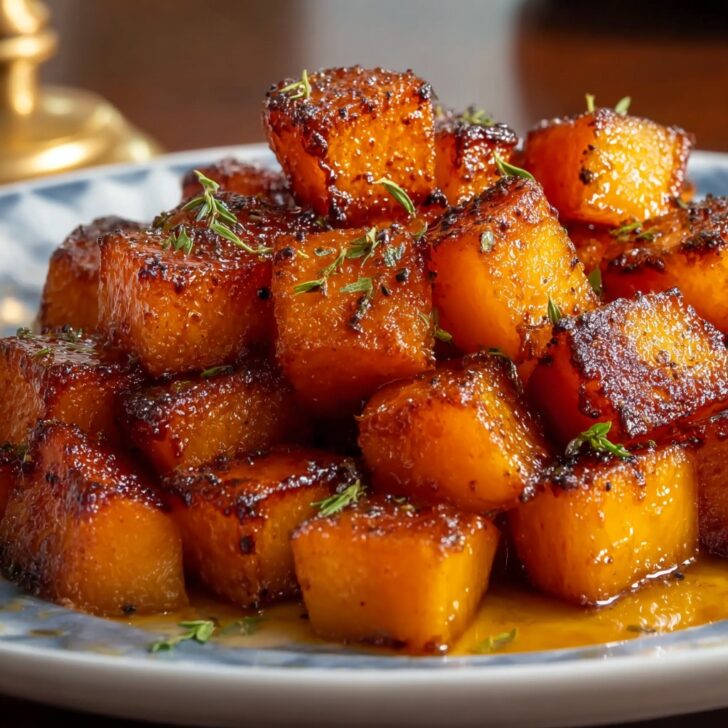
- 1 medium butternut squash (or even acorn squash if it's hiding in the pantry—works just fine!)
- 2 to 3 tablespoons brown sugar (sometimes, in a pinch, I use maple syrup. Tastes great, slightly stickier)
- 2 tablespoons melted butter (oil is totally fine if you’ve run out, but butter’s got that extra oomph)
- A good pinch of salt (I use flaky sea salt but honestly, table salt is a-ok. My grandmother always insisted on Maldon, but really, who's checking?)
- Freshly ground black pepper—if you like a subtle kick, toss it in
- Optional: A dash of cinnamon or nutmeg (sometimes I go wild and use both; sometimes neither. Up to you!)
How To Actually Make It (With Occasional Sneaky Nibbles)
- Fire up the oven. Preheat to 200°C (or about 400°F if you’re stateside). If you forget to preheat, like I do at least once a week, just stick the tray in while it warms up—it’s not kitchen blasphemy.
- Prep your squash. Peel the butternut squash. (Friend, get a sharp veggie peeler, not a dinky knife—the slip factor is real! Alternatively, I’ve microwaved halves for 2 minutes to soften the peel.) Chop into roughly 1-inch cubes, or close enough.
- Make it a party in a bowl. Toss the squash with melted butter, brown sugar, salt, pepper, and any cinnamon or nutmeg if you’re going that route. I mix everything right on the tray so there’s one less bowl to wash, but sometimes it sticks. Your call.
- Bake (and resist peeking). Spread in a single layer. Into the oven it goes for about 25-30 minutes. Give it a stir halfway—this is where I usually sneak a borderline-too-hot piece and inevitably burn my tongue. If the edges look a little crispy or caramelized, you’re right on track.
- Check for doneness. Spear a cube. If it’s tender but not mushy, you’re golden. Don’t stress if it looks uneven at this point. Actually, it gets stickier as it sits, so just trust the process.
Some Tips I Learned The Messy Way
- If you line your tray with parchment, cleanup is laughably easy. Once I ran out, though, and used foil—everything stuck like glue. Never again.
- I usually cut the pieces smaller if I want them extra-caramelized. But if you’re rushing (read: always), big lazy chunks totally work; just roast longer.
- The first time I tried microwaving a whole butternut to peel it, I, um, forgot to poke holes. Don’t be me—poke a few holes if you microwave it, or you might get squash confetti.
Weird Variations I’ve Tried (Some Good, Some... Oops)
- Added chopped pecans and dried cranberries once for a faux-fancy vibe. Actually pretty delightful if you want a holiday side.
- Splash of orange juice? Surprisingly okay, kind of like breakfast, but not my thing. My partner loved it though.
- I tried honey + chili flakes—thought I was a genius. Partner refused to eat more than two bites, so, maybe skip that unless you like spicy desserts.
Do You Need Fancy Equipment?
Technically, a big sharp knife and a sturdy tray are your best friends here. But if you don't have a vegetable peeler, honestly, I've used a regular old paring knife (slow, but it works). Once, I even tried cubing the squash with a bread knife—don’t recommend, but it was all I could find in the email-induced chaos of a Monday night.


How to Store Extras (Though Haha, Good Luck With That)
Leftovers go in an airtight container in the fridge. They’ll probably last a solid 3 days...but in my house, they rarely survive till breakfast. Actually, I think this tastes better the next day, but that could be wishful thinking since it’s mostly hypothetical for us. If you’re someone who likes batch cooking, you might bulk-roast and freeze in bags—just be aware they thaw a little mushier.
Ways To Serve It Up (Our Messy Table Tradition)
Pile it on with roast chicken, toss onto salads, or (my personal favorite) stuff it into warm pita with feta and greens. At Christmas, my aunt insists on putting it beside the turkey, but honestly, I prefer it almost as a cold salad with a dash of apple cider vinegar the next day. Your call. Once, I just ate it cold at midnight standing at the fridge. No regrets.
What I Wish I’d Known Earlier (AKA: My Humble Pro Tips)
- I once skipped tossing the squash halfway ‘cause I was, um, binge-watching a series. Don’t do it! The bottom stuck, and I lost half the caramelization.
- Don’t overpower with too much brown sugar. I tried doubling it; ended up with a casserole that tasted like melted jam. Moderation is, as they say, key (so hard for those of us with a sweet tooth, I know).
- Piling the chunks too close together? Turns form roast to steam real fast. Use two trays if you need to.
Reader Q&A (Because Someone Always Asks!)
- Can I use pre-chopped squash from the store?
- Oh, 100 percent yes! It’s not cheating. Just check for freshness—sometimes they’re mushy. Plus, check out Serious Eats’ squash tips if you want to level up.
- Is this vegan?
- If you use olive oil instead of butter, it totally is (and some folks say it’s even better that way—I’m somewhere in the middle honestly).
- Do you have to peel it?
- Technically no, if you like the skin! It’s edible after roasting, but a bit tough for me. I know people who love it though so, why not try?
- Can I add other spices?
- Absolutely—cumin adds a savory note that’s kind of addicting. Found this out by accident while reading 101 Cookbooks and testing spice combos.
- What if my squash is huge?
- Just use half or save extra for soup. Or roast it all and make friends with your neighbors!
Sorry, went totally off track there thinking about pita bread. Anyhoo—Brown Sugar Roasted Butternut Squash: easy, cozy, and just sweet enough to remind you fall's not all about pumpkin spice. Hope you try it (and if you find a better hack for peeling, do let me know—I’ll be forever grateful).


Ingredients
- 1 large butternut squash (about 2 pounds), peeled, seeded, and cubed
- 2 tablespoons olive oil
- 3 tablespoons brown sugar, packed
- 2 tablespoons unsalted butter, melted
- ½ teaspoon ground cinnamon
- ¼ teaspoon salt
- ⅛ teaspoon ground black pepper
- Fresh parsley, chopped (optional, for garnish)
Instructions
-
1Preheat oven to 400°F (200°C). Line a large baking sheet with parchment paper.
-
2In a large bowl, toss the cubed butternut squash with olive oil until evenly coated.
-
3Add brown sugar, melted butter, ground cinnamon, salt, and black pepper to the squash. Toss again to coat all pieces.
-
4Spread the squash cubes in a single layer on the prepared baking sheet.
-
5Roast in the preheated oven for 25-30 minutes, flipping halfway through, until the squash is tender and caramelized.
-
6Remove from oven and garnish with chopped fresh parsley if desired. Serve warm.
Approximate Information for One Serving
Nutrition Disclaimers
Number of total servings shown is approximate. Actual number of servings will depend on your preferred portion sizes.
Nutritional values shown are general guidelines and reflect information for 1 serving using the ingredients listed, not including any optional ingredients. Actual macros may vary slightly depending on specific brands and types of ingredients used.
To determine the weight of one serving, prepare the recipe as instructed. Weigh the finished recipe, then divide the weight of the finished recipe (not including the weight of the container the food is in) by the desired number of servings. Result will be the weight of one serving.
Did you make this recipe?
Please consider Pinning it!!