Let Me Tell You About These Buns...
Alright, so the first time I tried making Blueberry Cheesecake Brioche Buns, my kitchen ended up looking like a crime scene—blueberry smudges everywhere, a bit chaotic, but honestly: worth every messy finger. There’s just something about the smell of sweet, pillowy brioche rising and then baking; it fills the whole house and makes anyone within sniffing distance suddenly appear in the kitchen ‘offering to help’. Reminds me a little of visiting my aunt’s house as a kid—she’d bribe us into chores with the promise of something warm from the oven. Clever woman, she was.

Why You'll Love Baking (and Eating) These
I pull out this recipe whenever someone needs cheering up (or ok, when I just want a treat with my coffee). My partner actually sets calendar reminders for “bun day”, which says a lot coming from the least organized person I know. They’re lush, creamy, with that tangy twist from the cheesecake middle and bursts of blueberry. You can eat them for breakfast, dessert, or straight off the tray when nobody’s looking. And confession: sometimes they come out a bit wobbly-looking but honestly, isn’t that the charm?
Here's What You'll Need (with my shortcuts)
- 350g bread flour (plain flour sort of works if you don't mind a little less spring)
- 60ml whole milk, lukewarm (I use oat milk when out of actual milk and nobody’s noticed—yet)
- 50g granulated sugar (brown sugar gives a hint of caramel, if you’re feeling fancy)
- 2 medium eggs, at room temp (one day I used duck eggs—too rich, honestly, but you do you)
- 7g (1 sachet) instant yeast (or 15g fresh yeast, but who keeps that on hand? Not me.)
- ½ teaspoon salt
- 90g unsalted butter, soft (Grandma swore by Lurpak, but I use supermarket brands half the time)
- 150g full-fat cream cheese, softened (spreadable is fine if that’s what you’ve got)
- 3 tablespoon powdered sugar, plus more for dusting
- 1 teaspoon vanilla extract
- 1 cup (around 130g) fresh blueberries (I sometimes use frozen—just don’t thaw them)
- 1 egg (for egg wash; if you forget, brush with milk like I sometimes do)
Get Baking! (Trust Yourself, it’ll be Fine)
- Mix your dough: In a big bowl (or the bowl of a stand mixer if you’re feeling posh), throw in bread flour, sugar, yeast, and salt. Make a well and pour in your lukewarm milk and two eggs. I start mixing with a wooden spoon until it's a shaggy mess, then knead by hand (or use the dough hook) for about 10 mins. If the dough keeps sticking, add a little flour—but not too much, or you’ll lose the fluffiness.
- Add butter: Plop in the soft butter, a couple cubes at a time; keep kneading until the dough is shiny and stretchy. (This part takes some patience, but just stick a podcast on and mush away.) It should pass the 'windowpane test'—stretch it a little and it shouldn’t tear easily. Or just decide it’s close enough, which happens at my place a lot.
- First rise: Cover with a tea towel and let it rise somewhere warm until doubled—usually about 1.5 hours? But I’ve left it 2 hours before while distracted and it was perfectly fine.
- Shape the buns: Tip dough onto a lightly floured surface. Knock the air out (my favorite part), divide into 8 pieces. Shape each into a ball and arrange on a lined tray, well spaced. Flatten the tops and use your knuckles (or a shot glass if you don't mind getting creative) to make a dip in the middle of each bun for the filling.
- Let them puff up: Cover buns loosely and let them rise another 30-45 mins. I usually tidy up the kitchen (sometimes).
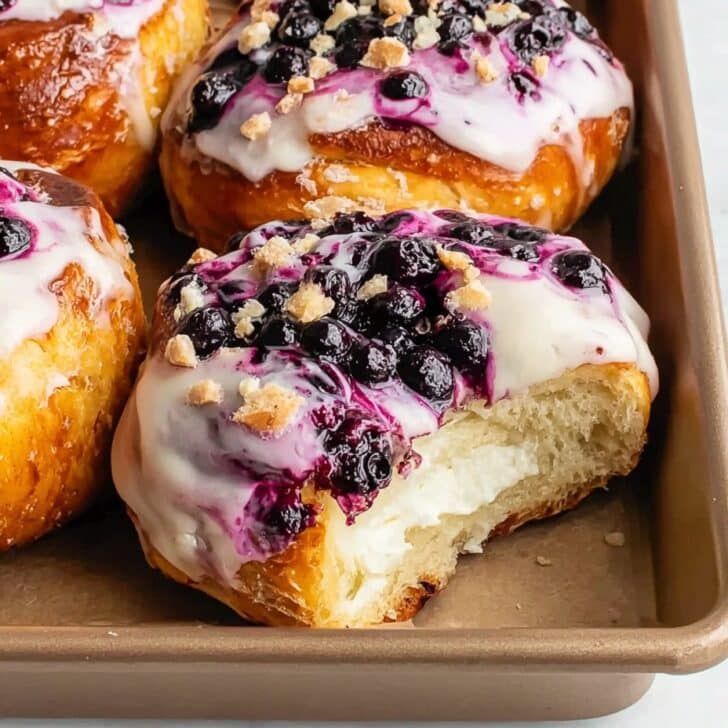
- Mix the cheesecake filling: Beat together cream cheese, powdered sugar, and vanilla until smooth. Spoon a generous blob into the dip in each bun. Top with a handful of blueberries. (This is where I always eat a stray berry or two.)
- Preheat & egg wash: Start preheating oven to 180°C/350°F. Brush buns gently with your egg wash (or milk, as I said), being careful not to drown the filling.
- Bake time: Pop into the oven for 18-22 mins, until golden and the filling is softly set. If they brown too fast, cover with foil. Don’t panic if the blueberries bubble over a bit; looks more rustic, honestly.
- Cool-ish, then devour: Let the buns cool for at least 10 minutes, or do as my dad does—burn your tongue because you can’t wait. Dust with a bit more powdered sugar if you fancy.

A Few Real Notes I Learned the Hard Way
- Don’t skimp on the rise time—seriously, I did once, and they came out like tiny dense hockey pucks.
- Soft butter is key; cold just doesn’t want to join the party.
- The filling runs a bit if you over-stuff (but when is too much cheesecake really a problem?).
- If you use frozen berries, don’t thaw; otherwise, you’ll get blue goo everywhere.
If You Feel Like Tweaking
- Once, I swapped in raspberries for the blueberries…it was delicious, but messier. A friend used chopped strawberries and insisted they liked it better (jury’s out).
- Tried mixing some citrus zest into the filling, which made it taste a bit like summer holidays.
- One attempt at adding white chocolate chips made the filling run everywhere—just don’t.

Do You Really Need Special Equipment?
I always say a stand mixer makes life easier, but honestly, I’ve kneaded this dough while watching telly, bowl in lap, looking mildly ridiculous. If you don’t have a piping bag, just spoon the filling in—nobody’s judging.
How Do You Store Them? (Not That You’ll Need To)
These keep in an airtight tin or tub for up to two days—though honestly, in my house it never lasts more than a day! If I ever actually have leftovers (rare), I zap them in the microwave for 10 seconds. Good as new.
How We Like to Serve (and Eat) Them
I love these with a strong cup of tea mid-morning. Sometimes we split them and toast lightly, then pile on more cream cheese (I know, decadent). On birthdays, I’ve been known to stick a candle in one for breakfast—beats cereal, right?
A Few Things I’ve Learned (the Hard Way)
- Once tried to rush the rise by cranking up the oven. Result: slightly scrambled eggs and sad buns—wait it out.
- Don't skip the second rise, no matter how hungry you are; trust me.
FAQ (Honestly, People Ask Me These!)
- Can I make the dough ahead? Yep! Sometimes I leave it overnight in the fridge, then let it come to room temp before shaping.
- Do I really need bread flour? Well, you’ll get more fluff that way, but use plain if you must—it’s not the end of the world.
- Frozen berries—OK? Definitely, just don’t thaw them or you’ll make a right mess.
- Can I freeze the finished buns? Actually, yes, but they’re best fresh. Reheat gently if you do freeze (and don’t expect the filling to look as pretty afterwards).
- What if I don’t have instant yeast? Use active dry, just let it proof first in your milk with a pinch of sugar.
- Can I halve the recipe? Sure can—then regret not making the full batch when they disappear.
Sometimes, when I’m kneading this dough on a rainy Sunday, I start thinking about how foods like this are just little pockets of happiness—and then, suddenly, the timer beeps and I’m yanked back to reality, and the kitchen smells like blueberries and cake and everything is right for a minute. That’s what these buns really are for me. Enjoy!
Ingredients
- 350g bread flour (plain flour sort of works if you don't mind a little less spring)
- 60ml whole milk, lukewarm (I use oat milk when out of actual milk and nobody’s noticed—yet)
- 50g granulated sugar (brown sugar gives a hint of caramel, if you’re feeling fancy)
- 2 medium eggs, at room temp (one day I used duck eggs—too rich, honestly, but you do you)
- 7g (1 sachet) instant yeast (or 15g fresh yeast, but who keeps that on hand? Not me.)
- ½ teaspoon salt
- 90g unsalted butter, soft (Grandma swore by Lurpak, but I use supermarket brands half the time)
- 150g full-fat cream cheese, softened (spreadable is fine if that’s what you’ve got)
- 3 tablespoon powdered sugar, plus more for dusting
- 1 teaspoon vanilla extract
- 1 cup (around 130g) fresh blueberries (I sometimes use frozen—just don’t thaw them)
- 1 egg (for egg wash; if you forget, brush with milk like I sometimes do)
Instructions
-
1Mix your dough: In a big bowl (or the bowl of a stand mixer if you’re feeling posh), throw in bread flour, sugar, yeast, and salt. Make a well and pour in your lukewarm milk and two eggs. I start mixing with a wooden spoon until it's a shaggy mess, then knead by hand (or use the dough hook) for about 10 mins. If the dough keeps sticking, add a little flour—but not too much, or you’ll lose the fluffiness.
-
2Add butter: Plop in the soft butter, a couple cubes at a time; keep kneading until the dough is shiny and stretchy. (This part takes some patience, but just stick a podcast on and mush away.) It should pass the 'windowpane test'—stretch it a little and it shouldn’t tear easily. Or just decide it’s close enough, which happens at my place a lot.
-
3First rise: Cover with a tea towel and let it rise somewhere warm until doubled—usually about 1.5 hours? But I’ve left it 2 hours before while distracted and it was perfectly fine.
-
4Shape the buns: Tip dough onto a lightly floured surface. Knock the air out (my favorite part), divide into 8 pieces. Shape each into a ball and arrange on a lined tray, well spaced. Flatten the tops and use your knuckles (or a shot glass if you don't mind getting creative) to make a dip in the middle of each bun for the filling.
-
5Let them puff up: Cover buns loosely and let them rise another 30-45 mins. I usually tidy up the kitchen (sometimes).
-
6Mix the cheesecake filling: Beat together cream cheese, powdered sugar, and vanilla until smooth. Spoon a generous blob into the dip in each bun. Top with a handful of blueberries. (This is where I always eat a stray berry or two.)
-
7Preheat & egg wash: Start preheating oven to 180°C/350°F. Brush buns gently with your egg wash (or milk, as I said), being careful not to drown the filling.
-
8Bake time: Pop into the oven for 18-22 mins, until golden and the filling is softly set. If they brown too fast, cover with foil. Don’t panic if the blueberries bubble over a bit; looks more rustic, honestly.
-
9Cool-ish, then devour: Let the buns cool for at least 10 minutes, or do as my dad does—burn your tongue because you can’t wait. Dust with a bit more powdered sugar if you fancy.
Approximate Information for One Serving
Nutrition Disclaimers
Number of total servings shown is approximate. Actual number of servings will depend on your preferred portion sizes.
Nutritional values shown are general guidelines and reflect information for 1 serving using the ingredients listed, not including any optional ingredients. Actual macros may vary slightly depending on specific brands and types of ingredients used.
To determine the weight of one serving, prepare the recipe as instructed. Weigh the finished recipe, then divide the weight of the finished recipe (not including the weight of the container the food is in) by the desired number of servings. Result will be the weight of one serving.
Did you make this recipe?
Please consider Pinning it!