
Cream Cheese Squares That'll Win Any Potluck (and Maybe a Few Hearts)
So let me paint you a picture. It's raining (of course), I've got a handful of neighbors coming over for game night (which basically means sugar and coffee), and I'm staring into my fridge with that what-on-earth-can-I-make look. Enter: cream cheese squares. I'm not even kidding, these little beauties are like the duct tape of dessert—there's almost nothing they won't fix. The first time I made them I was half-distracted chatting to my sister on the phone, but they still turned out semi-magical. Sometimes the universe just does you a favor, right?
And I totally blame my Aunt Linda for starting this whole cream cheese square tradition in our family, but let’s be honest—I’ve taken her recipe and sort of run amok with it, for better or worse. At Christmas, there are never leftovers, and even my dog has tried to swipe one off the kitchen counter. Yes, really! (Don't worry, she's fine. But I'm not condoning feeding them to your pets—she's just a sneaky hound.)
Why I Think You'll Love These
Whenever I make these, it’s usually because I’m in dire need of something sweet that doesn’t require an advanced degree or a million bowls. My family goes wild for these; my husband tries to hide a stash for himself (but I always find it!), and personally, I love how I can play with the flavors a bit without risking kitchen disaster. Sometimes I’ll add a little lemon zest or even a scattering of chopped pecans if I’m feeling fancy—or if I’m out of cinnamon, which happens more than I care to admit. Plus, you can whip ’em up in almost no time, even if you’re half-watching reruns of Bake Off in the background.
Oh, and here’s a confession: the first time I tried to double the recipe in a smaller pan, I made a literal cheesecake brick—but hey, still got eaten! (Some people just like extra-thick squares, apparently.)
Here’s What You’ll Need (Give or Take)
- 2 cans (8 oz each) refrigerated crescent roll dough (I’ve swapped puff pastry once in a pinch. Not quite the same, but good enough if you’re desperate!)
- 2 packages (8 oz each) cream cheese, softened (Listen, any brand will do; my gran swears by Philadelphia, but sometimes store-brand saves a few quid and no one notices.)
- 1 cup white sugar (I tend to use half brown if I want more of a caramel thing going on)
- 1 teaspoon vanilla extract (imitation’s okay but real is, well, real)
- ¼ cup butter, melted (there’s been the odd occasion where I was fresh out and just brushed with some neutral oil—wasn’t my proudest, but worked!)
- 1 tablespoon ground cinnamon (I sometimes skip this and dust with cocoa instead—wild, I know)
- Optional: handful of chopped nuts, little lemon zest, even chocolate chips if you’re feeling rebellious
How to Actually Make the Cream Cheese Squares (Step by Step-ish)
- Crank up your oven to 350°F (175°C). I know some folks like to go hotter but honestly, low and steady stops the bottom burning—it’s happened, trust me.
- Unroll one can of crescent dough and lay it flat in the bottom of a 9x13 inch baking pan. No need to stress if seams aren’t perfect; it’ll all get covered. Actually, I find pinching them together helps but sometimes I just sort of smoosh and call it good.
- Whip up the filling: In a bowl, beat cream cheese, 1 cup sugar, and vanilla until smooth. This is where I usually sneak a taste—who can resist a cream cheese-vanilla combo? Not me.
- Spread the mixture evenly on your crust. Don’t worry if you don’t get right to the very edges; it kind of levels out in the oven anyway.
- Unroll the second can and lay it over the filling. It might look a bit patchworky (is that a word?), but trust me, no one’s inspecting.
- Pour the melted butter over the top. Then, mix cinnamon and a couple tablespoons of sugar and sprinkle evenly. If you want extra crunch, throw those nuts on now.
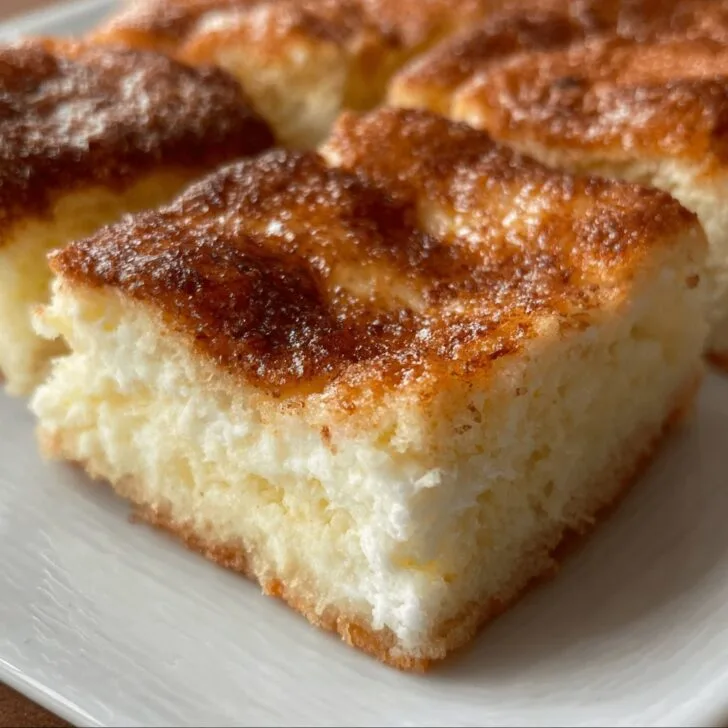
- Bake 30 minutes, give or take. Top should be golden, and the kitchen will smell fantastic—seriously, this bit always gets the fam poking around wanting a taste.
- Let it cool completely before cutting. I always jump the gun and end up with a sticky mess, but it firms up if you wait. (Patience not included.)
Little Notes From My Messy Kitchen
- Firm cream cheese is a pain to spread; softening it (sometimes I zap it in the microwave for a few seconds) makes life easier.
- If you’re out of ground cinnamon but have cinnamon sugar blend it up with a bit more sugar—works just fine!
- The second layer of dough doesn’t need to be perfect. Actually, I find it’s kind of charming when it’s a bit rustic.
Fun Twists I've Tried (Some More Successful Than Others)
Once, I subbed the sugar for honey—tasted good but the squares didn’t set up properly (wouldn’t recommend unless you’re after more of a scoopable cheesecake). Adding lemon zest brightens it up. If you want a chocolate version, sprinkle a handful of dark choc chips under the top layer—my niece called them “brownie-cheese bars,” which is hilarious but kinda accurate.
What You’ll Need—Well, Mostly
- 9x13 inch baking dish (last time I couldn’t find mine, so I used two 8x8s side by side—bit fiddly but worked in a pinch)
- Hand mixer or just a good old-fashioned spoon and some elbow grease
- Spatula for spreading. Or, if yours disappears like mine always seems to, a butter knife works in a pinch.


Storing These (If They Last!)
Fridge in an airtight container—supposedly up to 4 days, but honestly, in my house we’re lucky if they survive more than 24 hours. I think they taste better the next day; flavors really meld together, and the texture’s perfect for sneaky fridge raids. I hear they freeze all right, but they never last long enough for me to try!
How We Eat Cream Cheese Squares (A Little Family Tradition)
We have a strange habit—midnight snacking! But these are also lovely with a mug of tea or, if you’re feeling a bit posh, served warm with a spoon of berry jam on top. Sometimes I’ll plop a few fresh strawberries on the side. Oh, and a fork is strictly optional in my book.
Random Tips (Most Learned the Hard Way)
- Don’t try to cut before they’re cool. I rushed once and ended up with gooey chaos. Lesson learned (well, mostly).
- If your oven runs hot (mine does, ugh), check five minutes early—it can go from golden to burnt in the blink of an eye.
- Taste the cream cheese filling before layering—once, I forgot the sugar and, let’s just say, it was ‘experimental’ dessert night. Not my finest hour.
Frequently Asked (and Answered) Questions
- Can I make these ahead? Oh, absolutely—sometimes I even think they’re better the next day, though my kids disagree (impatience runs in the family).
- Can you use homemade dough? Yep, and more power to you if you do! I almost never do (time, energy, laziness—pick one), but if you’ve got a trusty recipe, have at it.
- Is there a gluten-free version? I’ve never tried it, but I’ve seen folks recommend gluten-free crescent dough like Nicole Hunn's recipes. Worth a peek if that’s your jam.
- How do you get neat squares? Chill it first, and use a sharp knife (rinsed in hot water—old bakery trick). That, or just embrace the messy look!
- What if I don’t like cinnamon? Skip it, use cocoa, or even a little espresso powder for a mocha twist—sky's the limit!
- Do these work for bake sales? Like a charm. Just remember to cut them a bit smaller (but not too small, or Dave from work will complain), and keep ’em cool if it’s a hot day.
And hey, if you’re keen to deep dive into cream cheese dessert wizardry, I love browsing recipes at Sally's Baking Addiction and checking Serious Eats for the proper science of things. But honestly, this one is foolproof—or as close as I’ve come!
There we are! If you’ve tried any wild variations, or if your dog also attempts grand larceny with baked goods, send a story my way. Always up for a good kitchen giggle.


Ingredients
- 2 (8 oz) packages cream cheese, softened
- 1 cup granulated sugar
- 2 large eggs
- 1 teaspoon vanilla extract
- 2 (8 oz) cans refrigerated crescent roll dough
- ¼ cup unsalted butter, melted
- ¼ cup granulated sugar (for topping)
- 1 teaspoon ground cinnamon
Instructions
-
1Preheat the oven to 350°F (175°C). Lightly grease a 9x13 inch baking dish.
-
2Unroll one can of crescent roll dough and press it evenly into the bottom of the prepared baking dish, sealing the seams.
-
3In a medium bowl, beat the softened cream cheese with 1 cup sugar, eggs, and vanilla extract until smooth and creamy.
-
4Spread the cream cheese mixture evenly over the dough layer. Unroll the second can of crescent dough and lay it over the cream cheese layer, gently pressing to cover and seal edges.
-
5Brush the top with melted butter. In a small bowl, mix ¼ cup sugar with cinnamon and sprinkle evenly over the buttered top.
-
6Bake for 35 minutes, or until the top is golden and set. Cool completely before cutting into squares and serving.
Approximate Information for One Serving
Nutrition Disclaimers
Number of total servings shown is approximate. Actual number of servings will depend on your preferred portion sizes.
Nutritional values shown are general guidelines and reflect information for 1 serving using the ingredients listed, not including any optional ingredients. Actual macros may vary slightly depending on specific brands and types of ingredients used.
To determine the weight of one serving, prepare the recipe as instructed. Weigh the finished recipe, then divide the weight of the finished recipe (not including the weight of the container the food is in) by the desired number of servings. Result will be the weight of one serving.
Did you make this recipe?
Please consider Pinning it!!