
A Cozy (and Occasionally Messy) Banana Bread Story
If you know me at all, you’ve probably eaten this banana bread at least thrice by now (and, sorry for all the crumbs on your car seat that one time). This is my go-to when the bananas on my counter hit that sketchy spotted stage, and I feel just slightly more Italian than usual. I borrowed a touch of rustic Tuscan flair for this one—though let’s be real, the closest I get to Tuscany is usually my back porch with a cup of coffee in hand. Once, I accidentally doubled the chocolate hazelnut swirl and nobody in my house even blinked. That’s just how it goes around here.


Why You'll Love (or maybe just Crave) This Bread
I bake this when I’m stuck inside on a rainy Saturday (which, weirdly, is when my baking urge skyrockets). My family goes bonkers for the gooey chocolate bits—they fuss if I skip the hazelnut swirl. On occasion, I hide a slice for myself behind the spice tins so there’s something left for Sunday breakfast too. If your oven’s heating element is wonky, don’t sweat it. Mine’s older than half my dinner plates and it still works—sort of; well enough for banana bread, anyway. Actually, the only real frustration I’ve had is trying to wait for it to cool before slicing, which frankly never happens. Hot bread, scorched fingers: a small price to pay.
Gathering What You'll Need (Plus a Sub or Two)
- 3 medium overripe bananas (can totally wing it with 2 big ones or 4 smaller if you need to clear the fruit bowl—just mash what you've got)
- 2 large eggs (I sometimes end up using 1 duck egg instead, if the neighbor’s given me some)
- 100g unsalted butter, melted (about 7 tablespoons; olive oil sort of works, but don’t tell my Tuscan friends)
- 180g all-purpose flour (1 ½ cups) — my gran swore by King Arthur but honestly, store brand is fine
- 120g granulated sugar (about ⅔ cup; I’ll swap in light brown for a bit more squidge)
- 1 heaping teaspoon baking powder
- ½ teaspoon baking soda
- ¼ teaspoon fine sea salt (or kosher—don't go fancy, it disappears anyway)
- 75g chocolate hazelnut spread (Nutella or whatever "choco-nut goop" is lurking in your pantry)
- 50g chopped hazelnuts (small handful; can leave out if you’re nut-averse or swap for walnuts when hazelnuts cost a king’s ransom)
- 1 teaspoon real vanilla extract (or skip if you’re out, I forget half the time)
>
>
Let's Make It! Directions (Warts and All)
- Preheat your oven to 350°F (180°C), unless you, like me, sometimes forget and have to do it five minutes in. Grease a loaf tin—8x4 or 9x5 inches, either's fine. I use parchment if I'm feeling tidy, but oil and paper towels do the job (guess which I do more often).
- Mash the bananas in a big bowl until they’re fairly smooth. Some lumps are fine—Toddler-me would tell you more lumps means more fun. Stir in the eggs, cooled melted butter (don’t rush this or you’ll end up with streaky scrambled egg bits), and vanilla if using. Beat together by hand—no need for fancy mixers here.
- Sprinkle in the sugar, salt, baking powder, and baking soda. Mix until the banana goo is even and not too streaky.
- Tip in the flour and almost all the chopped hazelnuts, saving a pinch for later (unless you forget, like I often do). Fold gently until it’s mostly combined—don’t overmix, even if you’re tempted to chase the last bit of flour. Actually, slightly floury is fine at this stage!
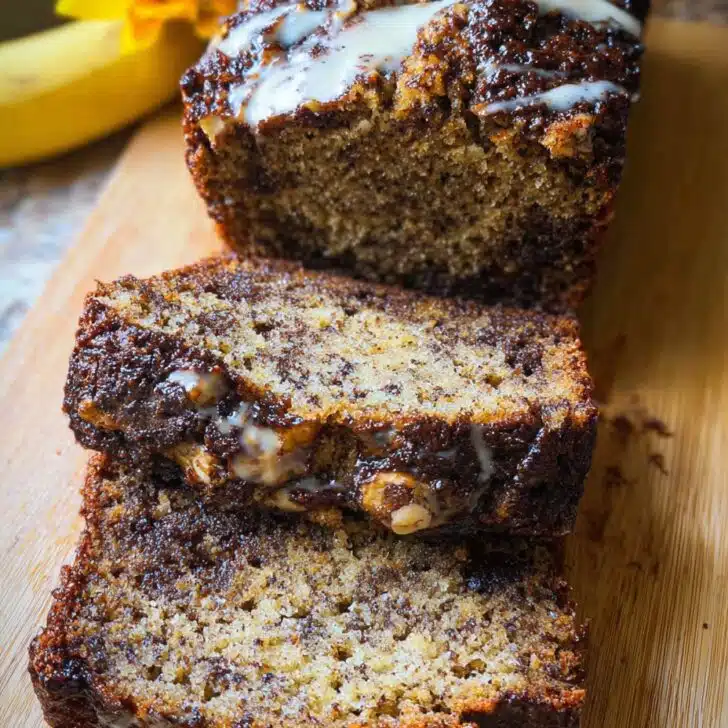
- Scoop half the batter into your prepared tin. Dot big spoonfuls of chocolate hazelnut spread all over—most people swirl it, but sometimes I just leave chunky bits (more of a surprise bite that way). Cover with the rest of the batter and blob the last of the chocolate hazelnut on top. Swirl gently with a butter knife—think lazy S-shapes, not full-on marbles.
- Scatter the reserved hazelnuts haphazardly over the surface. Bake 45–55 mins until golden and risen—the loaf should spring back if pressed, though the Nutella bits make the toothpick test weird. I once took mine out early and had a pudding situation (still edible, but a fork was required!).
- Cool in the tin at least 15 mins, but let's be honest—if you tip it out early, just be ready for a crumb explosion. Slice thickly and serve warm, cold, or furtively in the kitchen at midnight.


Notes Form Trial and Error
- Don’t use frozen bananas right out of the freezer—they make the mixture oddly watery (I learned this the hard way, ripening bananas in the microwave doesn’t fix it either).
- The chocolate swirl is optional, but people will ask where it went if you skip it. Trust me.
- Brown sugar makes it a bit richer, but use what you like. I mixed both once and nobody noticed.
- The chopped nuts on top get toasty, so check at 40 mins to avoid burning.
Variations I've Actually (Sort Of) Tried
- Once I tried using almond butter and white chocolate chips—tasted fine but lost the "Tuscan" vibe I like most.
- Swapped olive oil for butter in a pinch. The flavor is nice, but the texture is less dreamy (maybe too healthy?).
- I once even added orange zest but, honestly, it clashed somehow—wouldn’t do that again. Stick with the vanilla.


If You Don't Have Fancy Gear, No Worries
All you need is a mixing bowl, a wooden spoon, and a loaf tin. If you don’t have a loaf pan, bake it in a cake tin or even muffin tins—just adjust the time down a bit and peek in early. (Baked in a Pyrex dish once; it worked, just came out a little wonky!)
How to Store Leftovers (If There Are Any!)
Wrap leftovers in foil or pop in an airtight tin. Stays moist for 2–3 days… though honestly, in my house it barely sees sunrise the next morning. If it dries out, just toast and slather with a bit more chocolate spread or butter.
Serving—How We Love It Most
Perfect with coffee (obviously) or a glass of cold milk if you’re feeling childlike. My partner goes for generous slices, never toasted. I like thick slabs warmed, with a thin scrape of salted butter. Sometimes Sunday guests bring mascarpone—which is downright decadent; you do you.
Pro Tips (Mostly Learnt the Hard Way)
- Don’t rush the bake just because the house smells amazing. I once pulled it out early and got a strange, gummy center (still ate it, but kinda weird!).
- If the top is browning too fast, loosely cover with foil. I forgot this once and crust got… let’s call it "extra rustic."
- Actually, I find it works better if you swirl the chocolate in gently and leave big pockets, rather than going wild and overmixing—otherwise it all just melds and you lose the marbled bits.
FAQ: Stuff People Genuinely Ask Me
- Q: Can I freeze it?
A: Definitely—slice first, wrap individually, then stick in a freezer bag. Thaws pretty quick, but you can always zap it in the microwave. I usually forget it’s there and end up baking another loaf anyway. - Q: Can I use gluten-free flour?
A: Yep! Just pick one that subs 1:1 for regular. It might be a touch denser, but still tasty. Actually, my friend Louise prefers it that way. - Q: I’m out of hazelnuts, what now?
A: Swap with walnuts, pecans, even pistachios in a pinch. Or just leave nuts out, nobody will riot. - Q: Why does mine sink in the middle?
A: Usually because it’s slightly underbaked or too much banana (or both). Just trust your oven and don’t panic if it’s a bit sunken—it’s "Tuscan-style," remember?
And there you have it—my cozy (occasionally messy) banana bread with chocolate hazelnut, just rustic enough to pass as Italian, just homey enough for any kitchen. Enjoy, and don’t forget to sneak the first slice—baker’s rights!
Ingredients
- 3 medium overripe bananas (can totally wing it with 2 big ones or 4 smaller if you need to clear the fruit bowl—just mash what you've got)
- 2 large eggs (I sometimes end up using 1 duck egg instead, if the neighbor’s given me some)
- 100g unsalted butter, melted (about 7 tablespoons; olive oil sort of works, but don’t tell my Tuscan friends)
- 180g all-purpose flour (1 ½ cups) — my gran swore by King Arthur but honestly, store brand is fine
- 120g granulated sugar (about ⅔ cup; I’ll swap in light brown for a bit more squidge)
- 1 heaping teaspoon baking powder
- ½ teaspoon baking soda
- ¼ teaspoon fine sea salt (or kosher—don't go fancy, it disappears anyway)
- 75g chocolate hazelnut spread (Nutella or whatever "choco-nut goop" is lurking in your pantry)
- 50g chopped hazelnuts (small handful; can leave out if you’re nut-averse or swap for walnuts when hazelnuts cost a king’s ransom)
- 1 teaspoon real vanilla extract (or skip if you’re out, I forget half the time)
Instructions
-
1Preheat your oven to 350°F (180°C), unless you, like me, sometimes forget and have to do it five minutes in. Grease a loaf tin—8x4 or 9x5 inches, either's fine. I use parchment if I'm feeling tidy, but oil and paper towels do the job (guess which I do more often).
-
2Mash the bananas in a big bowl until they’re fairly smooth. Some lumps are fine—Toddler-me would tell you more lumps means more fun. Stir in the eggs, cooled melted butter (don’t rush this or you’ll end up with streaky scrambled egg bits), and vanilla if using. Beat together by hand—no need for fancy mixers here.
-
3Sprinkle in the sugar, salt, baking powder, and baking soda. Mix until the banana goo is even and not too streaky.
-
4Tip in the flour and almost all the chopped hazelnuts, saving a pinch for later (unless you forget, like I often do). Fold gently until it’s mostly combined—don’t overmix, even if you’re tempted to chase the last bit of flour. Actually, slightly floury is fine at this stage!
-
5Scoop half the batter into your prepared tin. Dot big spoonfuls of chocolate hazelnut spread all over—most people swirl it, but sometimes I just leave chunky bits (more of a surprise bite that way). Cover with the rest of the batter and blob the last of the chocolate hazelnut on top. Swirl gently with a butter knife—think lazy S-shapes, not full-on marbles.
-
6Scatter the reserved hazelnuts haphazardly over the surface. Bake 45–55 mins until golden and risen—the loaf should spring back if pressed, though the Nutella bits make the toothpick test weird. I once took mine out early and had a pudding situation (still edible, but a fork was required!).
-
7Cool in the tin at least 15 mins, but let's be honest—if you tip it out early, just be ready for a crumb explosion. Slice thickly and serve warm, cold, or furtively in the kitchen at midnight.
Approximate Information for One Serving
Nutrition Disclaimers
Number of total servings shown is approximate. Actual number of servings will depend on your preferred portion sizes.
Nutritional values shown are general guidelines and reflect information for 1 serving using the ingredients listed, not including any optional ingredients. Actual macros may vary slightly depending on specific brands and types of ingredients used.
To determine the weight of one serving, prepare the recipe as instructed. Weigh the finished recipe, then divide the weight of the finished recipe (not including the weight of the container the food is in) by the desired number of servings. Result will be the weight of one serving.
Did you make this recipe?
Please consider Pinning it!