
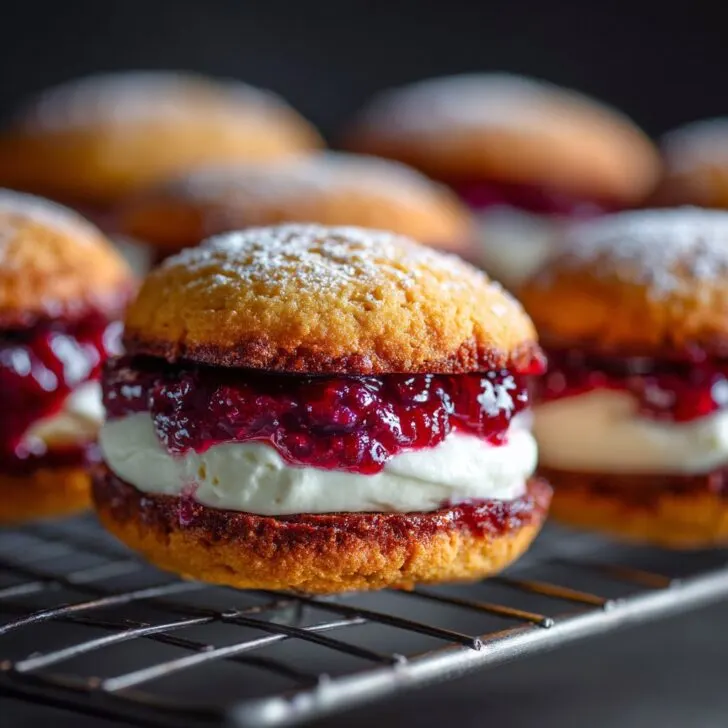
Let's Talk Berry-Lemon Whoopie Pies (And Why I'm Obsessed)
Okay, story time: The first time I made these Berry-Lemon Whoopie Pies, I was trying to impress my cousin at a family picnic. Turns out, I dropped the whole first tray (seriously, I tripped on the dog leash—classic me). But even the sad, squished ones got eaten, crumbs and all. So, now these are like a running joke in my family, and I make them whenever I'm feeling nostalgic, or, honestly, just when I want something that tastes like a summer day in pastry form. Also, they're impossible to eat gracefully, which makes it even more fun at parties. Just don’t wear your best shirt.
Why You'll Love Making These (Or: Why My Family Begs for Them)
I bake these Berry-Lemon Whoopie Pies when I want something that feels special but isn't fancy-pants. My family basically devours them right off the baking sheet—I'm not exaggerating, I once tried to save a couple for a neighbor and came back to... crumbs. The combo of zingy lemon and sweet-tart berries is just, ugh, perfect. And you don't need to be a pro baker. I used to panic about getting the filling just right (it once oozed everywhere, but in a good way?), but I've learned a few tricks. Plus, if you have kids or nosy housemates, this is a great recipe for letting them lick the bowl—just don't tell anyone I said that.
Here's What You'll Need (And What You Can Swap)
- For the cakes:
- 2 cups all-purpose flour (sometimes I use half whole wheat if I'm feeling "healthy")
- ½ teaspoon baking soda
- ½ teaspoon salt
- ½ cup unsalted butter, softened (my gran swore by Kerrygold, but any butter works)
- 1 cup granulated sugar
- 1 egg (I’ve used flaxseed as a sub, but it comes out a bit chewy)
- ½ cup buttermilk (or, my lazy hack: ½ cup milk + 1 teaspoon lemon juice)
- Zest of 1 lemon (if you love lemon, add 2)
- 2 tablespoon fresh lemon juice
- 1 teaspoon vanilla extract (the cheap stuff is fine, honestly)
- 1 cup mixed berries (blueberries, raspberries, or blackberries—frozen works in a pinch)
- For the filling:
- 4 oz cream cheese, softened
- ¼ cup unsalted butter, softened
- 1 ½ cups powdered sugar (or a bit more if you like it thicker)
- 1 tablespoon lemon juice
- ¼ cup berry jam (I used blueberry last time—homemade or store-bought is fine)
How I Actually Make These (With a Few Detours)
- Prep stuff: Heat your oven to 350°F (180°C). Line two baking sheets with parchment. Sneak a taste of the berries—just for quality control.
- The batter: In a bowl, whisk flour, baking soda, and salt. In another (bigger) bowl, beat butter and sugar until fluffy—it takes a couple minutes, or as long as it takes to hum through a song. Mix in egg, buttermilk, lemon zest, lemon juice, and vanilla. (It might look a bit lumpy here, that's normal!)
- Combine & fold: Add dry ingredients to wet, stirring gently. Don't overmix or they go tough—just until you stop seeing flour. Gently fold in berries. If you’re using frozen, don’t thaw them or your batter will turn Smurf blue. (Learned that the hard way.)
- Scoop: Drop heaping tablespoons of batter onto sheets, leaving space—these will spread. Sometimes mine come out more blob than round, but they taste the same.
- Bake: 11–13 minutes, till the tops spring back when touched. Cool on sheets for a few then transfer to a rack (or don’t, if you’re impatient).
- Filling time: Beat cream cheese and butter till smooth. Add powdered sugar, lemon juice, and jam. Beat till fluffy. I usually add a little extra sugar if it looks too runny. Taste it; this is where I always do a little dance—it’s that good.
- Assemble: Match up cakes by size (I always have a couple oddballs), spread filling on one, sandwich with another. Don’t press too hard or the filling will squish out the sides (don't ask me how I know).
Some Notes I Wish I Knew Earlier
- If you only have salted butter, just skip the salt in the recipe. (I always forget and double salt, then wonder why...)
- The batter is quite thick, almost like cookie dough—don’t panic.
- I find these taste even better the next day, but my family never lets that happen.
- Don’t stress if the filling starts to ooze. Just stick them in the fridge for 10 min. Actually, I think they taste better cold.
If You Want to Mix Things Up (Or What Didn’t Work So Well)
- I tried using orange instead of lemon once; it was... fine, but didn’t have that zing I crave.
- Strawberries work, but they make the batter runnier—add a tablespoon more flour if you go that route.
- I once added white chocolate chips to the filling. Overkill. Wouldn’t recommend, but hey, live and learn.
- Oh, and if you’re dairy-free, coconut oil and vegan cream cheese do work. Just chill the filling longer.
What You’ll Need (Don’t Fret If You’re Missing Stuff)
- Mixing bowls (I use mismatched ones; who cares?)
- Hand mixer or stand mixer (but I’ve done it with a whisk and some elbow grease)
- Baking sheets
- Parchment paper (I’ve used foil in a pinch, but things stick more)
- A cookie scoop or just two spoons—nobody’s judging


How I (Try to) Store Them
Store these in an airtight container in the fridge. They’ll keep a couple days—though honestly, in my house it never lasts more than a day! You can freeze them if you must, but the texture gets a bit weird. They’re best fresh, or within 24 hours (if you have that kind of self-control—which I don’t).
How We Serve 'Em (But Do Your Own Thing)
I like to stack these on a plate and dust with a bit of extra powdered sugar—no one’s ever complained. In the summer, my aunt likes to serve them with a scoop of vanilla ice cream and a few fresh berries on the side. Sometimes we just eat them standing around the kitchen. Best enjoyed with lemonade, if you ask me.
Things I Learned the Hard Way (A.K.A. Pro Tips)
- I once tried to rush the cooling step and filled them while still warm—bad idea, the filling turned into a puddle. Wait till they’re cool, really.
- Don’t overbake. They go from fluffy to dry real quick; check at 11 minutes and go from there.
- If your filling seems runny, add a spoonful more powdered sugar; or just pop it in the fridge for a bit.
FAQ (Based on Actual Texts and DMs I’ve Gotten)
Can I make these gluten-free? Yup, just use a 1-to-1 gluten-free flour—Bob’s Red Mill works fine. The texture’s a bit more crumbly, but no one’s noticed at my table.
What berries are best? Whatever you’ve got—blueberries are my go-to, but raspberries add a nice tart kick. Mixed frozen berries are super convenient (and usually on sale at Trader Joe’s, just saying).
Can I double the recipe? Oh, for sure. I’ve tripled it for a big BBQ once (never again... so many dishes). You might need to bake in batches, though.
How do you keep them from sticking together when stacking? A layer of wax paper between layers helps. Or just eat them all at once—problem solved!
Where do you get good jam? I like Bonne Maman (it feels fancy), but check out this Serious Eats jam review for ideas. Or make your own, if you’re feeling ambitious—honestly, I usually just grab whatever’s in the fridge.
Do I really need parchment paper? Technically no, but your clean-up will thank you. If you’re out, butter the pan like there’s no tomorrow.
By the way, if you’re in the mood to geek out on whoopie pie history, Southern Living has a fun article. Spoiler: they're not from the South!
Anyway, give these Berry-Lemon Whoopie Pies a go. If you manage to save one for breakfast the next day, I think you’ll be glad you did. And if not—well, you’re in good company.


Ingredients
- 2 cups all-purpose flour
- 1 teaspoon baking powder
- ½ teaspoon baking soda
- ¼ teaspoon salt
- ½ cup unsalted butter, softened
- ¾ cup granulated sugar
- 1 large egg
- 1 tablespoon lemon zest
- 2 tablespoons fresh lemon juice
- ½ cup buttermilk
- 1 cup mixed berries (strawberries, blueberries, raspberries), chopped
- 4 ounces cream cheese, softened
- ½ cup powdered sugar
- ½ teaspoon vanilla extract
Instructions
-
1Preheat the oven to 350°F (175°C) and line two baking sheets with parchment paper.
-
2In a medium bowl, whisk together the flour, baking powder, baking soda, and salt.
-
3In a large bowl, beat the butter and granulated sugar until light and fluffy. Add the egg, lemon zest, and lemon juice, and mix until combined.
-
4Gradually add the dry ingredients to the wet mixture, alternating with buttermilk, until just combined.
-
5Drop tablespoonfuls of batter onto the prepared baking sheets, spacing them about 2 inches apart. Bake for 10-12 minutes, or until the edges are lightly golden. Let cool completely.
-
6For the filling, beat cream cheese, powdered sugar, and vanilla extract until smooth. Gently fold in the chopped berries. Spread the filling on the flat side of half the cookies, then top with the remaining cookies to form whoopie pies.
Approximate Information for One Serving
Nutrition Disclaimers
Number of total servings shown is approximate. Actual number of servings will depend on your preferred portion sizes.
Nutritional values shown are general guidelines and reflect information for 1 serving using the ingredients listed, not including any optional ingredients. Actual macros may vary slightly depending on specific brands and types of ingredients used.
To determine the weight of one serving, prepare the recipe as instructed. Weigh the finished recipe, then divide the weight of the finished recipe (not including the weight of the container the food is in) by the desired number of servings. Result will be the weight of one serving.
Did you make this recipe?
Please consider Pinning it!!