
Banana Pudding Cheesecake Cones with Crunch Topping: My Chaotic, Delicious Guide
Listen, if you're after something low-key and delicate, this probably isn't it. But if you want an outrageous, creamy, just-a-bit messy dessert, you're in the right place. The first time I made these cones, my brother ate two before supper—didn't even look sheepish. And you know, as a kid, banana pudding was always the 'special occasion' dessert, so stuffing it in a waffle cone and giving it a cheesecake twist just felt... right. Also, apologies in advance for the sticky fingers.
Why You'll Love This (Or at Least Why My Family Does!)
I break these out for potlucks, birthdays, or when it's just too hot to bake a real cheesecake. My family goes bananas—ha, sorry—for these cones because they're handheld and ridiculously creamy. (Plus, they're a sneaky way to use up bananas that are this close to compost.) Honestly, the only frustrating part is waiting for the filling to chill. Oh, and if you’ve ever ended up with soggy cones, trust me, I’ve been there—got the T-shirt and all. But we’ll dodge that pitfall.
What You'll Need (And What You Can Swap)
- 6-8 waffle cones – Sugar cones work in a pinch. My neighbor swears by those bulk packs from Aldi.
- 1 (8 oz) block cream cheese – Softened. Sometimes I use Neufchâtel if I’m feeling virtuous (spoiler: you can’t tell).
- 1 cup cold heavy cream – Or you could try Cool Whip; my aunt loves it but I think homemade is worth the effort.
- 1 box (3.4 oz) instant banana pudding mix – Vanilla pudding works, but you lose that banana oomph.
- ½ cup sweetened condensed milk – If you like it less sweet, use a bit less, but I like to go all out.
- ½ teaspoon vanilla extract – My grandmother insisted on the real stuff, but honestly, the store brand does the trick.
- 2 ripe bananas – Not the green ones, please. If they’re getting brown spots, you’re golden.
- Nilla wafers (about 1 cup, crushed) – Graham crackers also work. One time I used shortbread cookies... regret.
- 2 tablespoon melted butter – For that crunch magic. Salted or unsalted, doesn’t matter much here.
- Optional: Chocolate chips, sprinkles, or chopped nuts – I sometimes toss in a handful of pecans just because.
How To Make It (Honestly, It's Harder to Write Than to Do)
- Mix the Crunch Topping: In a bowl, smoosh together the crushed Nilla wafers and melted butter. I use my hands because—why not? If it clumps, that’s perfect. Set it aside. (Try not to eat it all before assembly. I never succeed.)
- Make the Cheesecake Filling: In a big bowl, beat the softened cream cheese until it’s smooth. No lumps if you can help it. Add the condensed milk, pudding mix, and vanilla. Beat again. This is where I usually sneak a taste—just to make sure it’s, you know, edible.
- Whip the Cream: In another bowl, whip the heavy cream until you get soft peaks. You can use a mixer or, if you’re feeling bold, a whisk and some elbow grease. Fold this fluffy stuff gently into the cream cheese mixture. Don’t over-mix, or you’ll lose that cloud-like texture.
- Add Bananas: Slice the bananas fairly thin and fold them in—careful, or you’ll mash them into oblivion. (Not the worst thing, but chunks are nice.)
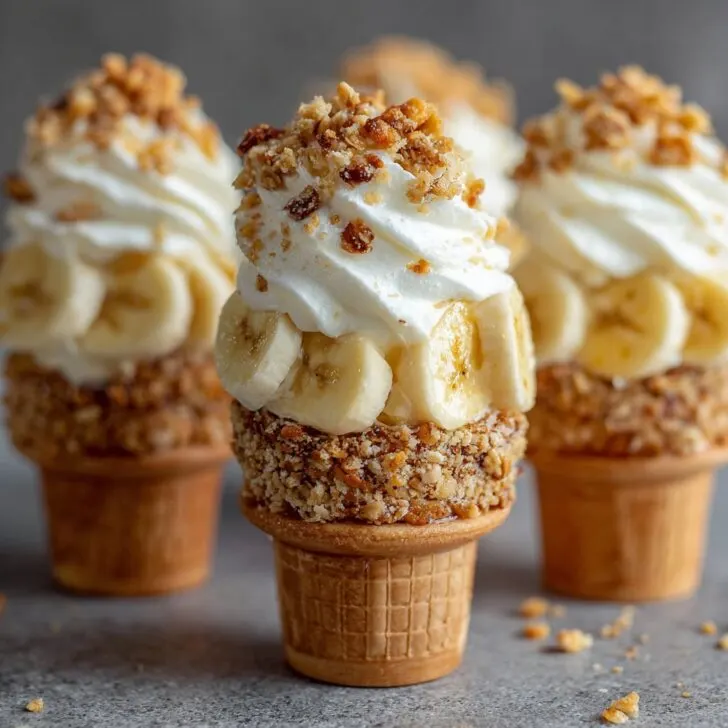
- Assembly Time: Spoon or pipe a bit of the cheesecake filling into each cone, then sprinkle in a little crunch topping, then more filling, then more crunch. Layer it up! I like to finish with a dramatic pile of crunch on top because, well, why wouldn't you?
- Chill: This is the hardest part. Stick the cones in the fridge for at least an hour to set. If you can manage overnight, even better. But honestly, they’re pretty irresistible right away, just a little softer.
Notes (aka Lessons Learned the Hard Way)
- If your bananas are too mushy, the filling can get a bit runny. On second thought, I like it a bit messy—but if you don’t, try firmer bananas.
- I once tried using chocolate cones. Not bad, but kinda overpowered the banana flavor. Just saying.
- If your cones seem wobbly, prop them up in a tall glass or mug while you fill them.
Variations (Some Worked, Some... Not So Much)
- Mini cones for parties—adorable, but honestly more fiddly than they’re worth.
- Adding a swirl of peanut butter in the filling. Pretty good, but not everyone’s cup of tea.
- Tried coconut flakes in the crunch—tasted weird (maybe I used the wrong kind?). Not doing that again.
Equipment Stuff (And What to Do if You Don't Have It)
- A hand mixer makes life easier, but I’ve used a big sturdy spoon when my mixer was on the fritz. Takes longer, arms get sore, but hey—it works.
- Piping bags look fancy, but a zip-top bag with the corner snipped off is just as good. Or just use a spoon and embrace the rustic vibe.


How to Store (If They Last That Long)
Stick any leftovers (ha!) in the fridge, cone-side up in a glass or muffin tin. Best eaten within a day or two—the cones do go a bit soft after a while, though honestly, in my house, there’s never any left past breakfast.
How I Serve 'Em (And You Should, Too... Or Not)
I usually plop them on a big tray and let everyone grab their own, but my cousin insists they’re best with a little drizzle of caramel. Sometimes, for birthdays, I add a candle in one cone just for laughs. Makes a fun photo for the family group chat, too.
Pro Tips (Because I've Definitely Messed These Up Before)
- Don’t rush the chilling step. I tried serving them straight away once and the filling just ran out the bottom. Not cute.
- If you’re making them ahead, line the inside of the cone with a little melted chocolate to keep them crisp longer. Actually, I find it works better if you let the chocolate cool before filling.
FAQs: People Actually Ask Me These
- Can I make these gluten-free? Yep! Use gluten-free cones and cookies for the crunch. There’s some decent options—check out Celiac.com for brands.
- What if I don’t have instant pudding mix? You can use homemade banana pudding, but it takes longer. I’ve used Sally’s recipe and it’s great.
- Why is my filling lumpy? Your cream cheese probably wasn’t soft enough—happened to me last time I forgot to take it out early. Pop it in the microwave a sec (without the wrapper!).
- Can I freeze these? I mean… technically yes, but the cones get weirdly chewy. Not my favorite texture, but you do you.
- Help! My cones are soggy! Next time, try lining them with chocolate, or just eat them faster—problem solved, haha!
And there you go—Banana Pudding Cheesecake Cones with Crunch Topping! Honestly, I think they taste even better the next day (if you can wait that long), but that's just me. If you give it a go, let me know how it turns out—or if you have any wild add-ins I should try. Oh, and if you want to get really fancy, check out this homemade waffle cone recipe—I tried it once, and while it was a bit of a faff, it did taste amazing. Cheers, and happy snacking!


Ingredients
- 6 waffle cones
- 8 oz cream cheese, softened
- 1 cup heavy whipping cream
- ½ cup granulated sugar
- 1 package (3.4 oz) instant banana pudding mix
- 1 cup cold milk
- 1 cup vanilla wafer cookies, crushed
- 2 tablespoons unsalted butter, melted
- 1 ripe banana, sliced
- ½ teaspoon vanilla extract
Instructions
-
1In a medium bowl, beat the softened cream cheese and granulated sugar until smooth and creamy.
-
2In a separate bowl, whisk together the instant banana pudding mix and cold milk until thickened. Fold the pudding into the cream cheese mixture.
-
3In another bowl, whip the heavy cream and vanilla extract until stiff peaks form. Gently fold the whipped cream into the banana cheesecake mixture.
-
4Prepare the crunch topping by combining crushed vanilla wafer cookies with melted butter. Mix until the crumbs are evenly coated.
-
5Spoon or pipe the banana cheesecake filling into each waffle cone. Top with banana slices and sprinkle generously with the crunch topping.
-
6Serve immediately for a crisp cone, or chill for 15 minutes for a firmer filling.
Approximate Information for One Serving
Nutrition Disclaimers
Number of total servings shown is approximate. Actual number of servings will depend on your preferred portion sizes.
Nutritional values shown are general guidelines and reflect information for 1 serving using the ingredients listed, not including any optional ingredients. Actual macros may vary slightly depending on specific brands and types of ingredients used.
To determine the weight of one serving, prepare the recipe as instructed. Weigh the finished recipe, then divide the weight of the finished recipe (not including the weight of the container the food is in) by the desired number of servings. Result will be the weight of one serving.
Did you make this recipe?
Please consider Pinning it!!