
Let Me Tell You About Banana Pudding Cheesecake Cones
So, I sort of stumbled on this idea one lazy Saturday when I was craving banana pudding and something with a little crunch. (Yeah, indecision is my superpower.) I remembered the way my aunt used to serve banana pudding in giant bowls at family picnics—layers of banana, pudding, vanilla wafers, the whole show. But cones? That’s my little twist, and let me just say, the first time I tried it, my kitchen was a total mess, but my mood was off the charts. Even my brother, who claims he doesn’t “do” sweets, snuck back for seconds. If that’s not a win, I don’t know what is. Also, side tangent: I once dropped half a cone on my sock, so maybe don’t eat these walking around. Unless you want banana-scented feet (which, now that I think about it, isn’t the worst fate).
Why You’ll Totally Love This (and Maybe Crave More)
I usually whip these up when I’m in need of a quick party trick. My neighbors still ask about "those crazy cones" from last summer’s barbecue. Honestly, the best part is they look fancy, but you don’t need any wild skills. (Though, if your cones tip over in the fridge, join the club.) It’s also brilliant for picky kids, because who doesn’t love eating dessert form a cone? Sometimes I make a batch just because it’s Tuesday and I want to feel a bit fancy. Oh, and if you’ve ever battled lumpy pudding—been there—I’ve found a workaround below.
Gather Your Ingredients (But Substitute Freely!)
- 8 waffle cones (though sugar cones work in a pinch; I’ve even used those little cups when desperate)
- 1 cup heavy cream (or honestly, cool whip if you’re in a rush—my sister swears by it)
- 8oz cream cheese, softened (I usually go with Philadelphia, but my grandma always said store-brand tastes the same. She wasn’t wrong!)
- 1 box instant banana pudding mix (3.4 oz)
- 1 ½ cups cold milk (whole milk is best, but I’ve used 2 percent, and it’s fine)
- 2–3 bananas, sliced (choose ripe but not mushy; I learned that the hard way)
- 1 cup vanilla wafers, crushed (graham crackers work too, in a pinch)
- ¼ cup powdered sugar (sometimes I go a bit heavier if I want it really sweet)
- Optional: caramel sauce, chocolate chips, or a handful of chopped pecans for topping
How I Build These Cones (With a Few Distractions Along the Way)
- First, make the cheesecake filling: Beat the cream cheese and powdered sugar together in a bowl until creamy. I usually let the mixer run while I pick banana slices off the counter (my toddler is a thief).
- In a separate bowl, whip the heavy cream until it holds stiff peaks. Or, just fold in your cool whip—no shame in shortcuts.
- Mix the instant banana pudding and cold milk in another bowl. I always get tempted to taste-test here (and sometimes, I do). Let it sit a couple minutes so it thickens up nicely.
- Combine the cream cheese mixture with the pudding; fold in the whipped cream. Don’t overmix—just enough to look smooth. If it looks a little lumpy, don’t panic; it evens out in the cone.
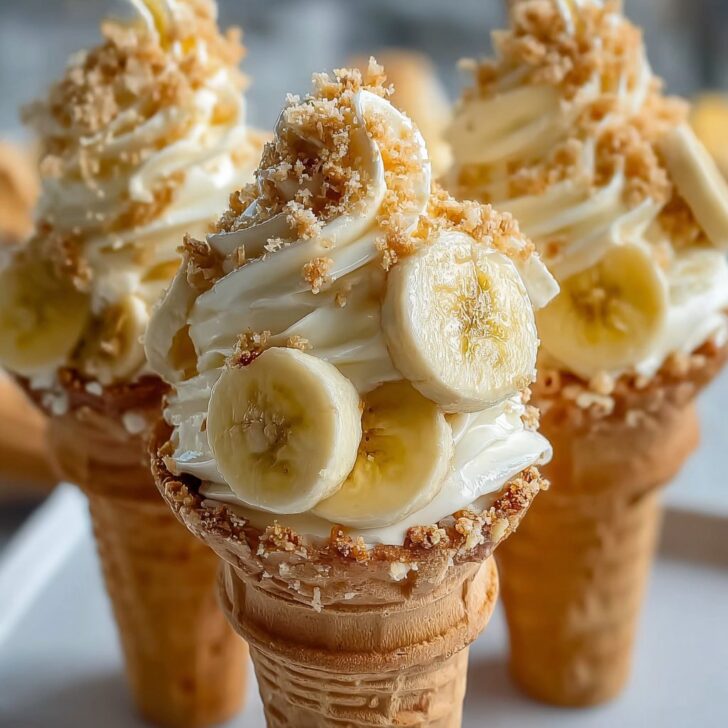
- Take your cones and layer in a scoop of the cheesecake mixture, then banana slices, then some crushed wafers. Repeat if you’ve got room—sometimes I get carried away and overfill by accident. (Messy but delicious!)
- Top with more wafers and whatever fun toppings you want. Caramel drizzle makes these next-level. Then, into the fridge for 30 minutes or so. If you can wait that long. I usually can’t.
Notes from My Many Attempts (Some More Successful Than Others)
- If the cones sit too long, they get a bit soggy. Still tasty, just a different vibe.
- Actually, I find it works better if you chill the filling before stuffing the cones. Less drippy!
- One time I tried using those tiny ice cream cones; cute but way too small. You want enough space for layers.
Random Variations I’ve Tried (Some Winners, One Not So Much)
- Chocolate cones instead of plain—adds a whole new flavor, in a good way.
- Peanut butter chips in the filling (my youngest liked it; my partner didn’t, so go figure)
- Attempted coconut pudding once—too weird for me, but maybe you’ll love it?
What If You Don’t Have Fancy Equipment?
All you really need is a couple mixing bowls and a hand mixer. If you don’t have a piping bag, just snip the corner off a plastic sandwich bag. Or embrace the chaos and use a spoon. No judgement here. I hardly ever pipe anything neatly, anyway.


Keeping Them Fresh (But Who Am I Kidding?)
Okay, technically you can keep these in the fridge (upright, if possible) for about 24 hours. After that, the cones start to get soft. But honestly, in my house, these are gone before breakfast the next day. If you want to make them ahead, keep the filling and cones separate, then assemble right before serving. That’s what I do if I’m actually organized, which isn’t often.
How I Like to Serve Them (And a Family Quirk)
I always serve these on a big platter with extra banana slices and crushed wafers scattered around—looks fancier than it is. My cousin dunks her cone in hot chocolate (don’t ask, but it’s surprisingly good). For a grown-up twist, I’ve drizzled a little bourbon caramel on top once or twice. Saturdays only, though.
Lessons I Learned the Hard Way (Pro Tips, Honest)
- Don’t skip chilling the filling; I rushed it once and ended up with banana lava pouring out the cone. Not fun to clean.
- Bananas can brown fast—brush with lemon juice if you want them to look pretty. Or just embrace the brown; it all tastes the same.
- If you use store-brand cones, check for cracks—learned that the hard way carrying a tray outside.
FAQ: Questions People Actually Ask Me
- Can I make these with gluten-free cones? Yep! I’ve tried this recipe on Serious Eats—works great.
- Can I freeze the cones? Probably not worth it; the cones get weird and chewy. Maybe just freeze the filling instead.
- What if I don’t like banana? Use vanilla or even chocolate pudding. It’s your party.
- How do I make these look fancy? If you want to impress, try a swirl of whipped cream on top. Or check out some ideas at SugarHero (her cones are wild!).
- Is this better the next day? I tend to think so, if you keep the cones separate from the filling till serving—otherwise, sog city.
- Do I have to use pudding mix? Nope. Homemade pudding’s great, but who has the time? (If you do, teach me your ways.)
Okay, I’ll stop rambling. Seriously, try these Banana Pudding Cheesecake Cones—or just mash up whatever snack you love into a cone and claim it’s a family tradition. That’s what I do. Enjoy!


Ingredients
- 6 waffle cones
- 1 cup cream cheese, softened
- 1 cup heavy whipping cream
- ½ cup granulated sugar
- 1 package (3.4 oz) instant banana pudding mix
- 1 cup cold milk
- 2 ripe bananas, sliced
- 1 cup vanilla wafer cookies, crushed
- 1 teaspoon vanilla extract
Instructions
-
1In a large bowl, beat the softened cream cheese and granulated sugar together until smooth and creamy.
-
2In a separate bowl, whisk together the instant banana pudding mix and cold milk until thickened, about 2 minutes.
-
3Fold the banana pudding into the cream cheese mixture, then add vanilla extract and mix until well combined.
-
4In another bowl, whip the heavy cream until stiff peaks form, then gently fold into the banana pudding cheesecake mixture.
-
5Spoon or pipe the cheesecake filling into each waffle cone. Layer with banana slices and crushed vanilla wafer cookies.
-
6Garnish the tops with extra banana slices and cookie crumbs. Serve immediately or chill for up to 1 hour before serving.
Approximate Information for One Serving
Nutrition Disclaimers
Number of total servings shown is approximate. Actual number of servings will depend on your preferred portion sizes.
Nutritional values shown are general guidelines and reflect information for 1 serving using the ingredients listed, not including any optional ingredients. Actual macros may vary slightly depending on specific brands and types of ingredients used.
To determine the weight of one serving, prepare the recipe as instructed. Weigh the finished recipe, then divide the weight of the finished recipe (not including the weight of the container the food is in) by the desired number of servings. Result will be the weight of one serving.
Did you make this recipe?
Please consider Pinning it!!