
Remind Me Why I Love Making This Again?
Alright, so baked cauliflower. If you’d told 12-year-old me I’d be roasting veggie trees for fun and liking it, I’d have laughed my head off and reached for chips instead (who wouldn’t?). But one evening, years back, all that changed—I was staying at my mate’s flat in Brighton, fridge pretty much empty except for half a sorry-looking cauliflower and not much else. We winged it, baked it with whatever we could find, and somehow, it turned out epic. Been making it ever since, sometimes even on purpose!
Honestly, whenever I want something a bit cozy but not too much fuss—yeah, this is the trick. Plus, you get that feeling like you’re eating proper food, not just snacking. And trust me, my partner is convinced I’m hiding a secret because they swear mine turns out crispier than anyone’s. (Not true. It just never leaves the oven early—because I’m usually distracted until the timer practically yells at me.)
Why I Keep Coming Back to Baked Cauliflower
I make this when I’ve got a cauliflower loitering near the back of the fridge giving me a guilty look, honestly. My family goes a bit wild for it, especially when I throw in extra garlic—my brother-in-law basically hoovers it up, which is the only time I’ve ever seen him eat a vegetable willingly. And if I’m in a rush, I just chop it rough; sometimes the messy bits crisp up best. Last week I forgot the paprika and, you know what, it still knocked socks off the usual steamed stuff (which, let’s face it, is a bit sad sometimes).
What You’ll Need (But Mix It Up If You Like)
- 1 big head of cauliflower (or two small ones—doesn’t matter, really)
- 2–3 tablespoons of olive oil (I use extra virgin but bog standard does fine)
- 1 teaspoon garlic powder (real garlicky flavour but I’ll use fresh when I’m feeling fancy or can be bothered to chop)
- 1 teaspoon smoked paprika (or normal, or skip it entirely—my mate prefers curry powder)
- Salt and pepper—to taste, obviously. My grandmother always insisted on that flaky Maldon stuff, but table salt is what I reach for when I’m not showing off
- Optional extras: A squeeze of lemon, a handful of grated parmesan (I sometimes swap for nutritional yeast if I’m feeling a bit vegan-curious), chili flakes, dried herbs. Raid the cupboard.
Here’s How You Actually Make It (In My Kitchen)
- Heat your oven up—200°C (about 400°F, if you use those old school numbers). Line a baking tray with parchment or foil, unless you like scrubbing pans. I don’t.
- Break the cauliflower up into bite-sized florets. Don’t be precious; just get it done. Sometimes I leave the leaves in, chop them up, and toss them on too (they go crispy like kale chips!).
- Toss it all into a big ol’ bowl, drizzle over the olive oil. Sprinkle the garlic powder, paprika, salt, pepper—whatever else your heart (or spice cupboard) desires. Get your hands in. Mix it up for real; don’t let those florets hog all the oil in one spot.
- Spread the lot out on your tray—a single layer is best so it all crisps (well, maybe except the edges, but those are chef’s treat).
- Bake for 25–30 mins. At about 20 mins, I peek in and give it a wobble. Don’t worry if it’s a bit uneven—those toasted brown bits are the best.
And this is when I usually sneak a hot piece because self-control is for other people. - If you’re adding parmesan or anything like that, maybe try tossing it on for the last 5 mins. Makes it extra golden (and the scent—it’s ridiculous).
- Pull the tray out. Squeeze over lemon, scatter herbs... or don’t. Up to you.
Notes From Too Many Batches
- If you crowd the tray too much, it’ll steam instead of crisp. Learned that the soggy way, more than once.
- Sometimes I prep this in the morning and forget it till dinner—marinates in its own oil and spices. Tastes even better, but don’t stress. Works either way.
- For what it’s worth, big chunks always take longer, so chop small if you’re impatient like me.
Ways I’ve Messed With This (Some Hits, Some Misses)
- I tried adding panko crumbs once—lovely crunch, but they burn if you’re not watching like a hawk. Proceed with caution or just embrace the slightly charred bits.
- Threw in some curry powder instead of paprika—unexpectedly perfect, especially with a dollop of yogurt on the side.
- One time I poured balsamic on before baking... bit weird, honestly. Better to just drizzle after.
Gear You’ll Probably Use (And What If You Don’t Have It?)
- Baking tray—though honestly, I’ve used the bottom of my grill pan before, lined with foil. Worked a treat (if a bit dodgy looking).
- Mixing bowl—A big Tupperware or even a clean salad spinner will do in a pinch. Actually, sometimes I just toss everything straight on the tray. Less washing up—who’s complaining?
- Good sharp knife. Or that slightly blunt one everyone’s got (just be careful, obviously).


But What If There’s Leftovers? (Ha!)
Store any extra baked cauliflower in an airtight container in the fridge—it’ll keep for 2 or 3 days (though honestly, in my house it never lasts longer than a day; it just...disappears). I think it even tastes better cold, especially tossed in a salad the next day. If I bother heating it up, a dash under the broiler or air fryer crisps it back up.
How I Like to Serve This
This is a bit of a family thing—I love piling it on a platter next to roast chicken or just shoving it into a pitta with hummus (don’t knock it ‘til you try it). Sometimes it’s just me and Netflix and a tray of cauliflower, eaten with my fingers because, why not?
I saw someone once drizzle tahini and pomegranate over the top for a dinner party—looked so posh. I only tried it once; maybe I’ll give it another go at Christmas.
Looking Back: What I’ve Learned the Hard Way
- If you rush the bake and pull it out too early, it just tastes...meh. I once did this for guests and had to pretend it was “meant to be softer.” Not fooling anyone.
- Don’t overdo the oil. It goes greasy fast. Less is (sometimes) more.
- Actually, I find it works better if you don’t skip turning the florets at least once midway through. On second thought, if you don’t care about perfect crispiness, just leave them be.
Questions I Actually Get About Baked Cauliflower
- Can you freeze it? Erm, yeah... but it comes out a bit gummy in my experience. Not the best, but if you’re desperate, go for it. Try reheating in the oven not the microwave (lesson learned...)
- What if my oven’s a bit rubbish? Not to worry, mate. Just crank up the heat a touch or give it a bit longer. Every oven I've had seems to have a mind of it’s own, so keep an eye on things after 20 min.
- Can I make it ahead for parties? Yep! Prep everything, stash it in the fridge, and bake when you're ready. Though, it's best hot and fresh—it just is.
- Do I have to use oil? Well, that’s where the magic crispiness happens (mostly), but I’ve tried it with a spray and it kinda works. Wouldn’t serve it to my pickiest mate though.
- Where can I find more ideas? Try Bon Appétit’s method or have a gander at this Cookie & Kate recipe—pretty sure they don’t burn it as often as I do.
Sometimes I think I’ll branch out and try something fancier than cauliflower, but honestly, this one just fits the bill every time. Oh, that reminds me—did you know you can pickle the stalks? Saved me from binning them and gave a weirdly delicious snack for later. Anyway, that’s a story for another day.


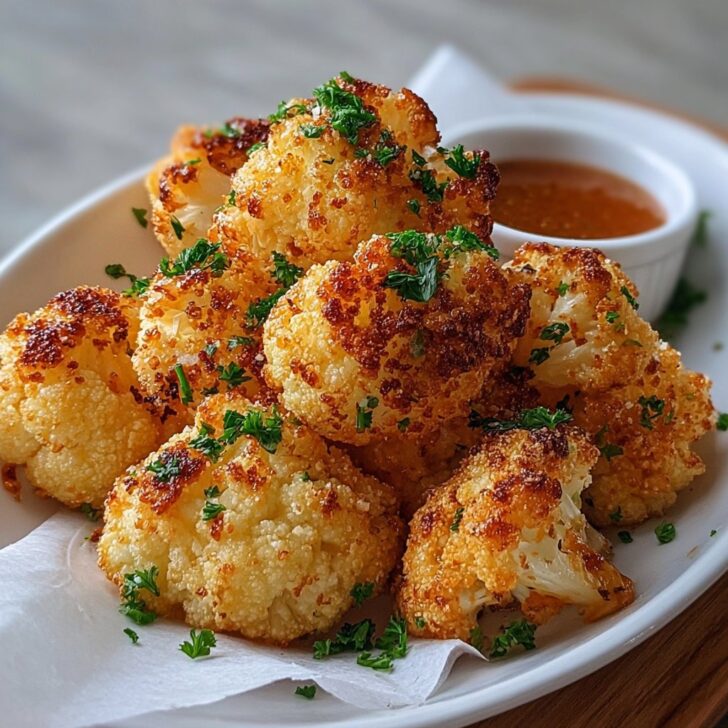
Ingredients
- 1 large head of cauliflower, cut into florets
- 2 tablespoons olive oil
- 1 teaspoon garlic powder
- 1 teaspoon smoked paprika
- ½ teaspoon salt
- ½ teaspoon black pepper
- ¼ cup grated Parmesan cheese
- 2 tablespoons fresh parsley, chopped
Instructions
-
1Preheat the oven to 400°F (200°C). Line a baking sheet with parchment paper.
-
2In a large bowl, toss the cauliflower florets with olive oil, garlic powder, smoked paprika, salt, and black pepper until evenly coated.
-
3Spread the cauliflower evenly on the prepared baking sheet in a single layer.
-
4Bake in the preheated oven for 25 minutes, stirring halfway through for even roasting.
-
5Remove from the oven, sprinkle with grated Parmesan cheese, and return to the oven for an additional 10 minutes until golden and crisp.
-
6Garnish with fresh parsley before serving. Enjoy hot as a side or main dish.
Approximate Information for One Serving
Nutrition Disclaimers
Number of total servings shown is approximate. Actual number of servings will depend on your preferred portion sizes.
Nutritional values shown are general guidelines and reflect information for 1 serving using the ingredients listed, not including any optional ingredients. Actual macros may vary slightly depending on specific brands and types of ingredients used.
To determine the weight of one serving, prepare the recipe as instructed. Weigh the finished recipe, then divide the weight of the finished recipe (not including the weight of the container the food is in) by the desired number of servings. Result will be the weight of one serving.
Did you make this recipe?
Please consider Pinning it!!