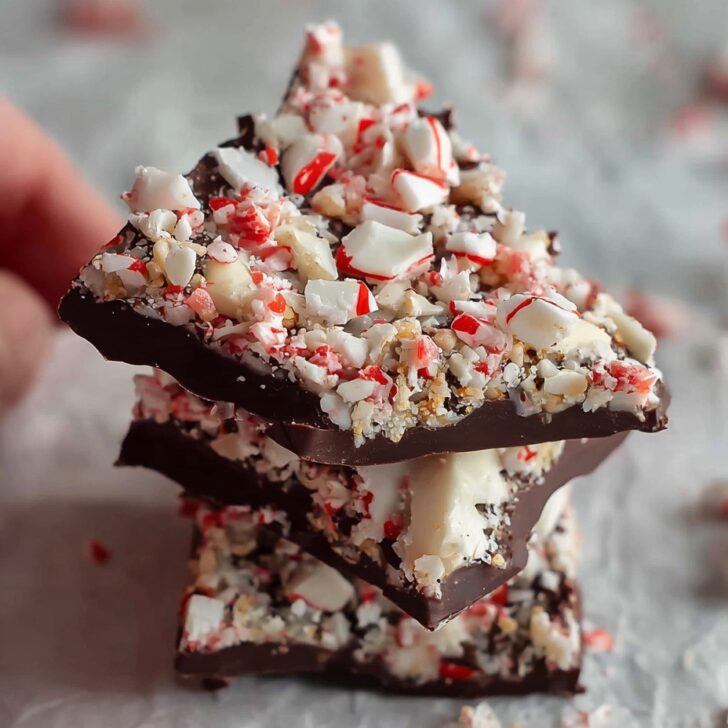

Let's Chat About These Bars First
Okay, so you know those afternoons when it’s cold outside and you just want to make something sweet, but not the kind of thing that turns your kitchen into a disaster zone? Yup, that’s when I reach for my Peppermint Crunch Chocolate Bars recipe. Honestly, my first go at these was a total mess—there were chocolate handprints everywhere—but the taste made up for it. Fair warning: I sometimes make these just because I love smashing up the candy canes. My nephew calls it “peppermint therapy.” Also, fair warning #2: if you manage to keep a batch hidden, the stealth skills in your house are Olympic level compared to mine.
Why I'm Slightly Obsessed (and You Might Be Too)
I make these bars when—I kid you not—it's the only way I can trick my family into eating mint. Even my mom, who's super picky, gobbles these up (she swears she ‘doesn’t like mint’ but honestly, she just doesn’t like cleaning up the crumbs). My family goes crazy for this because it’s got that wintery snap from the peppermint, but the chocolate makes it comforting. Plus, I’ve learned to accept the crushed candy mess as part of the process—kind of like confetti, but stickier.
Also, the only "hard" part is waiting for them to set, which used to drive me bananas, but now I just go watch a British baking show for inspiration and the time flies.
The List (aka What You'll Need—Swap as Needed)
- 2 cups semisweet chocolate chips (I’ve used dark in a pinch, or even milk chocolate chips when I "ran out")
- ½ cup unsalted butter (I’ve totally gotten away with margarine, so don’t stress)
- 1 cup crushed peppermint candies or candy canes (I sometimes use a store brand, my gran swore by Brach’s but honestly, whatever’s cheapest works fine)
- ⅓ cup sweetened condensed milk (or, if you’re like me and run out, try evaporated milk plus a spoonful of sugar—it’s not perfect, but hey, it works)
- 1 teaspoon vanilla extract (those little cheap bottles at the supermarket are just fine in my experience)
- ½ cup crushed chocolate cookies—Oreos, digestive biscuits, whatever’s lurking in your pantry
- Pinch of flaky salt (my new favorite thing—I didn’t bother for years, but it really does something magic)
How I Fumble Through Making Them
- Line an 8x8 inch pan with parchment. (Or just butter the heck out of whatever dish you have. Sometimes the bars stick, but I just scrape those bits out and eat 'em warm. Nobody sees those.)
- Melt the chocolate chips and butter together in a saucepan over low heat. Stir so it doesn’t burn at the bottom. (Actually, I tried the microwave once—worked fine, but keep your eye on it, or it’ll go grainy in a blink.)
- Stir in the vanilla and condensed milk. It might look a bit odd at first—almost... gloopy? That’s totally normal. Though, if it smells off, check your milk; learned this the, err, weird way.
- Add most of the crushed peppermint and all the cookie crumbs. (Keep a couple tablespoons of peppermint aside for the top, if you fancy!) I honestly just dump it and stir. No need for fancy spatulas—unless you’re feeling posh.
- Spread the mixture into your pan, pressing it into all the corners. It’ll be thick, so use the back of a spoon and a bit of elbow grease.
- Sprinkle the leftover peppermint on top, plus a pinch of salt if you’re trying to impress someone.
- Refrigerate for at least two hours. (Okay, here’s where I’ll admit: sometimes I only wait one. They still taste great, just a little soft.)
- Slice up and marvel. This is when I ‘accidentally’ eat all the ragged edge pieces because they’re not photogenic enough, right?
Bits and Bobs That Actually Matter
- I thought melting chocolate was a science. Turns out, not really. Just stir, keep it low, don’t wander off to scroll on your phone for ages—unless you like finding out what burnt chocolate smells like.
- Don’t bother crushing candies to dust—I love some bigger chunks for the crunch, but you do you.
- Cut with a warm knife. (Not strictly necessary, but it makes things easier when the bars are cold. Mostly I just can’t find a sharp one and end up hacking away anyway.)
Variations Worth Mentioning (and My Failures)
- Tried adding a thin layer of melted white chocolate once for a pretty swirl—looked impressive (in a wonky sort of way).
- Swapped out the peppermint for toffee bits—very sweet, but actually quite good. My friend Jen still prefers the original though.
- I once added mini marshmallows. It sounded fun in my head, was pretty much a gooey trainwreck in practice. Wouldn’t recommend unless you like things glued to your teeth for hours.
What You'll Need (or Improvise, Like Me)
- 8x8 inch baking pan (if you only have a loaf tin, just use that; the bars will be taller and slightly odd—or, do as my uncle does, just plop dollops onto parchment and call them “bark”)
- Parchment paper (or lots of butter)
- Saucepan and spoon (I used a nonstick the first time—clean up was a dream)
- Big knife for slicing, or even a pizza cutter, believe it or not


How to (Attempt to) Make Them Last
Store in an airtight container in the fridge. Technically they’ll keep for a week, but truthfully, I’ve never seen them survive a day here. If you do, well, you have more willpower than me.
In summer, don’t leave 'em out for long, especially if your kitchen is anything like my sweatbox flat. Melty bars and sticky counters everywhere!
How I Like to Serve These (and You Might Too)
I’m partial to snacking straight out of the fridge (cold chocolate just hits different, right?). But at Christmas, we pile them alongside other nibbles like ginger molasses cookies—plus, with a big mug of hot chocolate, it’s sublime.
For a not-too-sweet treat, I sometimes crumble a bar over ice cream. My sister calls that ‘extra’ but whatever, she eats two anyway.
Little Lessons From My (Occasional) Mistakes
- I once tried to speed up the cooling in the freezer—don't; the chocolate goes weird-textured. (Still edible. Just... not pretty.)
- Let the bars sit five minutes after taking out of the fridge, they slice easier—unless you’ve remembered them halfway through a movie, in which case, just eat the chunk and call it rustic, right?
- Don’t worry if the mix looks weird before chilling. First time, I nearly threw it out, but it comes right after it firms up.
People Have Actually Asked Me This—FAQ
- Can I use peppermint extract instead of candy? Sure! Just add ½ teaspoon to the mix, but skip adding much more or you'll feel like you're eating toothpaste (learned this the hard way!).
- My chocolate seized. Can I save it? Oh, buddy, we've all been there. Try adding a bit more butter and warming slowly. Or just start over—sometimes you gotta cut your losses.
- Do these freeze well? They do, but they get a little frosty. I think they taste better the next day after just chilling in the fridge.
- Can kids help make these? Yep! Crushing the peppermint is everyone's favorite part. There will be a stuck rolling pin, though, just accept it as your destiny.
- I’m allergic to peppermint. What else works? Swap in orange zest and a splash of orange extract—it’s basically a whole new dessert, but equally addictive.
Totally unrelated: does anyone else get lost in kitchen supply stores and come out with three spatulas and a new coffee mug? Just me? Anyway, happy crunching, and let me know if you try these—feedback (even the "it stuck to my teeth" kind) makes my day.


Ingredients
- 1 cup semi-sweet chocolate chips
- ½ cup unsalted butter, melted
- 1 cup granulated sugar
- 2 large eggs
- 1 teaspoon pure vanilla extract
- ¾ cup all-purpose flour
- ¼ teaspoon salt
- ½ cup crushed peppermint candies
- ½ cup white chocolate chips
Instructions
-
1Preheat the oven to 350°F (175°C). Line an 8x8-inch baking pan with parchment paper.
-
2In a large bowl, mix melted butter and sugar until combined. Add eggs and vanilla extract; whisk until smooth.
-
3Stir in flour and salt until just incorporated. Fold in semi-sweet chocolate chips.
-
4Spread the batter evenly into the prepared pan. Sprinkle white chocolate chips and crushed peppermint candies over the top.
-
5Bake for 25 minutes, or until a toothpick inserted into the center comes out with a few moist crumbs. Let cool completely in the pan, then lift out and cut into bars.
Approximate Information for One Serving
Nutrition Disclaimers
Number of total servings shown is approximate. Actual number of servings will depend on your preferred portion sizes.
Nutritional values shown are general guidelines and reflect information for 1 serving using the ingredients listed, not including any optional ingredients. Actual macros may vary slightly depending on specific brands and types of ingredients used.
To determine the weight of one serving, prepare the recipe as instructed. Weigh the finished recipe, then divide the weight of the finished recipe (not including the weight of the container the food is in) by the desired number of servings. Result will be the weight of one serving.
Did you make this recipe?
Please consider Pinning it!!