
Let Me Tell You About These Enchiladas (Pull Up a Chair)
So, white chicken enchiladas. Honestly, I started making these back in college when I was broke and very hungry, but also wanted something that tasted like home (and, let’s be real, looked halfway decent on Instagram). My first attempt was a, um, saucy disaster—like, the tortillas totally fell apart and I was scraping the gooey bits straight form the pan. But it still tasted pretty amazing. Now, whenever my cousin swings by, she expects these enchiladas, and I swear if I serve anything else she gives me that look.
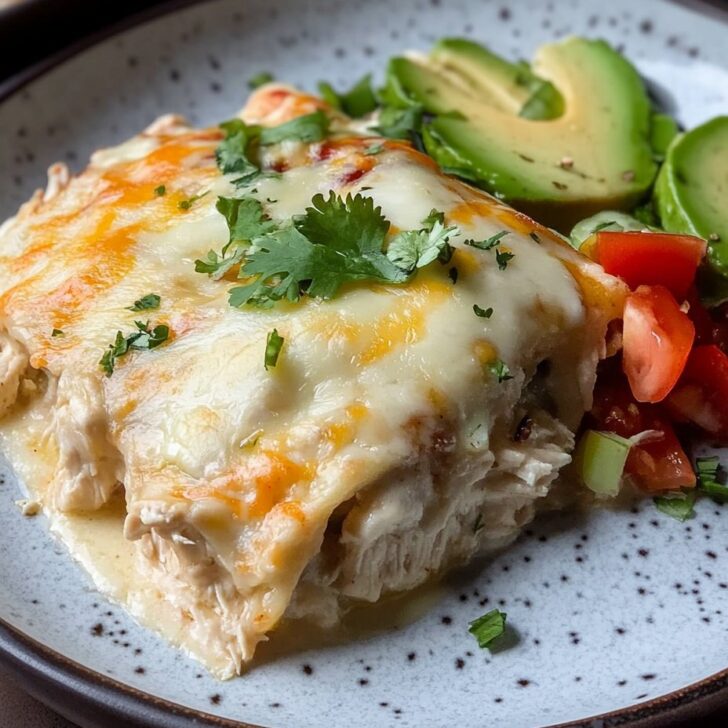
There’s just something about the combo of creamy sauce, tender chicken, and cheesy, bubbly top that feels like a big old edible hug. Also, pro tip: this is a great dish for using up random leftovers (once I accidentally used leftover rotisserie turkey, and it was... not bad, actually).
Why I Keep Coming Back to This Recipe
I make these white chicken enchiladas when I want everyone at the table to just shut up and eat, which, in my house, is rare. My family goes mad for these, especially when I make the sauce extra creamy. Bonus: the leftovers taste even better the next day—although, to be honest, there are rarely any leftovers. (I used to get frustrated with the tortillas soaking up ALL the sauce, but actually, I’ve come to love the soggier bits.)
And if you’re hosting? People always ask for the recipe, which is nice, except when I forget what tweaks I made and just stare at them blankly. Oops.
What You’ll Need (and What I Sometimes Swap)
- 2 cups cooked chicken, shredded (Sometimes I just grab a rotisserie chicken from the shop. Or, in a pinch, I’ve used canned chicken—don’t tell my mom!)
- 8-10 flour tortillas (My grandmother always insisted on Mission brand, but honestly, any soft flour tortilla does the job. Corn tortillas work if you want more texture, but they do tend to break apart.)
- 2 cups shredded cheese (Monterey Jack is classic, but I’ve used cheddar, mozzarella, or even that bag of "Mexican blend" when that’s all I had)
- 3 tablespoons butter
- 3 tablespoons flour
- 2 cups chicken broth (I usually use the powdered stock cubes and hot water—works fine)
- 1 cup sour cream (Greek yogurt in a pinch, but it’s tangier)
- 1 small can diced green chiles (optional, but I love them for a little kick)
- Salt and pepper
- Chopped cilantro or green onions for topping (if you happen to have some lingering in the fridge—they make it look fancier, I reckon)
How I Actually Throw This Together
- Preheat your oven to 180°C/350°F. I usually forget until I’m halfway through, so if you do too, no biggie—it just means dinner’s a bit slower.
- Grab a medium saucepan, melt the butter over medium heat. Stir in flour, and whisk for a minute or so until it’s bubbly (don’t let it brown, though). This is where I tend to get distracted by my phone, but try to keep an eye on it!
- Slowly whisk in the chicken broth. It’ll look thin at first—don’t worry, it thickens up. Cook for a few minutes, stirring pretty often. When it’s the consistency of, like, thin gravy, remove from heat.
- Stir in the sour cream and green chiles (if using). Mix until it’s all smooth-ish—sometimes I get impatient and there are a few lumps, but honestly, you won’t notice once it bakes.
- Spread a few spoonfuls of sauce in the bottom of a 9x13-inch baking dish. This keeps the tortillas from sticking and burning. Trust me, I learned the hard way.
- In a bowl (or right on the cutting board if you’re lazy, like me), toss together the shredded chicken and a handful of cheese. Add a little salt and pepper if you want.
- For each tortilla, scoop some chicken/cheese mix down the center, then roll it up. Place seam-side down in the dish. Repeat until everything’s packed in—squeeze them in like sardines, it’s fine.
- Pour the rest of your sauce all over the top. Sprinkle the remaining cheese everywhere. Be generous.
- Bake for about 25 minutes, or until the top is bubbly and maybe a little golden in spots. (This is where I usually sneak a taste of the crispy corner, and singe my tongue. Every. Single. Time.)
- Let it cool for a few minutes before serving, unless you like burning the roof of your mouth (I never learn).
Real-Life Notes You Should Know
- If your sauce looks kinda lumpy, don’t panic: it totally smooths out in the oven.
- I used to overload the filling, but then the tortillas burst open during baking—so, less is more (even though it’s tempting to go big).
- Sometimes the cheese on top separates a bit. It’s not broken, just...cheesy.
Stuff I’ve Tried (Some Good, Some Not So Much)
- Mushroom and spinach filling: actually delicious, especially for veggie friends.
- Using corn tortillas instead of flour: they fall apart, but the flavor’s great if you don’t mind a bit of a mess.
- Once I tried adding smoked paprika to the sauce—honestly, it overpowered everything. Won’t do that again!
What You’ll Need (and, Well, What You Don’t)
- Baking dish (9x13-inch is the usual, but I’ve jammed them into a round cake tin before when it was all I had—no shame)
- Saucepan & whisk (if you don’t have a whisk, a fork does the job—just takes longer, and you’ll get more of an arm workout)
- Mixing bowl or just a big plate for tossing the chicken and cheese, if you’re like me and hate extra washing up


Storing Your Leftovers (If Any Survive)
Pop them in an airtight container and stick them in the fridge. They’ll keep for a couple of days, but honestly, in my house, it never lasts more than a day! You can reheat in the oven or even in the microwave—just cover so they don’t dry out. I actually think these taste better the next day, but my brother disagrees (he's wrong, obviously).
Serving Ideas (From My Table to Yours)
I love these with a scoop of salsa (the fresh kind, like this) and a blob of guac. Sometimes I’ll add a side salad if I’m pretending to be healthy. On Taco Tuesdays, my family insists on tortilla chips on the side—go figure.
Things I’ve Messed Up (So You Don’t Have To)
- Don’t rush the sauce. I tried skipping the roux step once—just dumping everything in—and it was, uh, not my finest moment. Lumpy and weirdly floury. Take the extra five minutes, trust me.
- If you microwave the leftovers uncovered, they dry out and get chewy. Just drape a damp paper towel over them. Simple fix.
- On second thought, don't try to double the cheese inside the enchiladas; it makes the filling slide right out when you cut them. Learned that the messy way.
People Ask Me These All the Time
Can I make these ahead of time? Yep, totally. Prep them up to the baking stage, cover, and refrigerate. Bake when you’re ready (maybe add a few extra minutes if they’re cold from the fridge).
Can I freeze them? I’ve done it. Wrap tightly, freeze before baking, then bake from frozen—just expect it to take longer. (Check out these tips if you want specifics.)
Is there a gluten-free version? For sure! Use gluten-free tortillas and swap the flour for a GF blend or cornstarch. It’s not quite the same, but works in a pinch.
How spicy are these? Not very, unless you go wild with the chiles. My aunt adds a jalapeño or two when she’s feeling sassy.
Can I use a different meat? Oh, yeah—leftover turkey, pork, or even beef. I wouldn’t recommend fish, though. That didn’t end well (the less said, the better).
And, briefly: I had a friend ask if you could grill these instead of baking. Short answer: you could, but you're gonna have a rough time keeping them together. Stick to the oven, trust me.
So, that’s my honest take on white chicken enchiladas. If you make them and somehow manage leftovers, let me know your trick, because I still haven’t figured it out!