
These Turkey Stuffing Balls Always Steal the Show
I’ll tell you straight up: if there’s ever leftover stuffing after Thanksgiving or Christmas at my place, I get mean looks, because apparently it means I didn’t make enough. A few years back—feels like forever now—I started making Turkey stuffing Balls so everyone got more of that crispy, delicious edge (and nobody argues over the corner pieces). My cousin once tried to steal an extra ball off my plate, and I’m only half joking when I say it nearly started a tiny family war. Food brings people together, but in my house, good stuffing balls can start a playful scuffle or two!
Why I Keep Coming Back to These
I make this when I’m low on time but want it to look (and smell!) like I really fussed. My family goes crazy for these because they’re easy to grab—no carving, no silverware, just the satisfying crunch and a soft, savory middle. Honestly, I like munching on one or two cold, straight from the fridge the day after. Don’t judge me! And yes, there’s something almost rebellious about sneaking a few bites of stuffing before dinner is officially served. (Don’t worry, nobody notices. Usually...)
I used to get frustrated when the balls crumbled apart, but after a few batches and slightly stickier hands, I found my groove—and now it’s basically foolproof. Unless you try to toss one across the kitchen like my brother did that one time. (It's not baseball, Ben.)
Grab These Ingredients (Or Close Enough)
- 3 cups leftover stuffing (any kind, honestly. Sometimes I use Stove Top if I’m in a hurry. My mum swore by Pepperidge Farm, but store brand totally does the trick.)
- 1 ½ cups cooked turkey, diced or shredded (rotisserie chicken if you’re in a pinch—nobody minds)
- 2 eggs, lightly beaten (sometimes I use just one if I want a firmer texture)
- ½ cup chicken or turkey broth (homemade is best but the boxed stuff is fine—seriously, don’t sweat it)
- ½ cup onion, finely chopped (red, yellow, white—it’s all good)
- 2 stalks celery, chopped (could skip if you’re not a fan; maybe toss in some diced apple for a cheeky twist)
- Big handful of chopped parsley (or skip, it's just for a bit of green)
- Salt & pepper to taste (sometimes a tiny pinch of smoked paprika or sage, but that’s me getting fancy)
- Butter or oil for greasing/basting (I like Kerrygold butter when I’m feeling posh)
How I Actually Make These—Step-by-Step (sort of?)
- Preheat your oven to about 200°C (or 400°F). I usually forget and have to wait. Don’t be like me, ha.
- Grab a big mixing bowl. Toss in your stuffing, turkey, onions, celery, and parsley. Give it a good squish with your hands (go ahead, it’s messy but fun—just wash up first, please!).
- Pour in the eggs and half the broth to start. Mix until everything’s well distributed. If it seems dry, add more broth a splash at a time until it holds together but isn't soupy. You want it, um...squishable? But not a wet mess.
- Salt, pepper, and whatever other seasoning you like, then mix again. This is where I sneak a little taste—though, fair warning, the raw egg, etc., so use your own judgment or taste before you add the eggs.
- Roll the mixture into golf-ball size balls. Sometimes mine are snowball-sized—no judgement, bigger is better. Lay them on a greased baking sheet (or use parchment if, like me, you’re averse to scrubbing).
- Baste the tops quickly with melted butter or a glug of oil. Adds color—plus, yum.
- Bake for about 20–25 minutes, turning after 15 so they get golden all over. Don’t worry if they look too brown, I think the crispy bits are the best part. If you like them extra crisp, flick the broiler on for a couple minutes at the end (but don’t wander off—ask me how I know...)
Casual Notes from My Own, Slightly Messy, Kitchen
- If the balls aren’t sticking, add another egg (sometimes it’s just a dry day or your stuffing was from last week—I won’t tell).
- Leftover bits can be smashed together and baked as a loaf, if you’re done with rolling. Actually, I sometimes prefer this because I’m a bit lazy at the end of the day!
- You really do want the mixture cold if you can—pop it in the fridge for 10 minutes before shaping, it’s just less sticky on your fingers. Not essential, mind, but helpful.
Variations I’ve Tried (for Better or Worse)
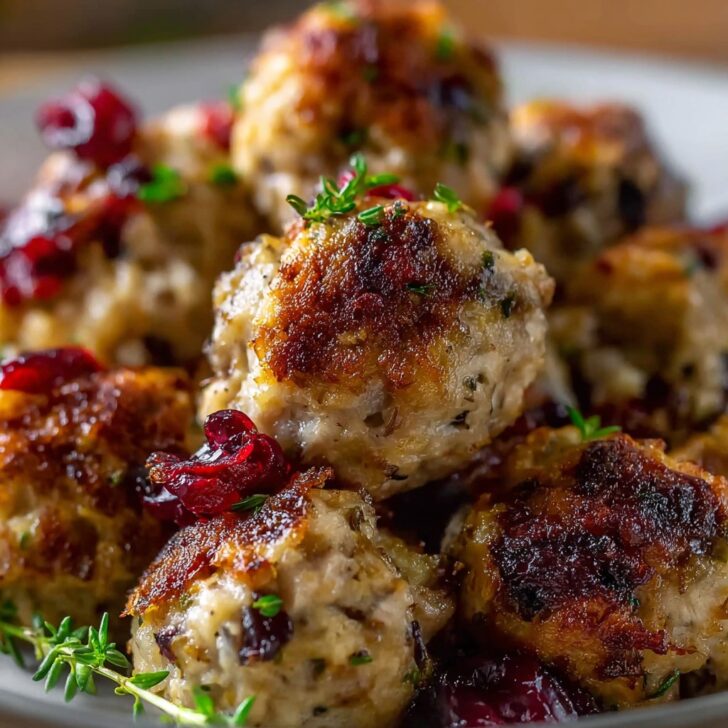
- Adding diced dried cranberries—a hit at holiday parties; tart and sweet, goes well with turkey.
- Mushrooms finely chopped (tried this once, maybe added too many; family asked if I was hiding veggies again)
- Chopped pecans or walnuts for crunch (only if no one's allergic—I forget sometimes and play ingredient roulette...)
- I once stuffed a ball with a cube of brie... honestly, it sounded fancier than it tasted (bit of a mess, cheese oozed out).
Do You Actually Need Fancy Equipment?
I use a baking tray and my hands for shaping. Some people swear by a cookie scoop. I tried that. Worked fine but actually, I find the good old hands-on method more satisfying (plus one less thing to wash). If you don’t have a wire rack, just use parchment—it works. If you’re really pressed, an old casserole dish does the job, just space them out a bit.


Storing Leftovers (yeah, right...)
Store in an airtight container in the fridge up to 3 days, but honestly, in my house they never last more than a day! You can freeze them—just don’t forget to let them cool first—or they'll get all steamy and weird.
Serving Suggestions (and a family tradition or two)
We serve these with gravy on the side (mine’s from this amazing recipe on Serious Eats—can’t recommend it enough) or with homemade cranberry sauce. But sometimes late at night, I eat a cold one, standing over the sink, contemplating the meaning of life. Or just the dishes in the sink. (Is that a British thing, eating over the sink?)
Lessons Learned (so you don't make my mistakes!)
- Once, I rushed shaping the balls and they fell apart—don’t do it, give them a gentle but firm squeeze. It’s like forming snowballs, not mud pies.
- Using too much broth? The stuffing turns to mush, so add a splash at a time, not all at once. I still do this sometimes if I’m not paying attention.
- Oven too crowded = soggy sides. Maybe just bake in batches, or use a couple sheets.
Real Questions I’ve Actually Heard (and Honest Answers)
- Can I use boxed stuffing? Yup. In fact, for quick dinner parties I reach for whatever’s in the pantry. Nobody’s checking credentials here.
- What if my mixture is too wet? Toss in extra breadcrumbs, crushed crackers, or even some oats. Actually, oats give an interesting texture.
- How do I keep them from falling apart? Cold mixture, gentle squeeze, and don’t overload with liquid. But even if they crumble, they taste great—call it a deconstructed turkey ball?
- Could I air-fry these? Oh, for sure—about 10–12 minutes at 180°C (360°F). They get extra crispy. On second thought, maybe just check at 8 mins so they don’t blow up (that happened to me once!).
Anyway, there you have it. Feel free to experiment—food’s nothing without a bit of fun and chaos, right? If you’re hunting for more inspiration, try this simple stovetop stuffing recipe from Budget Bytes, or drop me a comment below if you stumble on a combo that works (or flops, because misery does love company). Happy rolling!


Ingredients
- 1 lb ground turkey
- 2 cups breadcrumbs
- 1 cup diced celery
- 1 cup finely chopped onion
- ¼ cup chopped fresh parsley
- 2 cloves garlic, minced
- 2 large eggs, beaten
- ½ cup chicken broth
- 1 teaspoon dried sage
- ½ teaspoon salt
- ½ teaspoon black pepper
- 2 tablespoon unsalted butter, melted
Instructions
-
1Preheat the oven to 375°F (190°C) and line a baking sheet with parchment paper.
-
2In a large bowl, combine ground turkey, breadcrumbs, celery, onion, parsley, garlic, beaten eggs, chicken broth, sage, salt, pepper, and melted butter.
-
3Mix until all ingredients are thoroughly combined, but do not overmix.
-
4Shape the mixture into 12 evenly sized balls and place them on the prepared baking sheet.
-
5Bake for 25-30 minutes, or until the stuffing balls are golden brown and cooked through.
-
6Serve warm as an appetizer or side dish.
Approximate Information for One Serving
Nutrition Disclaimers
Number of total servings shown is approximate. Actual number of servings will depend on your preferred portion sizes.
Nutritional values shown are general guidelines and reflect information for 1 serving using the ingredients listed, not including any optional ingredients. Actual macros may vary slightly depending on specific brands and types of ingredients used.
To determine the weight of one serving, prepare the recipe as instructed. Weigh the finished recipe, then divide the weight of the finished recipe (not including the weight of the container the food is in) by the desired number of servings. Result will be the weight of one serving.
Did you make this recipe?
Please consider Pinning it!!