
Okay, storytime: the first time I tried making healthy banana bread that was both vegan and gluten-free, I somehow managed to glue the whole thing to the bottom of the pan. I mean, truly welded on like it was trying to become part of the kitchen counter—scraped it off and ate it anyway (weirdly proud moment). Since then, I've probably baked this bread... more times than I'd like to admit. Probably made peace with bananas, too. So, friend, if you’re after the best vegan gluten free banana bread to ever soak up your leftover peanut butter, I’ve got your back. Oh, and this version? There’s no glue. Just golden goodness.
")
")
Why You'll Love This Banana Bread
I make this whenever I overbuy bananas—so, pretty much twice a month. My family goes a little banana-bread-mad for this one because it’s unexpectedly moist (you wouldn’t know it’s GF, honestly). Plus, it’s great for using up those brown bananas that always seem to be multiplying in my fruit bowl. If I’m feeling a bit lazy, I’ll even mash the bananas straight in the loaf tin, though it probably makes a mess. Oh, and when my mate came round after a run, she polished off half a loaf and raved about it; so, if that’s not a ringing endorsement, I don’t know what is. No weird aftertaste, no gummy middle—just lovely easy bread that goes with coffee, tea, or eaten standing up by the oven. Confession: I always pick at the crust.
What You'll Need (With My Rambling Notes)
- 3 medium ripe bananas, super spotty is best (sometimes I freeze them and thaw—gets kind of slimy, but works in a pinch)
- ¼ cup maple syrup (or agave if you ran out—doesn’t make much difference, honestly)
- ⅓ cup olive oil or melted coconut oil (my grandmother only used sunflower oil, and yeah, it works too)
- ⅓ cup unsweetened almond milk (oat milk is fine, or water if you’re desperate; tried orange juice once, not my thing)
- 1 teaspoon vanilla extract (fancy stuff if you have it but supermarket vanilla is totally fine)
- 2 cups gluten-free all-purpose flour blend (I usually go for Bob’s Red Mill, but any blend that includes xanthan gum works—homemade is good too, if you’re that organized)
- 1 teaspoon baking powder
- ½ teaspoon baking soda
- ½ teaspoon ground cinnamon (add more if you're into a spicy kick—I usually eyeball it, honestly)
- ¼ teaspoon fine sea salt (pinch more if you like things salty)
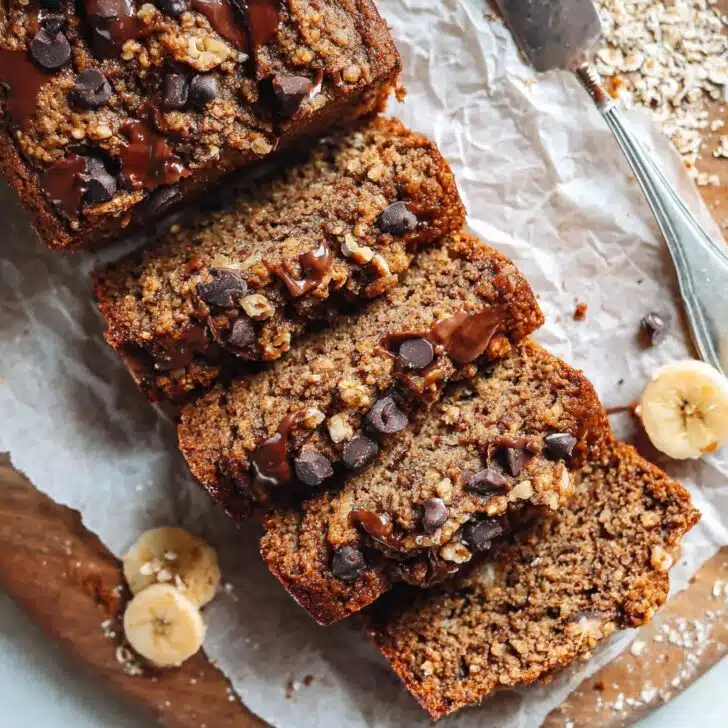
- ½ cup chopped walnuts or pecans (optional, or swap for dark chocolate chips—sometimes both because, why not?)
How To Make It (A.K.A. The Way I Do It)
- Preheat your oven to 350°F (180°C). Line a loaf pan with parchment paper, or just grease it if you’re not feeling fancy. (Real talk: I usually forget the paper and it still turns out fine half the time.)
- Mash those bananas in a big bowl until mostly smooth. If they’re super ripe, you can just smoosh them with a fork. Chunky is fine—it all bakes out.
- Add the maple syrup, olive oil, almond milk, and vanilla. Stir it together with a whisk or a big spoon. This is usually where I sneak a taste (even though it’s just banana soup at this stage).
- Dump in the flour, baking powder, baking soda, cinnamon, and salt. Give it a stir—gently! If you mix it too much, you might end up with a dense loaf. Not the end of the world, but, you know, fluff is nice.
- Fold in the walnuts or chocolate chips (or whatever add-in you fancy). Don’t worry if it looks a bit lumpy—banana bread is forgiving like that.
- Scoop the batter into your prepared loaf pan and smooth the top. Sometimes I sprinkle a bit of extra cinnamon or a pinch of sugar on top; it’s not necessary, but I like a little sparkle.
- Bake for 50–60 minutes. Start checking at 50 minutes. You want a toothpick or knife poked in the center to come out mostly clean (a smudge of banana is fine—raw batter, not so much). If the top gets too brown, I sort of haphazardly drape foil over it.
- Let it cool in the pan for 10–15 minutes, then run a knife around the edge and lift it out. Cool on a rack (or don’t—I’m often too impatient and end up with warm, crumbly slices, which are actually kind of the best).
")
")
Some Notes From My Many Attempts
- This is pretty foolproof, but once I used coconut flour instead of a GF blend and ended up with a dry lump. So, stick with the blend.
- If your bananas are small, just use four. Too much banana? The bread gets extra squishy—not a disaster.
- If you want pretty slices, let it cool completely; but let’s be honest, I usually don’t.
Stuff I’ve Tried (And a Flop or Two)
- Swapping maple syrup for brown sugar: Kind of works, but makes it denser (still tasty though)
- Mixing in blueberries—this turned the bread purple and honestly, didn’t look as good as I hoped
- Adding shredded coconut for a tropical kick—this one was decent, though my kids picked it out
")
")
Gear—And How To Wing It
I use a basic 9x5 inch loaf pan, but once I baked it in a square cake tin and just cut chunky squares (works great if you don’t mind non-traditional shapes). Don’t have a wire rack? Set your loaf on a chopping board with a couple of spoons under the corners. Improvisation keeps things interesting, hey?
How To Store It (If There’s Any Left)
This bread keeps for two to three days wrapped on the counter, or up to a week in the fridge (though honestly, in my house, it never lasts more than a day!). Sometimes I freeze slices if we’re feeling organized—pop them in the toaster straight from the freezer! Slightly crunchy edges, yum.
")
")
How I Serve It (Feel Free To Ignore)
My favorite: thick slice, tiny bit of vegan butter melted on top, and a sprinkle of flaky salt. My son likes his with almond butter and a drizzle of agave. Sometimes we warm slices in a skillet, which makes the edges go all crispy—absolute magic, if you ask me.
The Things I Wish I’d Known
- I once pulled it out of the oven early (impatience strikes again) and had gooey, undercooked bread. Just wait for the toothpick to come out clean-ish.
- Don’t skip the salt. Bland banana bread is a tragedy.
- And don’t over-mix! Lumpy batter = fluffy bread.
Your Questions, Answered (Yes, Even the Odd Ones)
Can I use regular flour instead of gluten-free?
Yep! Same amount—just don’t overwork it, or you’ll get a doorstop loaf. (Been there.)
Does it really need oil?
I tried replacing oil with applesauce, and it was okay, just more cake-y and less rich. For special occasions, I stick with oil.
Can I leave out the nuts?
Absolutely. No nuts, no fuss. Or sub pumpkin seeds—tried that in autumn and it was lovely.
How can I make it sweeter?
Throw in another tablespoon of maple syrup, or chuck in some mini vegan choc chips. I prefer it less sweet personally, but go wild!
By the way, once I made banana bread at 2am after a gig, and I’m convinced it tasted amazing solely because it was 2am. Just try it—let me know what quirks you come up with!
Ingredients
- 3 medium ripe bananas, super spotty is best (sometimes I freeze them and thaw—gets kind of slimy, but works in a pinch)
- ¼ cup maple syrup (or agave if you ran out—doesn’t make much difference, honestly)
- ⅓ cup olive oil or melted coconut oil (my grandmother only used sunflower oil, and yeah, it works too)
- ⅓ cup unsweetened almond milk (oat milk is fine, or water if you’re desperate; tried orange juice once, not my thing)
- 1 teaspoon vanilla extract (fancy stuff if you have it but supermarket vanilla is totally fine)
- 2 cups gluten-free all-purpose flour blend (I usually go for Bob’s Red Mill, but any blend that includes xanthan gum works—homemade is good too, if you’re that organized)
- 1 teaspoon baking powder
- ½ teaspoon baking soda
- ½ teaspoon ground cinnamon (add more if you're into a spicy kick—I usually eyeball it, honestly)
- ¼ teaspoon fine sea salt (pinch more if you like things salty)
- ½ cup chopped walnuts or pecans (optional, or swap for dark chocolate chips—sometimes both because, why not?)
Instructions
-
1Preheat your oven to 350°F (180°C). Line a loaf pan with parchment paper, or just grease it if you’re not feeling fancy. (Real talk: I usually forget the paper and it still turns out fine half the time.)
-
2Mash those bananas in a big bowl until mostly smooth. If they’re super ripe, you can just smoosh them with a fork. Chunky is fine—it all bakes out.
-
3Add the maple syrup, olive oil, almond milk, and vanilla. Stir it together with a whisk or a big spoon. This is usually where I sneak a taste (even though it’s just banana soup at this stage).
-
4Dump in the flour, baking powder, baking soda, cinnamon, and salt. Give it a stir—gently! If you mix it too much, you might end up with a dense loaf. Not the end of the world, but, you know, fluff is nice.
-
5Fold in the walnuts or chocolate chips (or whatever add-in you fancy). Don’t worry if it looks a bit lumpy—banana bread is forgiving like that.
-
6Scoop the batter into your prepared loaf pan and smooth the top. Sometimes I sprinkle a bit of extra cinnamon or a pinch of sugar on top; it’s not necessary, but I like a little sparkle.
-
7Bake for 50–60 minutes. Start checking at 50 minutes. You want a toothpick or knife poked in the center to come out mostly clean (a smudge of banana is fine—raw batter, not so much). If the top gets too brown, I sort of haphazardly drape foil over it.
-
8Let it cool in the pan for 10–15 minutes, then run a knife around the edge and lift it out. Cool on a rack (or don’t—I’m often too impatient and end up with warm, crumbly slices, which are actually kind of the best).
Approximate Information for One Serving
Nutrition Disclaimers
Number of total servings shown is approximate. Actual number of servings will depend on your preferred portion sizes.
Nutritional values shown are general guidelines and reflect information for 1 serving using the ingredients listed, not including any optional ingredients. Actual macros may vary slightly depending on specific brands and types of ingredients used.
To determine the weight of one serving, prepare the recipe as instructed. Weigh the finished recipe, then divide the weight of the finished recipe (not including the weight of the container the food is in) by the desired number of servings. Result will be the weight of one serving.
Did you make this recipe?
Please consider Pinning it!