
If You’ve Ever Wanted Cannoli, But Didn’t Want the Fuss…
I’ve gotta tell you, these cannoli cookies are kind of a love letter to my big, slightly chaotic holiday kitchen. The first time I baked a batch, I thought, ‘Oh, I’m just making regular cookies with a fancy hat.’ Nope – little did I know what a sticky adventure it would be (think frosting in my hair and a dog eating half the batch). My cousin Gina made the mistake of calling them “just sugar cookies” and nearly got voted off the island… so, trust me, they hit different. There’s something magical about the creamy, sweet ricotta filling peeking out—and let’s be honest, it’s way less anxiety-inducing than deep frying shells over Christmas week.
Honestly, This Is Why I Keep Making These
- I pull these out whenever I’m missing Nana’s old-school cannoli but haven’t got the time (or patience, if I’m being real) to haul out the oil and the forms. The cookies are always gone before I get my coffee mug cleaned.
- My family pretty much expects these to show up for every holiday now—which is sweet but a bit of pressure. Although, my kids like to sneak chocolate chips into the dough (good luck stopping them!), which is surprisingly delicious.
- If you like any excuse to eat ricotta, you’ll love them. And sometimes, when I’m too tired, I just sandwich a rough spoon of filling between two cookies instead of all the piping.
- Also, I finally figured out how to stop the filling going runny—let's just say there were some soggy-cookie incidents. Rookie move, now fixed.
What You’ll Need (And What I Swap in a Pinch)
- 2 cups all-purpose flour (I used to try whole wheat, but honestly, it doesn’t taste quite right. Still, if you like earthy-flavored cookies, it’s an option.)
- ½ teaspoon baking powder
- ¼ teaspoon salt – my gran was a stickler for kosher salt, but any fine salt is fine
- ½ cup unsalted butter, softened (sometimes I cheat and use margarine if I’ve forgotten butter at the store—forgivable, I think)
- 1 cup sugar – regular granulated is perfect
- 1 egg (if you’re out, 2 tablespoon of applesauce fills in… but the cookies taste slightly different)
- 1 teaspoon vanilla (extract is fine; if you’re feeling fancy, use vanilla bean paste)
- ½ cup ricotta cheese (you can do part-skim if you must, but full-fat is so much richer)
- ⅓ cup mini chocolate chips (or, you know, smash up a chocolate bar; I’ve done it more than once)
- ⅓ cup chopped pistachios or toasted almonds (optional but lovely. I once used walnuts in a hurry – not my fave, but edible)
For the filling (basically the cookie’s secret weapon):
- ¾ cup ricotta cheese (drain this well - see my notes or you’ll regret it later)
- ⅓ cup mascarpone or cream cheese (whichever is in the fridge is fine by me)
- ½ cup powdered sugar (I add a little more if I want it sweeter, just taste and see)
- Small handful mini chocolate chips
- 1 teaspoon orange zest (or skip it if you’re not into citrus; lemon is nice too!)
- Pinch cinnamon
Let’s Get Baking (Casual Style)
- First things first, preheat your oven to 350°F (about 175°C). Line a cookie sheet with parchment paper, or just grease it if you forgot parchment—no stress.
- In a bowl, whisk together the flour, baking powder, and salt. Nothing fancy here.
- In a bigger bowl (unless you enjoy washing extra dishes), cream the softened butter and sugar until it gets pale and fluffy; I use an electric mixer mostly, but a sturdy wooden spoon and elbow grease work too if that’s all you have. Don’t panic if your butter’s a little colder or warmer, it’s more forgiving than soufflé.
- Beat in the egg and vanilla. It’ll look slightly weird for a second; totally normal.
- Toss the ricotta in and mix until just combined. Don’t overthink it – this is where I usually sneak a taste. For, you know, quality control…
- Fold in your flour mixture gradually. If the dough gets really thick, switch to a spatula or even your hands. Last, gently stir in the chocolate chips and nuts (if you’re using them).
- Scoop out tablespoon-sized blobs (technical term!) onto the tray. They spread a little, but not much; spacing them an inch apart is plenty.
- Bake for about 12 to 14 minutes. They should look dry-ish on top and only slightly golden at the edges. If you go too long, they burn fast—ask me how I know. Let cool a few minutes on the tray, otherwise, they’ll stick.
- While the cookies cool their jets, whip together your filling: combine drained ricotta, mascarpone, powdered sugar, orange zest, and cinnamon. Give it a taste—I sometimes toss in extra zest if I’m in the mood. Fold in the chocolate chips last.
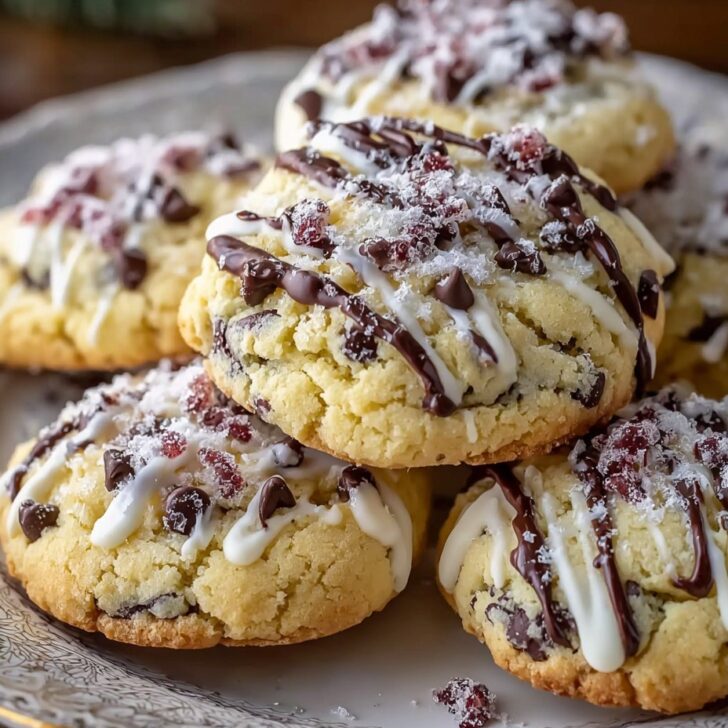
- Now, grab a piping bag (or, honestly, a ziptop bag with a snipped corner does the trick). Pipe a generous blob of filling on the bottom side of half the cookies, then top with a second cookie like a sandwich. Or, if you can’t wait, just slather it on with a spoon and eat messy. Sprinkle a little extra powdered sugar on top if you fancy.
Notes (Mostly Stuff I Figured Out the Hard Way)
- Let ricotta cheese drain for an hour in a sieve over the sink (with paper towels if you hate mess). If it’s too wet, your filling will ooze everywhere, and then you get sad, saggy cookies.
- Some days, the cookies look lumpy or misshapen, but dusting with powdered sugar makes them charming, promise.
- On a whim, I once added a splash of amaretto to the filling - gave it a grown-up vibe, but maybe skip if kids are around… or, don’t!
If You’re Feeling Experimental…Here’s What I’ve Tried
- Chopped dried cherries or orange peel instead of chocolate chips - nobody complained!
- A batch with only almond extract and no vanilla turned out a bit soapy, so I don’t do that again.
- Swapped mascarpone for Greek yogurt a couple of times, but the filling was runny; not my proudest kitchen moment.
Do You Need Fancy Equipment?
A stand mixer sure makes life easier (especially if, like me, you’re prone to wrist pain), but you can get by with a sturdy bowl and muscle if you don’t mind a bit of a workout. No piping bag? Use a plastic bag with the tip snipped off; or just spoon it on, rustic style. Actually, the more lopsided the cookies, the more homemade they look… I decided that’s my story and I’m sticking to it.


Storage (But Don’t Expect Leftovers)
Store these in an airtight tin with a piece of wax paper between each layer. In theory, they’ll last 2-3 days in the fridge, but honestly, in my house, they’re usually gone by breakfast. If you do make them ahead, they taste even better the next day (that ricotta flavor really deepens, which surprised me). Don’t freeze the stuffed cookies—the filling gets weird—but you can freeze the dough balls and bake fresh later. Oh, and here’s a good guide for ricotta draining tips: Serious Eats (it’s got step-by-steps with photos!).
Serving (How I Actually Bring Them to the Table)
Cannoli cookies look amazing heaped onto a big tray, dusted with extra powdered sugar, and flanked by a mountain of clementines (my family’s weirdly obsessed with citrus during the holidays). Or, for a laidback vibe, pass them around in mismatched mugs with afternoon coffee. The year I put them out with a scoop of vanilla gelato, everyone acted like I was a genius—might as well take the compliment!
Some Hard-Earned Pro Tips (Because I’ve Messed Up Plenty)
- Don’t rush draining the ricotta—the one time I did, the cookies turned slimy, and the filling slid out like a mudslide. Not pretty.
- Let the cookies fully cool before filling, or you’ll have a melty, runny disaster.
- If your dough seems too sticky, chill it for 30 minutes. I sometimes skip it and regret it later… impatience bites me every time.
FAQ (Because People Always Ask)
- Can I make these gluten-free? Yes, but use a 1:1 baking blend—I tried a couple flours and one batch turned out dusty, so pick a good one (King Arthur’s GF flour is what I go for).
- Why is my filling runny? Oh, happens to the best of us. Ricotta wasn’t drained enough; next time, give it more time, or even a quick squeeze in a clean dish towel (it’s messy but works).
- Can I make these ahead? Totally! In fact, they taste better the next day, if you can wait that long. Store the cookies and filling separate; fill right before serving for best crunch.
- Can I double the recipe? For sure! Just, um, block out enough counter space—you’ll need it. Bake in batches or you’ll end up with one huge, fused cookie monster. Ask me how I know.
- Do I really need pistachios? Nah. They look pretty, but if your wallet’s feeling light, skip ‘em—cookies still taste fab.
Anyway, if you give these cannoli cookies a go, drop me a note or DM—would love to hear how they turn out (and if your dog managed to sneak any…). Holiday baking should be a little messy, a lot delicious, and just the right amount of heartfelt. Cheers and happy cookie-baking!


Ingredients
- 1 cup whole milk ricotta cheese, drained
- ½ cup unsalted butter, softened
- ¾ cup granulated sugar
- 1 large egg
- 1 teaspoon vanilla extract
- 1 ¾ cups all-purpose flour
- 1 teaspoon baking powder
- ¼ teaspoon salt
- ½ teaspoon ground cinnamon
- ½ cup mini chocolate chips
- ½ cup chopped pistachios
Instructions
-
1Preheat the oven to 350°F (175°C) and line two baking sheets with parchment paper.
-
2In a large bowl, cream together the ricotta cheese, softened butter, and granulated sugar until light and fluffy.
-
3Beat in the egg and vanilla extract until well combined.
-
4In a separate bowl, whisk together the flour, baking powder, salt, and cinnamon. Gradually add the dry ingredients to the wet mixture, mixing just until combined.
-
5Fold in the mini chocolate chips and chopped pistachios.
-
6Drop tablespoon-sized scoops of dough onto the prepared baking sheets, spacing them about 2 inches apart. Bake for 12-14 minutes, or until cookies are set and lightly golden around the edges. Let cool before serving.
Approximate Information for One Serving
Nutrition Disclaimers
Number of total servings shown is approximate. Actual number of servings will depend on your preferred portion sizes.
Nutritional values shown are general guidelines and reflect information for 1 serving using the ingredients listed, not including any optional ingredients. Actual macros may vary slightly depending on specific brands and types of ingredients used.
To determine the weight of one serving, prepare the recipe as instructed. Weigh the finished recipe, then divide the weight of the finished recipe (not including the weight of the container the food is in) by the desired number of servings. Result will be the weight of one serving.
Did you make this recipe?
Please consider Pinning it!!