
The Time I Fell in Love with Thai Fried Chicken Sandwiches
If I had a dollar for every time I’ve stood in my kitchen, crumb-covered and mid-chicken flip, daydreaming about a vacation in Bangkok—I’d probably still be making my own sandwiches at home. My introduction to this glorious mashup came from a street vendor in Chiang Mai, who ladled so much sauce on my sandwich that it dripped down my hands and onto my flip-flops. I remember thinking, messy food is always the best food. And when I tried to make it myself? Well, let’s just say my first attempt was more "fried confusion" than anything else. But I kept at it, and now my Thai Fried Chicken Sandwich is what my friends beg for every time they visit. (Just a heads up: have plenty of napkins ready, or you’ll be licking your wrists… which, honestly, is part of the fun.)
Why You'll Love This Ungodly Delicious Creation
I make this when I’m craving something that feels like fast food but tastes way fancier—and spicier—than what you’d drive thru for. My family goes a bit bonkers for it every time, especially since I started doubling the sauce (somehow there’s never any leftovers, go figure). Plus, it’s actually way more forgiving than it sounds. I’ve had days where the breading looked weird, or the sauce came out too runny, but honestly, it was always demolished anyway. Oh, and if you like a bit of a kick? This sandwich’s chili-mayo situation won’t let you down—unless you forget to make extra, which I definitely have (still not living that down).
Let’s Talk Ingredients (and a Few Swaps I May or May Not Have Tried)
- Chicken thighs (boneless, skinless) – I use thighs for juiciness, but, on a busy weeknight, I’ve even grabbed breasts or those frozen chicken cutlets. My grandma swears only fresh works. Meh, I say both are fine.
- Buttermilk – Actually… if I’m out, plain yogurt whisked with a splash of milk works, or use coconut milk for a tropical twist.
- All-purpose flour – I tried rice flour once; was a bit too light, but it’s an option if gluten’s a no-go.
- Cornstarch – Don’t skip! Makes the crust extra crisp. Or use potato starch if that’s what’s lurking in your pantry.
- Thai red curry paste – Any brand is fine, though one time I used a homemade version from Hot Thai Kitchen; it was a bit much, but the flavor was wild.
- Egg – For binding. Free range makes me feel fancy, but I’ll grab whatever’s in the fridge.
- Fish sauce – Or soy sauce, if you’re nervous about funky smells (my cousin refuses fish sauce, so soy works in a pinch).
- Garlic & ginger – Fresh, if you can; the jarred stuff is legit easier though. Don't judge.
- Brioche buns – Or honestly, any hamburger bun. Once I made do with sandwich bread.
- Cilantro & cucumber – For topping. Lettuce works too, but not the iceberg stuff, please.
- Chili-mayo sauce: Mayo, sriracha, lime juice, dash of honey – or just grab your favorite spicy mayo. Also, Serious Eats has a cool version, if you’re keen.
How I Pull This Together (It’s Not as Chaotic as It Looks—Mostly)
- Marinate the chicken. Pat the thighs dry, chuck them into a bowl (I never measure, but about 4 thighs). Splash in enough buttermilk to coat, 1 tablespoon Thai red curry paste, a good squirt of fish sauce, grated garlic, and ginger (maybe a teaspoon each). Stir. Marinate at least an hour, but overnight is best (full transparency: I usually forget and do like 30 mins. Still good).
- Breading time! Mix a cup of flour with ½ cup cornstarch and a bit of salt. Crack an egg into a small bowl, beat it up. Pull a thigh from the marinade—let the drips fall off (this is where I sneak a taste of the marinade aroma, not the actual raw chicken, mind!)—then dip in the flour mix, egg, then flour mix again. It’ll look weird and clumpy. That’s good.
- Frying. Heat 1-2 inches of oil in a heavy pan (I use a cast iron, but nonstick has worked for me too). Med-high heat—350°F if you want to be exact, but I just toss in a crumb to see if it sizzles madly. Fry for about 4-5 mins per side, until brown and crispy. Drain on a rack or, if you are like me and out of racks, on a paper towel over a plate. Small detour: One time my tongs melted because I left them on the pan edge. Don’t do that.
- Sauce & Toppings. While the chicken’s crisping, stir together mayo with sriracha, lime juice, and honey (just to taste). Slice your cukes, rip up cilantro, toast (or don’t) the buns.
- Build! Pile the hot chicken on the bun, heap on sauce, top with cucumber and cilantro. Squish the bun lid on and try not to eat it before it hits the plate.
Notes from the Not-So-Perfect Kitchen
- I once used coconut oil instead of regular frying oil—my entire kitchen smelled like a tiki bar, but it actually worked. A bit sweet, probably best as an experiment only.
- Don’t freak if your breading slides off a little; this sandwich is about flavor first. (A little mess is badge of honor here).
- Chicken tastes even better cold the next day. Or, well, it would if any survived.
Weird Variations I've Tried (And One Flop)
- Swapped fish sauce for miso once—unexpectedly savory and not at all authentic, but hey, it worked!
- Tried vegan: used jackfruit. Honestly, texture was weird, but the flavors still popped.
- Panko bread crumbs as the second dip—ULTRA crunchy. Kinda extra, but in a good way.
- One time, added shredded green papaya slaw as the topping. All I’ll say is, too much crunch, not enough squish.
The Stuff You'll Need (But Workarounds Exist)
- Decent-sized frying pan or a heavy pot—cast iron makes me feel fancy, but my battered aluminum thing gets used half the time.
- Tongs or, if you’re like me and keep losing them, two forks will do. But tongs are less burn-y, trust me.
- Cooling rack (supposedly essential, but paper towel on a plate is fine for us mere mortals).


Storage Secrets—But Who Are We Kidding?
Supposedly, you can store the fried chicken in the fridge for up to 3 days (wrapped in foil, then reheat in the oven for crispiness). But, honestly, in my house it never lasts more than a day—someone always nicks a leftover at midnight.
How We Actually Serve These at Home
I love these with sweet potato fries and extra chili-mayo on the side. My cousin Julian swears by adding a pickle spear. Sometimes, we turn it into a "make your own sandwich" night—everything laid out in bowls, a bit like a build-your-own burger bar. Also, there’s usually a cold beer lurking somewhere nearby (root beer for the kids, or a thaitini if I’m feeling fancy).
What I'd Tell Myself Next Time (Pro Tips I Learned the Hard Way)
- Don’t rush the oil heat—once, I cranked it too high, and the outside got all brown while the inside was still practically clucking. Better medium heat and patience. It’s not a sprint.
- Actually, double the sauce. There’s never enough.
- Try not to overcrowd the pan, even if you’re hungry—I learned this makes the chicken go soggy. Just do a couple at a time and sneak a crispy bite as a reward.
FAQ (Because Friends Always Ask!)
- Can I make this gluten-free?
Oh absolutely. Just use rice flour and potato starch—it's a bit lighter but still gets that crunchy edge. And make sure your buns are gluten-free! (I forgot once.) - What if I can’t find Thai red curry paste?
So, I’ve used regular curry paste a few times or even sriracha and a sprinkle of cumin. Does it taste the same? Nope. Is it still good? Yup. - Is it super spicy?
Nope, unless you want it to be. The sauce can be tamed with more mayo, and you can skip the red chili altogether. But honestly, I reckon a bit of heat wakes up the soul. - Any side dish ideas?
Fries, yes. Sometimes slaw, sometimes that salad mix you buy and forget about. But always, extra napkins. Trust me. - Can I bake instead of fry?
Sure can! Bake at 425°F on a rack, spray with oil first. Not quite the same, but still does the job when you want less mess (or you're out of frying oil—been there).
Last thing: If you try this and come up with your own wild variation, please tell me. Kitchen experiments make the best stories (even if the sandwiches sometimes look a bit wonky). And if you want to explore more Thai flavor combos, take a peek at Eating Thai Food. They have some wild ones, I promise.


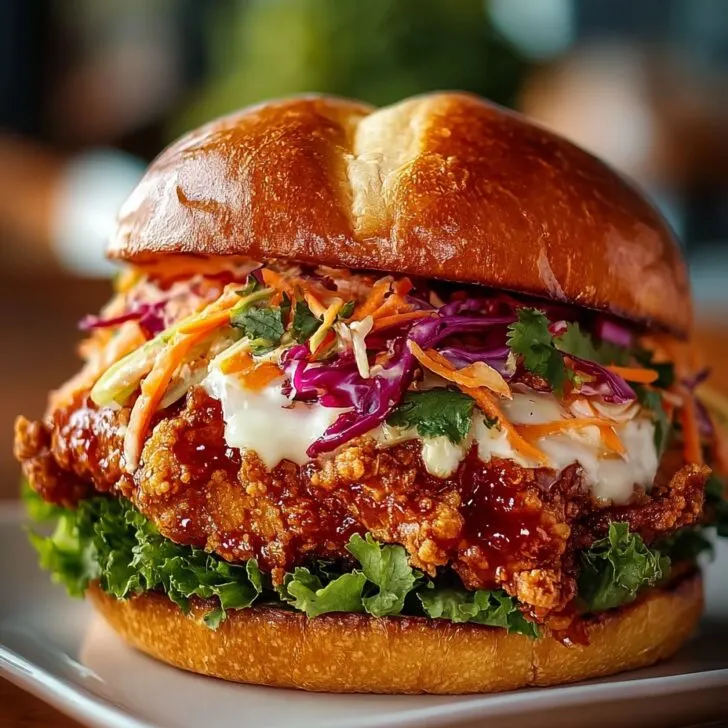
Ingredients
- 4 boneless, skinless chicken thighs
- 1 cup buttermilk
- 2 tablespoons Thai red curry paste
- 1 cup all-purpose flour
- 1 teaspoon garlic powder
- 1 teaspoon salt
- ½ teaspoon black pepper
- Vegetable oil for frying
- 4 brioche buns, toasted
- 1 cup shredded cabbage
- ¼ cup carrots, julienned
- 2 tablespoons fresh cilantro, chopped
- 3 tablespoons mayonnaise
- 1 tablespoon Sriracha sauce
- 1 tablespoon lime juice
Instructions
-
1In a large bowl, combine buttermilk and Thai red curry paste. Add chicken thighs, cover, and marinate in the refrigerator for at least 20 minutes.
-
2In a separate bowl, mix flour, garlic powder, salt, and black pepper. Dredge the marinated chicken thighs in the flour mixture, coating well.
-
3Heat vegetable oil in a deep skillet to 350°F (175°C). Fry chicken thighs for 5-6 minutes per side, or until golden brown and cooked through. Drain on paper towels.
-
4In a small bowl, whisk together mayonnaise, Sriracha, and lime juice to make the spicy mayo. In another bowl, toss shredded cabbage, carrots, and cilantro.
-
5To assemble, spread spicy mayo on the bottom half of each toasted brioche bun. Add fried chicken, top with slaw mixture, and cover with the top bun. Serve immediately.
Approximate Information for One Serving
Nutrition Disclaimers
Number of total servings shown is approximate. Actual number of servings will depend on your preferred portion sizes.
Nutritional values shown are general guidelines and reflect information for 1 serving using the ingredients listed, not including any optional ingredients. Actual macros may vary slightly depending on specific brands and types of ingredients used.
To determine the weight of one serving, prepare the recipe as instructed. Weigh the finished recipe, then divide the weight of the finished recipe (not including the weight of the container the food is in) by the desired number of servings. Result will be the weight of one serving.
Did you make this recipe?
Please consider Pinning it!!