
Let Me Tell You About My Obsession With Chalupas
Okay, so you know when you get a weird craving out of nowhere, usually late at night, for something crispy, chewy, kinda greasy but in the best way? For me, that's always a Chalupa Supreme form Taco Bell. It's like my brain says, "You know what you need? Fried bread with seasoned beef, sour cream, and probably more cheese than you should admit." So, after one too many midnight drives (and one too many "Sorry, kitchen's closed" moments), I decided to just make the dang thing myself. Did it go smoothly the first time? Absolutely not. But now, I can say my copycat Chalupa Supreme is dangerously close to the original. Maybe even a bit better? (Don’t tell the folks at Taco Bell, though.)
Why I Keep Making This (And Why You Might, Too)
I make this when friends come over and I want to show off a bit (but also want to eat something trashy-delicious). My family goes absolutely bananas for this stuff—my youngest swears it's better than the drive-thru, although she's also declared ketchup on pasta a "delicacy" so take that as you will. Honestly, it's fun, messy, and about a million times more filling than the little ones you get in the box. Plus, you can customize the toppings, which is handy for picky eaters or that one person who thinks cilantro tastes like soap (I get it, genetics are wild).
Oh, and the best part? There's no weird aftertaste you sometimes get with fast food. Unless you burn the shells. Which, um, I've totally never done. Only once or twice. Tops.
Ingredients (With My Lazy Swaps and Odd Family Preferences)
- 1 cup all-purpose flour (sometimes I mix in a bit of whole wheat if I'm feeling virtuous—rarely)
- 1 teaspoon baking powder (my grandma always swore by Clabber Girl, but honestly, whatever’s in the cupboard works fine)
- ½ teaspoon salt
- 2 tablespoons plain Greek yogurt or sour cream (I've even used mayo in a pinch—it’s not the same, but you won’t get any complaints at 2am)
- ⅓ cup milk (or water if you’re out. Not ideal, but hey, we make do.)
- 1 tablespoon vegetable oil (sometimes I use olive oil, but only if I’m out of the other stuff)
- For the Taco Meat:
- ½ pound ground beef
- 2 teaspoons chili powder (or taco seasoning packet if you’re in a hurry)
- ½ teaspoon garlic powder
- ½ teaspoon onion powder
- Salt, to taste
- Toppings:
- Shredded lettuce (iceberg is classic, but I like romaine for crunch)
- Diced tomatoes (I use grape tomatoes ‘cause they last longer in the fridge)
- Shredded cheddar cheese
- Sour cream (or more Greek yogurt if you’re feeling healthier)
- Chopped onion (if you remember to buy them, which I often don’t)
- Salsa, hot sauce, whatever you like
- Oil for frying (about 1 cup or more, depending on your pan)
How I Pull These Together (With a Few Bumps Along the Way)
- Mixing the Dough: In a medium-ish bowl (or a giant mug if you’re in a tiny apartment kitchen), whisk together the flour, baking powder, and salt. Add the yogurt (or whatever creamy thing you’ve got), milk, and oil. Stir it up until it forms a dough—don’t worry if it’s a little sticky. If it’s a disaster, sprinkle in a bit more flour.
- Shape ‘Em Up: Plop the dough onto a floured counter (or just a big cutting board, honestly), knead it a handful of times until it’s sort of smooth, then divide into 4-6 pieces. Roll each one into a rough oval or circle—precision is not important here. Mine always look more like Australia than a perfect circle anyway.
- Frying Time: Heat about an inch of oil in a heavy skillet over medium heat. You want it hot, but not smoking. (I throw in a scrap of dough to test; if it sizzles, you’re good.) Fry each piece about 1 minute per side, pressing it gently with tongs to puff up. This is where I usually sneak a taste—sometimes they’re so good I have to fight off snack attacks from the kitchen gremlins (aka family members). Drain them on a paper towel. Don’t stress if some are darker than others, it happens.
- Making the Taco Meat: While the chalupa shells cool off, brown the beef in a skillet. Drain some fat (or not, honestly, flavor), then add the spices. Taste and adjust—sometimes I double up on the chili powder, sometimes I forget the salt and wonder why it’s a bit bland. Happens to the best of us.
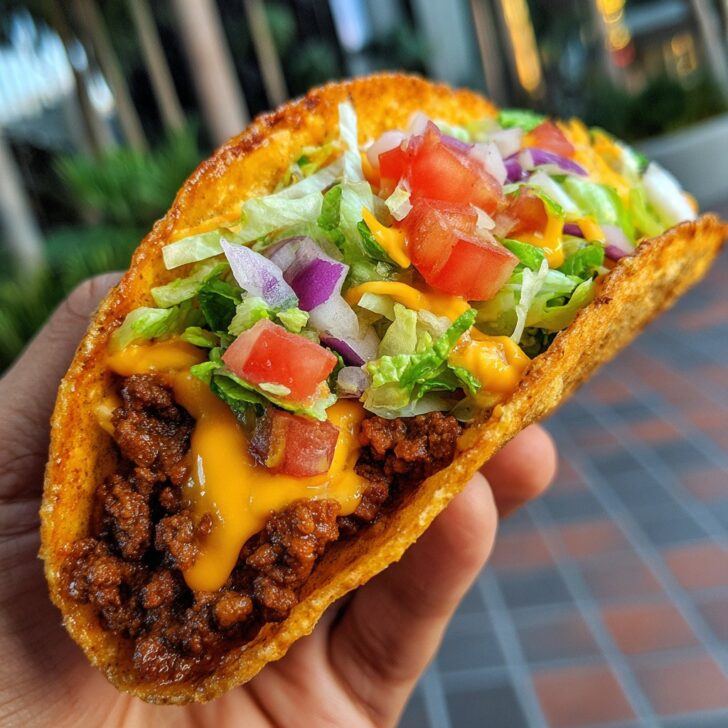
- Assemble: Spoon the beef onto the fried shells, then pile on lettuce, cheese, tomatoes, onions, and a big dollop of sour cream. Salsa, hot sauce, whatever tickles your fancy. Fold 'em gently—they’re a little bendy but not tortilla-soft, so don’t force it.
Some Notes Because I’ve Made All the Mistakes
- The dough is forgiving, thank goodness. But if it’s too sticky, flour your hands, not the dough—it works better (learned this after wearing half the dough on my fingers for an hour).
- If you want more crunch, fry a few seconds longer. But watch closely—the line between golden brown and “uh-oh, burnt” is pretty thin.
- I think these taste even better the next day. But, honestly, leftovers are rare.
- Don’t skip draining on paper towels. Otherwise, they’re greasier than a chip shop after a Friday rush.
When I Tried Tweaking It (Some Results: Awesome, One...Not So Much)
- I once used pulled chicken instead of beef—pretty tasty! A bit less classic, but still good.
- Tried whole wheat flour. Um. Let's just say the kids weren't impressed. Stick to white flour unless you really need to feel virtuous.
- Vegetarian version with spiced black beans? Surprisingly great, especially if you double up on cheese.
Do You Really Need Fancy Equipment?
Honestly, a rolling pin is nice, but I’ve used a wine bottle more than once (don’t judge). A heavy skillet or frying pan does the job. If you have a deep fryer, fab, but a saucepan works too—just don’t fill it too full. Tongs help, unless you like risking your fingertips (I don’t recommend it).


How Long Will These Last? (Spoiler: Not Long)
You can keep the shells in an airtight container at room temp for a day or two, and reheat in the oven. Fillings can go in the fridge—say, up to 3 days, if you’re the disciplined type. But honestly, in my house, they vanish before sunrise. If you do manage to save some, I’d say they’re best fresh, but not terrible as a next-day snack, either.
How We Serve Ours (And the Weird Family Rules)
We set everything out taco-bar style: shells, meat, toppings, the works. People build their own—more fun, fewer complaints. I always add extra hot sauce, but apparently, that’s "not normal" (I say it is). Sometimes, we do a side of homemade guac (this recipe’s a favorite). My brother-in-law swears by ranch dressing, which is a little out there, but hey, it’s your kitchen.
What I Learned the Hard Way
- Don’t rush the dough. I once tried to shortcut the resting time. Regretted it—chewy, not in a good way.
- Oil temp matters. If it’s too low, they soak up grease; too high, the outside’s burnt and inside’s raw. Been there. Now I use this guide for frying temps sometimes.
- Don’t overfill the shells—they crack. Or just eat with a fork, which is fine by me.
FAQs (Because Apparently, These Are the Burning Questions)
- Can I make the chalupa dough ahead? Yep! Cover and chill for up to a day. Just let it sit out to warm up a bit before rolling. Cold dough resists more than my dog at bath time.
- What’s the best oil for frying? I usually go with canola or vegetable, but peanut oil gives a nice flavor too (unless you’re allergic, obviously).
- Can I bake the shells instead of frying? Technically, yes. But, honestly, they’re just not the same. I tried once when I was feeling healthy—came out more like pitas. Still edible, just not chalupa-y.
- How do you keep them warm for a crowd? Pop them in a low oven (200F-ish) on a tray with a towel over them. Or just fry as you go and make everyone wait (hey, keeps 'em eager!).
- Is there a gluten-free option? I haven't tried it myself, but a friend swears by Cup4Cup flour for this. Can’t personally vouch for it, so if you try, let me know how it goes!
By the way, if you want to read more about the history of the chalupa (not that you need to, but it’s kinda fun), check out this Saveur article. Now, go forth and chalupa!


Ingredients
- 2 cups all-purpose flour
- 1 teaspoon baking powder
- ½ teaspoon salt
- 2 tablespoons vegetable oil (plus more for frying)
- ⅔ cup milk
- ½ pound ground beef
- 1 tablespoon taco seasoning
- 1 cup shredded lettuce
- ½ cup diced tomatoes
- 1 cup shredded cheddar cheese
- ½ cup sour cream
Instructions
-
1In a large bowl, combine flour, baking powder, and salt. Stir in 2 tablespoons vegetable oil and milk to form a soft dough. Knead briefly until smooth.
-
2Divide dough into 4 pieces and roll each into a 6-inch circle. Heat oil in a deep skillet over medium-high heat. Fry each dough circle for 1-2 minutes per side until golden and puffed. Drain on paper towels.
-
3In a skillet over medium heat, cook ground beef until browned. Drain excess fat, add taco seasoning, and cook for 2-3 minutes more.
-
4Assemble chalupas by spreading cooked beef onto each fried shell. Top with shredded lettuce, diced tomatoes, cheddar cheese, and a dollop of sour cream.
-
5Serve immediately while warm and enjoy your homemade Chalupa Supreme!
Approximate Information for One Serving
Nutrition Disclaimers
Number of total servings shown is approximate. Actual number of servings will depend on your preferred portion sizes.
Nutritional values shown are general guidelines and reflect information for 1 serving using the ingredients listed, not including any optional ingredients. Actual macros may vary slightly depending on specific brands and types of ingredients used.
To determine the weight of one serving, prepare the recipe as instructed. Weigh the finished recipe, then divide the weight of the finished recipe (not including the weight of the container the food is in) by the desired number of servings. Result will be the weight of one serving.
Did you make this recipe?
Please consider Pinning it!!