
Let Me Tell You How These Spicy Mexican Corn Bites Took Over My Kitchen
Okay, so I have to admit: the first time I tried making these spicy Mexican corn bites, I was mostly just trying to use up a half-bag of frozen corn hiding in the back of my freezer (you know the one, right?). Fast-forward to now, and they're basically mandatory at every family get-together. My cousin Becky once threatened to stage a coup if I showed up to game night without a tray. No kidding. And honestly, I don’t blame her—these little bites are pure crunchy, cheesy happiness. Plus, if you’re anything like me and sometimes get lost halfway through a new recipe, don’t worry. They’re forgiving—like, dropped-one-on-the-floor-and-ate-it-anyway forgiving.
Why You’ll Love This (or at Least, Why I Do)
I make these whenever I need something that looks fancy, but is honestly dead simple. My family goes crazy for them because they’re basically elote (that good Mexican street corn) but in crispy, snackable form. Oh, and you can adjust how spicy they are—my brother once tried to sneak in ghost peppers and nearly broke up Thanksgiving. (Don’t do that, please.) I used to get freaked out when the mixture looked too wet, but actually, it always sorts itself out once it’s in the oven. Honestly, half the battle is not eating the mix before it’s baked.
Here's What You'll Need (or What I Usually Grab)
- 2 packed cups of corn kernels (frozen, fresh, or canned—my grandma swears by Green Giant, but honestly, Aldi works fine too)
- 1 cup shredded cheddar cheese (or pepper jack if you like it wild—sometimes I do half and half)
- ½ cup crumbled cotija cheese (or feta in a pinch; I’ve even used shredded parmesan when I was desperate, don’t tell anyone)
- 2 or 3 green onions, chopped up (I skip these sometimes if I’m out, no one ever notices)
- 1 jalapeño, finely diced (leave out the seeds if you’re not into spice, or swap for a milder pepper)
- ¼ cup mayonnaise (Duke’s is my go-to, but Hellmann’s, Best Foods, or even sour cream will do in a jam)
- 1 large egg
- ½ cup Panko breadcrumbs (regular work too; crushed tortilla chips are a fun swap, actually)
- 1 teaspoon chili powder (or smoked paprika if you’re feeling fancy)
- ½ teaspoon garlic powder
- 1 big handful chopped cilantro (optional, but I like to go full-tilt with it)
- Salt and black pepper, just to taste
How I Throw These Together
- Preheat your oven to 400°F (200°C), or somewhere close—my oven runs hot, so I usually knock it down just a hair.
- Line a baking sheet with parchment paper. Or foil, if you’ve run out. I’ve done both, and sometimes neither if I’m feeling brave (not recommended, trust me).
- In a big bowl, dump in the corn, cheese(s), green onions, jalapeño, mayo, egg, breadcrumbs, chili powder, garlic powder, and cilantro. If you want to be extra, toss in a few grinds of black pepper and a pinch of salt. Throw caution to the wind.
- Get your hands in there (seriously, just wash 'em first) and mix until everything's totally combined. If it looks a little gloopy, that's normal. Actually, I find it works better if you let it sit for 5 minutes so the breadcrumbs soak up some moisture.
- Use a spoon or even your fingers to scoop out little mounds—think golf ball-ish size—and plop them onto the tray. I usually aim for about 18 bites, but you do you.
- Bake for 18–20 minutes, until the bites look golden and a little crispy on the edges. This is where I always peek at 15 minutes, just to be sure (and sometimes sneak a test bite... chef’s privilege).
- Let them cool for a few minutes before moving—otherwise, they can be a bit floppy. If some fall apart, I call those "chef snacks," and, well, they disappear pretty quick.
Random Notes (From the School of Hard Knocks)
- If the mixture feels too wet, just add a bit more breadcrumbs. Or crushed nacho chips, which is accidentally delicious.
- One time I forgot to grease the foil—so half of them stuck like barnacles on a rock. Don’t be me; grease it (even if you use nonstick!).
- I think these actually taste better the next day, cold, from the fridge. But my husband disagrees, so we argue and then just eat them all immediately.
Variations (Some Worked, Some... Not So Much)
- I tried adding chopped red bell pepper one time, and honestly, it looked prettier but made the mix way too watery. Maybe if you used roasted peppers instead?
- For the gluten-free folks, you can totally use GF breadcrumbs or even cornmeal. I’ve even done crushed pork rinds—sounds weird, but it’s a vibe.
- If you want to go dairy-free, I’ve subbed in vegan cheese and vegan mayo. The texture is a little different, but still tasty if you’re into that sort of thing.
What If I Don't Have the Right Equipment?
I always use a regular old sheet pan. If you don’t have parchment, foil works (just don’t forget to grease it, like I did). No food processor needed—honestly, a wooden spoon or your hands do the trick. My cousin once rolled hers in a muffin tin, which made them extra round but a pain to clean. Your call.


How Do I Store Them? (Or Will You Need To?)
Just pop any leftovers into an airtight container in the fridge—they’ll keep for up to 3 days, but honestly, in my house they never last more than a day! You can reheat them in the oven to get the crunch back, but half the time I just eat them cold, standing by the fridge. No shame.
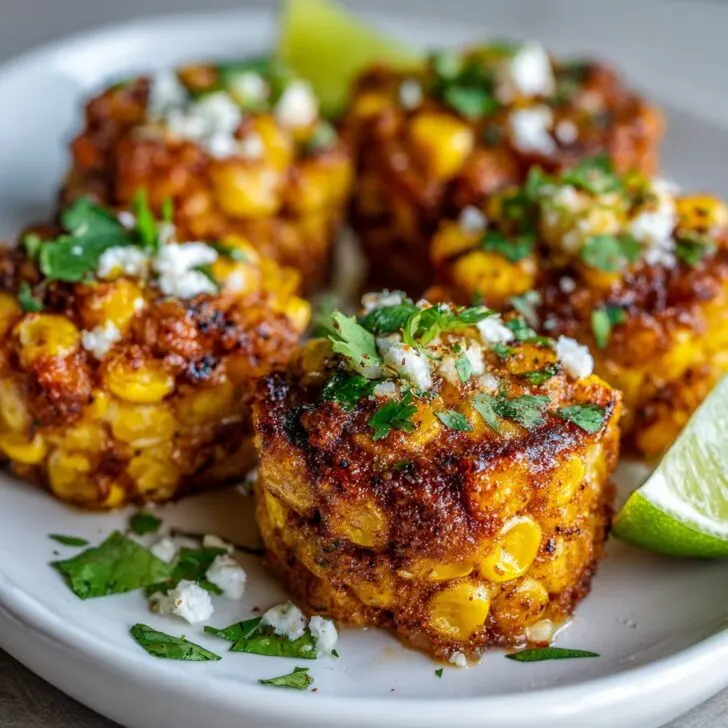
How I Like to Serve Them
I always pile them up on a big plate and sprinkle extra cotija and cilantro over the top. Sometimes I’ll serve with a little bowl of chipotle mayo or elote sauce (I found this recipe the other day, and it’s dangerously good). My aunt dips hers in salsa verde, which is also great if you want a tangy kick. Oh, and if we’re feeling extra fancy—tiny toothpicks make them feel party-ready.
Stuff I Learned the Hard Way (Pro Tips Straight From My Mistakes)
- Don’t rush the bake time. I once tried to speed things up by cranking the heat, and just ended up with burnt outsides and mushy insides. Patience, my friend.
- Let the bites cool before lifting them off the tray. If you don’t, they fall apart faster than my willpower in a bakery.
- Oh—and don’t skip the salt. I did once, thinking the cheese was enough, but nope. Bland-ville.
Questions I Get (Maybe You’re Wondering, Too?)
- Can I make these ahead? Totally! Actually, I think the flavors deepen if you do. Just store them in the fridge, like we chatted about.
- Do they freeze well? Eh, sort of. They get a bit soggy after thawing, but if you re-bake at 400°F for a few minutes, it revives them. Not perfect, but not terrible either.
- What if I don't like cilantro? Just leave it out. No one will notice, except my friend Jenny, but she's weird about herbs anyway.
- Can I make these in an air fryer? Yup—try 375°F for 8–10 minutes. Just don’t overcrowd, or they go soggy. Learned that the crispy way.
- Where do you get your cotija cheese? I usually grab mine at the local Mexican market, but if you can't find it, feta or even parmesan does the trick. Or order online if you want to go the extra mile.
So there you have it—my (slightly rambling) guide to Spicy Mexican Corn Bites. Honestly, once you make these, you'll probably get roped into bringing them everywhere, just like me! If you give ‘em a try, let me know how it goes—or if you stumble on an even better swap, I’m all ears. (Except when I’m elbows-deep in corn mixture, in which case, maybe text instead.)


Ingredients
- 2 cups fresh or frozen corn kernels
- ½ cup shredded cheddar cheese
- ¼ cup crumbled cotija cheese
- 1 medium jalapeño, finely chopped
- ¼ cup chopped fresh cilantro
- ¼ cup mayonnaise
- 1 teaspoon chili powder
- ½ teaspoon smoked paprika
- ½ teaspoon salt
- 1 tablespoon lime juice
Instructions
-
1Preheat oven to 400°F (200°C). Line a baking sheet with parchment paper.
-
2In a large bowl, combine corn kernels, cheddar cheese, cotija cheese, jalapeño, cilantro, mayonnaise, chili powder, smoked paprika, salt, and lime juice. Mix until well combined.
-
3Scoop tablespoon-sized portions of the mixture and shape into small mounds on the prepared baking sheet.
-
4Bake for 12-15 minutes, or until the bites are golden and the cheese is bubbling.
-
5Remove from oven and let cool slightly before serving. Garnish with extra cilantro and a squeeze of lime if desired.
Approximate Information for One Serving
Nutrition Disclaimers
Number of total servings shown is approximate. Actual number of servings will depend on your preferred portion sizes.
Nutritional values shown are general guidelines and reflect information for 1 serving using the ingredients listed, not including any optional ingredients. Actual macros may vary slightly depending on specific brands and types of ingredients used.
To determine the weight of one serving, prepare the recipe as instructed. Weigh the finished recipe, then divide the weight of the finished recipe (not including the weight of the container the food is in) by the desired number of servings. Result will be the weight of one serving.
Did you make this recipe?
Please consider Pinning it!!