
If You've Ever Craved S'mores…But Your Living Room Lacked a Firepit
Alright, confession time: I was once that person determined to roast marshmallows over a candle, salt lamp, or (not recommended) toaster just because the s’mores craving hit at 11 pm in January. So eventually, after a hot mess with sticky counters and some laughter, I invented this S'mores Campfire Pie you can actually make indoors, rain or shine or snow or, you know, when your camping gear is buried behind winter coats. My little cousin calls this my “comfy pie” because it’s basically a big blanket of chocolate and gooey stuff, and honestly, she’s nailed it. Anyway—grab a pie pan. This one's going to make your kitchen smell like you built a tent right next to the oven.


Why I Keep Coming Back to This Pie
I make this when the weather stinks or I just can’t handle another board game night without a little chocolate to keep things interesting. My family goes absolutely bonkers for this, even my dad who usually claims marshmallows are just sugary nonsense (until he’s fighting for the last slice—come on, Dad, at least pretend you don’t like it that much). Actually, I was sort of surprised at how much better it tastes the next morning, maybe because everything just... melds? Oh, and if you’re dodging the smoke alarm, this recipe's totally campfire-fail-proof. I mean, unless you really overdo the broiling, but we’ll get to that.
Here’s What You Need (& A Few Cheats I Use)
- 1 ½ cups graham cracker crumbs (Sometimes I swap in digestive biscuits because they’re what’s usually in my cupboard. My grandma swears by Honey Maid—really any kind is fine.)
- ⅓ cup granulated sugar (I’ve done it with brown sugar too; adds a hint of caramel, but honestly, regular is just easy.)
- 6 tablespoon unsalted butter, melted (If all you have is salted, go for it. Just go easy on extra salt.)
- 1 ½ cups semi-sweet chocolate chips (Milk chocolate works, or even a bar broken into pieces. Leftover chocolate bunnies? Use them!)
- 2 cups mini marshmallows (Or big ones ripped up by hand—messier, but a good stress reliever!)
- ¼ teaspoon flaky sea salt, optional (I skip if I’m feeling lazy.)
How To Pull Off S'mores Campfire Pie Indoors
- Preheat your oven to 350°F (175°C). Grab a 9-inch pie dish. If it’s not nonstick, give it a quick spritz with cooking spray—nobody likes sad, stuck crust.
- Mix together the graham cracker crumbs and sugar in a bowl. Stir in the melted butter until the texture feels like slightly damp sand. (This is where I usually sneak a taste. You’re among friends here.)
- Press the crumb mix into the bottom and up the sides of your pie pan. Pack it down with your hands, or the bottom of a glass if you want to get fancy. It’s OK if it’s not perfect—rustic is the new perfection. Bake for 10 minutes, just until it smells toasty and dreamy. Pull it out.
- While the crust is still warm, scatter your chocolate chips (or whatever chocolate army you assembled) all over the base. Let them hang out for 2 minutes so they get gooey, then spread them gently with a spatula. Or a big spoon. Or, if you forget and they cool too much, pop the pan back in the oven for a minute—no biggie.
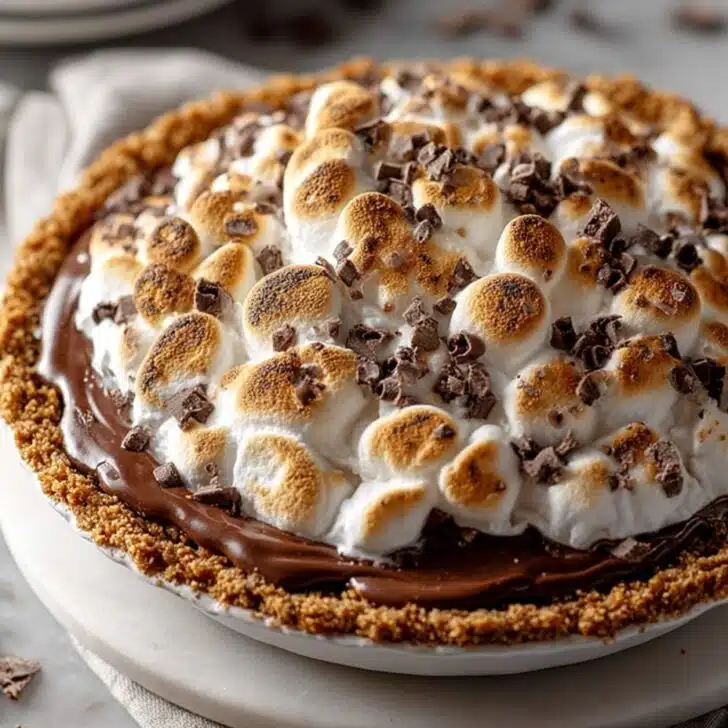
- Top with marshmallows. You want them pretty close together, but don’t stress if there are gaps; it gets delightfully messy anyhow.
- Back in the oven it goes for another 7–9 minutes, or until the marshmallows are golden and puffy. (Here’s where you really want to keep an eye on it. I’ve over-browned them once—it was still yummy, just a bit, um, smoky!)
- Optional: sprinkle the flaky sea salt on top. Totally your call.
- Give it at least 10 minutes to cool and settle. (Sure, I’ve tried to dig in hot and all I got was a chocolate lava landslide—up to you!)


Real-Life Notes I’ve Picked Up
- If you store it overnight, the marshmallows get this soft, sticky lid that’s oddly perfect with cold milk. (My cousin says it’s better than cake—that’s a big call from her, honestly.)
- If the crust crumbles a bit when serving, just scoop, don’t slice. No one complains.
- Don’t stress if your chocolate layer isn’t perfect; it all comes together. Once I used leftover holiday chocolate and it looked wild, tasted brilliant.
Variations I’ve Tried (And One I Wouldn’t Repeat)
- I sometimes add a sprinkle of cinnamon to the crust for a twist.
- I tried a peanut butter swirl once but it got a bit too sticky—maybe less is more there.
- If you’re feeling adventurous, swap in chopped up salted caramel chocolate instead of regular. Turns out ridiculously sweet but, well, I have no regrets.


Equipment, Or My Best Workarounds
- 9-inch pie dish (Or use any oven-safe dish. In a pinch, I’ve used a deep cake pan.)
- Mixing bowl for crumbs
- Spatula for spreading chocolate (Honestly, the back of a big spoon works just fine.)
Keeping the Pie (If It Sticks Around…)
Store leftovers at room temp, loosely covered. It does go a bit sticky but, well, who’s judging? Past experience: pie rarely lasts past breakfast with my lot in the house, but theoretically, it’s fine a couple days if you can resist.
How We Serve It (Because Rituals Matter)
I like to dig out a big messy scoop and plop it in a bowl with a scoop of vanilla ice cream. (Sometimes we take it straight out of the pan while watching movies and pretend we’re actually camping in the living room—blankets, fairy lights, the works.) Oh, and hot chocolate on the side if someone’s feeling “extra.”
Tiny (or Not So Tiny) Lessons Learned
- I once rushed through the toasting step. Burnt marshmallows are okay, but burnt on the bottom…not so much. Go easy, keep an eye on things.
- Tried to use margarine once instead of butter—eh, the flavor just wasn’t there.
FAQs—Because Friends Have Actually Asked!
- Can I make this ahead? Actually, yes! But the marshmallow top gets a bit tacky—nothing a 30 second reheat in the oven can’t fix.
- Do I have to use chocolate chips? Not at all. I’ve used broken chocolate bars, those coins that come at Christmas, even half a chocolate Easter bunny. Just chop them up decently small.
- What if I only have big marshmallows? Tear ‘em up! It’s sticky but kind of fun. It mixes up the texture, which my niece says is better anyway.
- Will it taste like real campfire s'mores? It gets pretty darn close! Maybe not the smokiness, but honestly, who wants their living room to smell like burnt wood for a week?
- Do I have to use a pie dish? Nope. Any oven dish that can handle a bit of heat will work. I’ve done this in a cake pan and in those disposible foil trays from the shop.
So there it is, my not-so-secret, goof-proof, indoor S’mores Campfire Pie. Try it for movie night, stormy weekends, or just because you feel like a chocolate hug in dessert form. And if you somehow make it last to the next day, please tell me your secret.
Ingredients
- 1 ½ cups graham cracker crumbs (Sometimes I swap in digestive biscuits because they’re what’s usually in my cupboard. My grandma swears by Honey Maid—really any kind is fine.)
- ⅓ cup granulated sugar (I’ve done it with brown sugar too; adds a hint of caramel, but honestly, regular is just easy.)
- 6 tablespoon unsalted butter, melted (If all you have is salted, go for it. Just go easy on extra salt.)
- 1 ½ cups semi-sweet chocolate chips (Milk chocolate works, or even a bar broken into pieces. Leftover chocolate bunnies? Use them!)
- 2 cups mini marshmallows (Or big ones ripped up by hand—messier, but a good stress reliever!)
- ¼ teaspoon flaky sea salt, optional (I skip if I’m feeling lazy.)
Instructions
-
1Preheat your oven to 350°F (175°C). Grab a 9-inch pie dish. If it’s not nonstick, give it a quick spritz with cooking spray—nobody likes sad, stuck crust.
-
2Mix together the graham cracker crumbs and sugar in a bowl. Stir in the melted butter until the texture feels like slightly damp sand. (This is where I usually sneak a taste. You’re among friends here.)
-
3Press the crumb mix into the bottom and up the sides of your pie pan. Pack it down with your hands, or the bottom of a glass if you want to get fancy. It’s OK if it’s not perfect—rustic is the new perfection. Bake for 10 minutes, just until it smells toasty and dreamy. Pull it out.
-
4While the crust is still warm, scatter your chocolate chips (or whatever chocolate army you assembled) all over the base. Let them hang out for 2 minutes so they get gooey, then spread them gently with a spatula. Or a big spoon. Or, if you forget and they cool too much, pop the pan back in the oven for a minute—no biggie.
-
5Top with marshmallows. You want them pretty close together, but don’t stress if there are gaps; it gets delightfully messy anyhow.
-
6Back in the oven it goes for another 7–9 minutes, or until the marshmallows are golden and puffy. (Here’s where you really want to keep an eye on it. I’ve over-browned them once—it was still yummy, just a bit, um, smoky!)
-
7Optional: sprinkle the flaky sea salt on top. Totally your call.
-
8Give it at least 10 minutes to cool and settle. (Sure, I’ve tried to dig in hot and all I got was a chocolate lava landslide—up to you!)
Approximate Information for One Serving
Nutrition Disclaimers
Number of total servings shown is approximate. Actual number of servings will depend on your preferred portion sizes.
Nutritional values shown are general guidelines and reflect information for 1 serving using the ingredients listed, not including any optional ingredients. Actual macros may vary slightly depending on specific brands and types of ingredients used.
To determine the weight of one serving, prepare the recipe as instructed. Weigh the finished recipe, then divide the weight of the finished recipe (not including the weight of the container the food is in) by the desired number of servings. Result will be the weight of one serving.
Did you make this recipe?
Please consider Pinning it!