Let Me Tell You About My Smash Burger Adventures
Alright, so, imagine your first bite of a burger that’s all crispy around the edges, almost whisper-thin in spots, but still somehow juicy smack dab in the middle. I still remember the first time I stumbled onto this technique—it was after seeing some chef dude on TV, so of course I had to give it a go, even though I was totally convinced I’d just end up with ground beef glued to my frying pan (spoiler: I did, the first time). But hey, that’s half the fun of cooking at home, right? Anyway, this one’s become a bit legendary at my place. Even my pickiest kid (he’s four and suspicious of anything green, so you know it’s real) devours these. Oh, and if you’re after something fancy, you’re probably in the wrong place. This is about joy, mess, and reckless amounts of cheese.
Why You’ll Love This—From My Kitchen to Yours
I make these smash burgers when I want dinner to be quick, slightly messy, and absolutely delicious. My family goes nuts for these crispy edges (sometimes they fight over the bits that break off—don’t judge, it’s a thing). And you know what? Smashing burgers is weirdly satisfying after a long day. Sometimes the cheese melts perfectly; sometimes it sort of escapes and crisps up on the pan and I pretend it was intentional. That’s life! Also, there’s just something magic about the combo of salty, crunchy, and juicy. I tried doing them in the oven once—total fiasco. Stovetop really is the way to go, trust me.
What You’ll Need (and Some Lazy Swaps)
- Ground beef (about 80/20 is best for juicy centers, but I’ve totally used 85/15 in a pinch—it works, just not quite as luscious)
- Salt and pepper (or that “All-Seasoning” stuff from the back of the spice cabinet—occasionally I toss in garlic powder if I’m feeling wild)
- American cheese slices (nostalgic, gooey, but cheddar or even Swiss is fine—my grandmother swore by Kraft, but honestly, any decent melty cheese does the trick)
- Soft burger buns (potato buns are my favorite—they soak up the juices, but any soft bun works; brioche if you’re feeling posh)
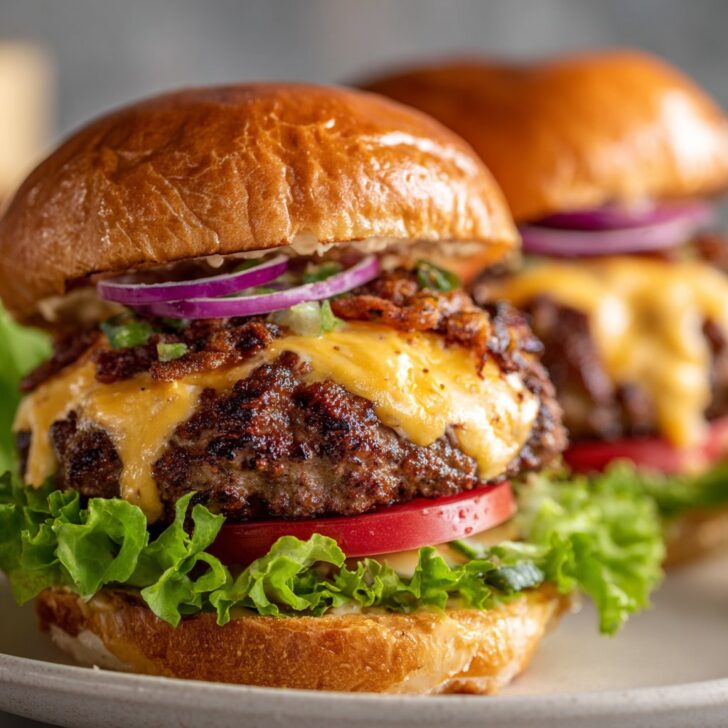
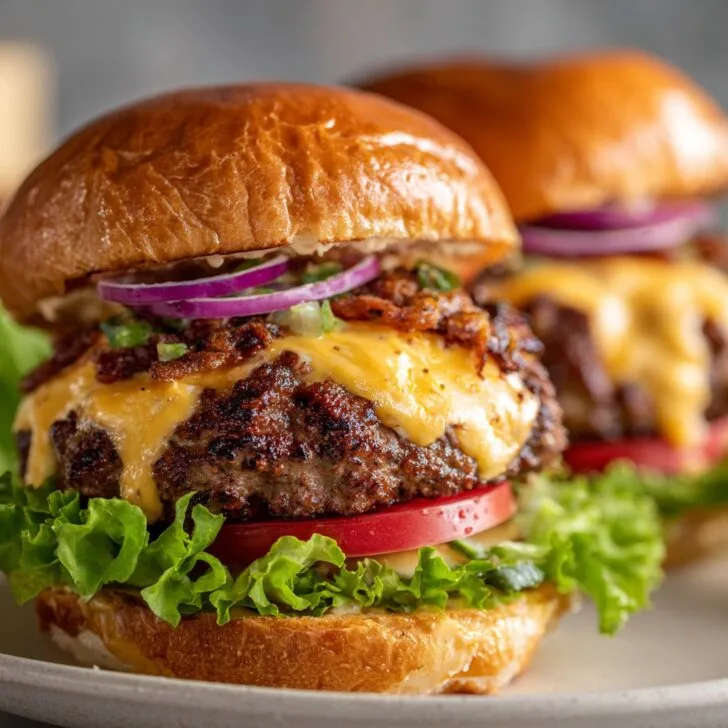
- Whatever toppings you like—I’m basic: lettuce, tomato, pickles, and a big ol’ dollop of mayo. But onions (raw or caramelized), bacon, or even jalapeños have made an appearance before
- Butter (a smidge for the pan, or use a splash of oil if you prefer—sometimes I just use the burger fat, shh)
How I Make ‘Em (And Where I Go Off Script)
- Form the patties: Scoop out a handful of beef (about 80g, or just eyeball it—I do, every single time), and loosely roll it into a ball. Don’t compact it too much or it’ll get tough. Trust me, I’ve made that mistake.
- Heat up your pan: Whack a heavy skillet (cast iron is dreamy for this, but I’ve used nonstick in a pinch) on medium-high. You want it hot, but not literally smoking. If you see a whisp, it’s probably ready.
- Butter the buns: I usually do this while waiting for the pan. Toast them cut-side down until they’re golden; sometimes I get distracted and burn them, but even that’s not a disaster.
- Smash time: Plop the beef ball in the pan. Right away, use a sturdy spatula (or two stacked, for leverage) to press it down as flat as you can. It’s going to sizzle and might look a bit odd—don’t worry! You want those jagged, lacy edges. If you’re feeling extra, place a bit of parchment paper between the meat and spatula; less sticking, more crunch.
- Season: Sprinkle with salt and pepper. This is where I sneak a taste of the cheese (for quality control, obviously).
- Flip & cheese: After 1-2 minutes (the edges should be frilly and brown), flip it carefully. Slap on your cheese. Don’t stress if the cheese hangs off; those crispy bits are the best part.
- Stack & serve: Once the cheese is melty (about a minute), scoop it onto your toasted bun. Load up your toppings, or keep it plain because you just can’t wait any longer.
Notes Form My Many Tries
- Honestly, don’t overwork the beef. The less you fuss, the juicier the center stays.
- If you forget to toast the buns, just pretend it was on purpose. I do.
- American cheese melts best, but sometimes I sneak in a sharp cheddar for a little tang (it doesn’t melt as prettily, but it’s good)
The Weird Stuff I’ve Tried (Variations & Flops)
- Tried a turkey version once—wasn’t my favorite. A bit too dry, honestly, but maybe I overcooked it?
- Adding a dollop of Dijon to the beef before smashing is surprisingly tasty.
- Double smash burgers: Just stack two thinner patties with cheese in between. It’s a lot, but sometimes my brother demands it.
- Mushrooms fried in the pan after the burgers come out—delicious. And a good way to use up stragglers from the fridge.
Don’t Have the Right Equipment? No Worries
Now, cast iron is great, but honestly, I’ve used a regular nonstick pan and even a griddle before. Heck, I once "smashed" burgers using a potato masher wrapped in foil. It worked. Kind of. For a more official-looking smash, check out the burger press reviews on Serious Eats. But don’t stress—use what you have.


How to Store—If There’s Anything Left
Pop leftovers (if you somehow manage to have them) in an airtight container in the fridge for up to 2 days. Microwave for a minute or reheat in a pan. They’re not quite as crispy but still good. Though honestly, in my house, they never last more than a day—midnight snack attack, you know?
Fun Ways to Serve Smash Burgers
We’re simple: a pile of crispy oven fries or potato chips, maybe a side salad if I’m pretending to be healthy. Sometimes we make a burger bar with all the toppings laid out and let everyone go wild. Oh, and pickles. Always pickles! If you’re looking for homemade sauce ideas, the Bon Appétit secret sauce is worth a peek.
Pro Tips I Learned the Hard Way
- I once tried rushing the preheat on my pan and regretted it—no crispy bits, just sad, pale meat. Patience pays off here.
- Stacking two burgers in the same bun sounds fun, but it’s a messy ordeal unless you’re feeling brave (or really hungry).
Smash Burger FAQ (for Real Questions I’ve Gotten)
- Can I make these on a BBQ? You sure can, but only if your grill has a flat griddle part—otherwise, they’ll fall through and that’s just heartbreak.
- Is there a way to make these healthier? Maybe use leaner beef or turkey, but they’ll be a bit less juicy. Or smaller patties, though that just means you’ll eat more, right?
- What if I don’t have parchment for smashing? Just use a spatula and hope for the best. Actually, I find it works better if you accept a little sticking—the crust is worth it.
- Do I have to use American cheese? Nope! I like it best, but use what you have. Even pepper jack is tasty, if a bit messy. Don’t stress.
- Can I freeze the patties? Yep—uncooked balls freeze well. Thaw overnight and smash away.
Sorry, I got a bit sidetracked thinking about that time I dropped a whole burger on the floor and was tempted to do the five-second rule. (Don’t worry, I didn’t!) But really, this "Smash Burgers Recipe with Crispy Edges and Juicy Center" is about having fun, getting a little messy, and making food that people actually beg for. If you want to geek out on burger science, J. Kenji Lopez-Alt has some wild experiments, but most days, simple is best. Happy smashing!


Ingredients
- 1 lb ground beef (80/20 blend)
- 4 burger buns
- 4 slices American cheese
- 1 small onion, finely diced
- 2 tablespoons unsalted butter
- Kosher salt, to taste
- Freshly ground black pepper, to taste
- Pickles, lettuce, tomato, and condiments for serving
Instructions
-
1Divide the ground beef into 4 equal balls (about 4 oz each) without overworking the meat.
-
2Heat a large cast iron skillet or griddle over medium-high heat and add 1 tablespoon of butter.
-
3Place the beef balls onto the hot skillet, then immediately smash each ball flat with a sturdy spatula to about ½-inch thickness.
-
4Season the patties generously with salt and pepper, then sprinkle diced onions on top. Cook for 2-3 minutes until the edges are crispy and browned.
-
5Flip the patties, top each with a slice of cheese, and cook for another 1-2 minutes until the cheese is melted and the center is juicy.
-
6Toast the burger buns with the remaining butter. Assemble the burgers with your favorite toppings and serve immediately.
Approximate Information for One Serving
Nutrition Disclaimers
Number of total servings shown is approximate. Actual number of servings will depend on your preferred portion sizes.
Nutritional values shown are general guidelines and reflect information for 1 serving using the ingredients listed, not including any optional ingredients. Actual macros may vary slightly depending on specific brands and types of ingredients used.
To determine the weight of one serving, prepare the recipe as instructed. Weigh the finished recipe, then divide the weight of the finished recipe (not including the weight of the container the food is in) by the desired number of servings. Result will be the weight of one serving.
Did you make this recipe?
Please consider Pinning it!!