
Making Shamrock Shake Pudding Cups – Let's Dive In
Alright, let me level with you: if you’re after a fancy, fussy dessert, maybe this isn’t it. But if you want something that’s smooth, sweet, and has that chilly minty vibe that takes me *right* back to my first ever Shamrock Shake (in a parking lot, age 12, and yes, it melted all over the seat), you’re in the right spot. These pudding cups are my lazy-but-loved solution for St. Paddy’s (or any Wednesday I want to be a little extra). It’s the sort of thing that makes my niece’s eyes practically glow. True story: one time she tried to bribe me for the last cup, but I caved and just made a double batch. It’s that sort of treat.


Why You’ll Love This
I make these when I need a fuss-free dessert that still looks like I put in a bit of effort. My family goes crazy for the creamy texture and that just-right mint flavor (though my brother insists on extra whipped cream, as if there’s any other way). Not gonna lie, I struggled for ages to get that green just right, but really, a few drops of food coloring is all it takes. Sometimes I just want that retro milkshake flavor without dragging out the blender or dealing with melting ice cream—that’s where these shine. And if you’ve had a long week—just say you need to test the flavor for “quality control.”
Here’s What You’ll Need (with my usual switches):
- 1 box (3.4 oz / about 96g) instant vanilla pudding mix (sometimes I swap in white chocolate pudding—tastes richer, but not everyone’s cup of tea)
- 2 cups (480ml) cold milk (honestly, I use 2%—whole turns out a bit thicker, so just use what you’ve got)
- 1 to 1 ½ teaspoons mint extract (NOT peppermint, please—the times I’ve grabbed the wrong bottle, you don’t want to know)
- Green food coloring (start with 3 drops; my granny swears by the gel kind, but I just grab the classic liquid and it’s fine)
- 1 cup (about 240ml) whipped topping or homemade whipped cream, plus extra for topping (when I’m being fancy, I whip my own, but usually it’s the frozen tub, straight from the freezer—just let it thaw a bit, obviously)
- Mini chocolate chips or chocolate shavings for garnish
- Maraschino cherries (optional, but my uncle insists it isn’t a real shake without one perched on top)
How To Make ‘Em—Real Talk
- Grab a big mixing bowl and whisk together your pudding mix and cold milk for a couple of minutes, until it thickens up. Don’t worry if it seems a bit runny at first—it’ll set up, promise! (This is when I usually manage to get pudding splatter somewhere totally unnecessary.)
- Stir in mint extract and a few drops of green food coloring. Give it a good sniff (ok, maybe don’t stick your nose right in). Adjust the color and mint to taste—I like it bold, but maybe don’t go full toothpaste-flavor.
- Once mixed, gently fold in about a cup of whipped topping—just enough to make it light and a tad fluffy. Use a spatula for this so you don’t kill the fluff. This is where I inevitably sneak a spoonful.
- Spoon the pudding evenly into cups or little bowls (I use those old jam jars I save for “someday” projects—works a treat).
- Chill the cups in the fridge for at least an hour—longer if you want them really set, but sometimes I just can’t wait.
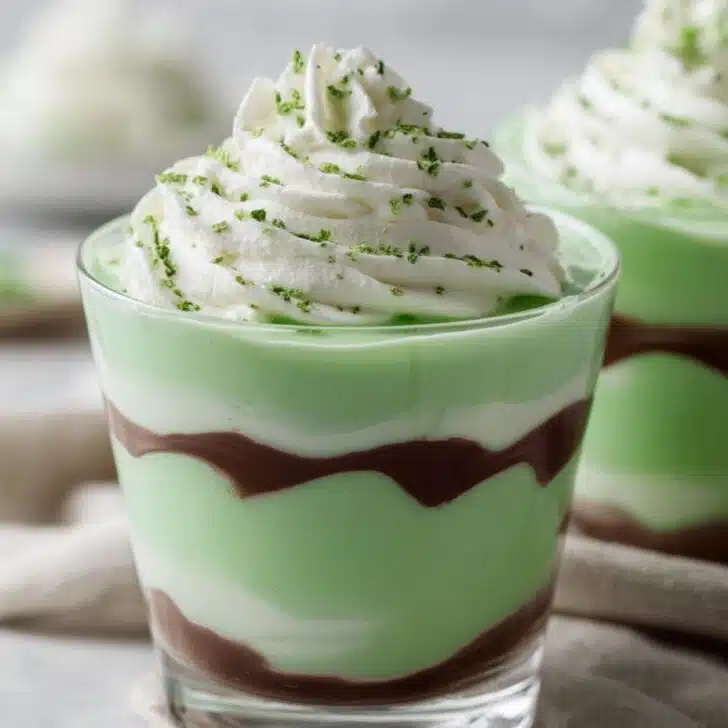
- Top with a swirl (or a mountain, no one’s judging) of whipped cream, sprinkle chocolate chips or shavings, and finish with a cherry if you like.


Some Stray Notes from My Kitchen
- If you’re using gel food coloring, you need less—though my cousin once went so wild with it that the pudding ended up looking like cartoon slime. Maybe be sparing.
- Actually, I find it works better if you let the pudding chill before spooning into cups, but sometimes I just wing it and portion immediately. No one’s ever noticed.
Variations I’ve Played With (and the One That Flopped)
- For chocolate-mint cups: add a layer of crushed chocolate cookies at the bottom. Tastes like a Thin Mint crashed the party.
- I once tried subbing pistachio pudding instead of vanilla. It was brilliant color-wise, but honestly, nobody liked it much—so maybe skip that one unless you’re obsessed with pistachio.
- If you’re dairy-free, almond or oat milk plus coconut whip won’t quite set as firmly, but it works for a looser, still-tasty treat.


Equipment (and Workarounds I’ve Used)
- You need a mixing bowl and a whisk—though one time I tried mixing by fork, and I can’t say I’d recommend it. Desperate times, right?
- Some kind of cups or jars, or honestly, I’ve made it straight in a Tupperware and just scooped it out.
How To Store Them (If They Last—Which is Rare Here)
Keep your pudding cups covered in the fridge; they taste great for up to two days, though, honestly, in my house it never lasts more than a day! If they sit longer, the whipped topping might get a bit weepy—but still totally edible in my book.
Serving ‘Em Up—What We Like
We love these pudding cups straight from the fridge, loaded with extra whipped cream and sometimes with colorful sprinkles (my youngest niece will riot otherwise). Tried one with a crunchy wafer cookie stuck in once—surprisingly delightful. And for parties? I’ve done mini versions in shot glasses; they disappear twice as fast. Go figure.
Pro Tips (Learned the Hard Way)
- I once tried to rush the pudding chilling stage and regretted it because the cups turned into a soupy green mess. Give ‘em at least an hour if you care about slurping versus scooping.
- Don’t bother over-mixing the whipped topping. Just gently fold, or it goes weirdly slack—ask me how I know.
FAQ—Actual Questions From Friends & Family
- Can I use peppermint extract instead of mint?
- You could, but I wouldn’t unless you want your pudding cups to taste like Christmas toothpaste. Stick with plain old mint if you can.
- Can I make these ahead?
- Yep! I usually make mine the morning of a party. They hold up well for a day (maybe even two, though the topping might sag a little).
- Do I need a stand mixer?
- Nope, just a whisk and some wrist action. Though if you have an electric mixer lying about, it does make things easier especially if you’re doubling up.
- Is there a way to make these even greener?
- Add a tiny touch more food coloring—or pop in a spinach leaf and blend (not kidding, I saw a food blogger do it, but I haven’t tried. Yet).
If you make these, let me know how it went or what weird garnish you topped it with. Last year, my neighbor added rainbow cereal, and you know what? It was actually kind of genius. So go wild.
Ingredients
- 1 box (3.4 oz / about 96g) instant vanilla pudding mix (sometimes I swap in white chocolate pudding—tastes richer, but not everyone’s cup of tea)
- 2 cups (480ml) cold milk (honestly, I use 2%—whole turns out a bit thicker, so just use what you’ve got)
- 1 to 1 ½ teaspoons mint extract (NOT peppermint, please—the times I’ve grabbed the wrong bottle, you don’t want to know)
- Green food coloring (start with 3 drops; my granny swears by the gel kind, but I just grab the classic liquid and it’s fine)
- 1 cup (about 240ml) whipped topping or homemade whipped cream, plus extra for topping (when I’m being fancy, I whip my own, but usually it’s the frozen tub, straight from the freezer—just let it thaw a bit, obviously)
- Mini chocolate chips or chocolate shavings for garnish
- Maraschino cherries (optional, but my uncle insists it isn’t a real shake without one perched on top)
Instructions
-
1Grab a big mixing bowl and whisk together your pudding mix and cold milk for a couple of minutes, until it thickens up. Don’t worry if it seems a bit runny at first—it’ll set up, promise! (This is when I usually manage to get pudding splatter somewhere totally unnecessary.)
-
2Stir in mint extract and a few drops of green food coloring. Give it a good sniff (ok, maybe don’t stick your nose right in). Adjust the color and mint to taste—I like it bold, but maybe don’t go full toothpaste-flavor.
-
3Once mixed, gently fold in about a cup of whipped topping—just enough to make it light and a tad fluffy. Use a spatula for this so you don’t kill the fluff. This is where I inevitably sneak a spoonful.
-
4Spoon the pudding evenly into cups or little bowls (I use those old jam jars I save for “someday” projects—works a treat).
-
5Chill the cups in the fridge for at least an hour—longer if you want them really set, but sometimes I just can’t wait.
-
6Top with a swirl (or a mountain, no one’s judging) of whipped cream, sprinkle chocolate chips or shavings, and finish with a cherry if you like.
Approximate Information for One Serving
Nutrition Disclaimers
Number of total servings shown is approximate. Actual number of servings will depend on your preferred portion sizes.
Nutritional values shown are general guidelines and reflect information for 1 serving using the ingredients listed, not including any optional ingredients. Actual macros may vary slightly depending on specific brands and types of ingredients used.
To determine the weight of one serving, prepare the recipe as instructed. Weigh the finished recipe, then divide the weight of the finished recipe (not including the weight of the container the food is in) by the desired number of servings. Result will be the weight of one serving.
Did you make this recipe?
Please consider Pinning it!