
Pulled Together Over Laughter (and Cravings)
I’ll just put it out there: sometimes, a roast beef & cheddar melt sandwich is the only thing that gets me through a rainy Thursday on planet Earth. My first time making this, I was maybe twelve, using cold leftover roast beef we forgot was in the fridge (a risky move which, miraculously, paid off). There was cheese, bread, and—yes—some fairly questionable mustard lurking in the corner. Anyway, it’s become sort of a regular thing since then; sometimes I even plan for leftovers just to make these. Oh, and once my cousin Trevor tried to add pickles and it became a whole saga…but that’s probably a story for another time.
Why You’ll Love This (Or at least, why I do)
I make this when someone (okay, usually me) declares they can’t possibly face another cold sandwich. My family goes a bit wild for this because, honestly, there’s something oddly charming about gooey cheddar and warm beef on toasted bread (especially when you’re standing in the kitchen, stealing a bite before anyone else sees). Sometimes I mess up and the cheese oozes everywhere—doesn’t matter. Still delicious. Also, you can basically throw in anything you like. I used horseradish sauce straight out of stubbornness once and it was actually pretty great—major shock to me.
Lay Out the Goods – Ingredients (with a few cheats)
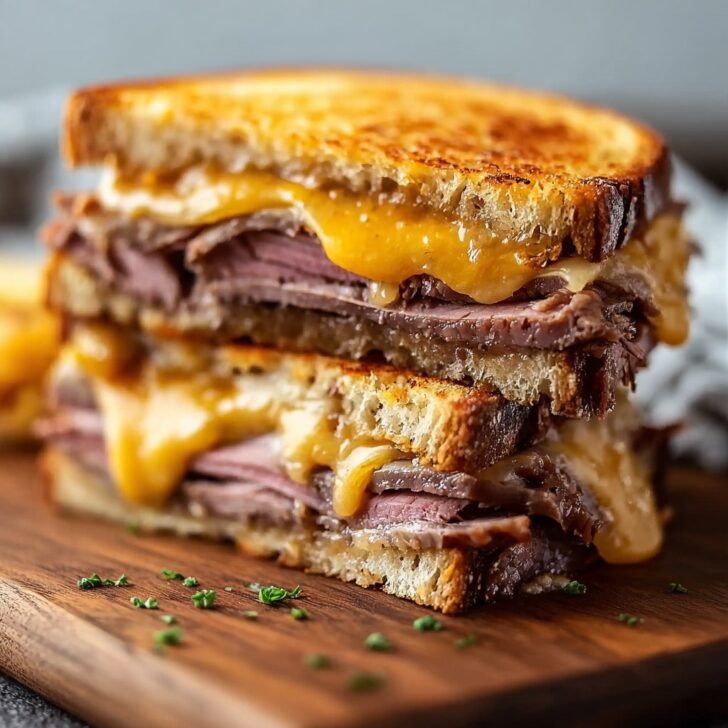
- About 200g roast beef, thinly sliced (leftover home-roasted is chef’s kiss, but the stuff from the deli works fine—my grandma used to swear by that fancy stuff from the market, but honestly, who has the time?)
- 4 slices of sturdy bread—sourdough, rye, or whatever’s about to go stale
- 2 thick slices sharp cheddar cheese (I sometimes use pre-shredded if I’m in a hurry, but it melts funkier—your call)
- 1 tablespoon butter, soft enough to spread (sometimes I use mayo; don’t @ me, it crisps up great)
- 1-2 teaspoons prepared horseradish sauce or Dijon mustard (optional but not really optional—I’d riot without it)
- A few slices of red onion (if you’re feeling fancy, or you need to justify calling it a “meal”)
- Freshly cracked black pepper (don’t skip this—it lifts the whole thing)
- Pinch of salt (if your beef’s from the store, you probably need it)
Making The Magic Happen (Directions that don't require perfection)
- First up: butter (or mayo, if you dare) one side of each bread slice. Trust me, it helps lock in all the melty goodness later. This is the spot where my dog usually gives me the most judgmental look.
- Heat a skillet or frying pan over medium heat. While it warms, lay out two slices, butter-side down. Add a slice of cheddar to each, then pile on the roast beef. You want enough beef that it sticks out the sides (that’s the snacky bit you steal while no one’s looking).
- Dollop some horseradish or Dijon over the beef. (It always looks a bit weird at this point—don’t panic. Maybe I add too much?)
- If you’re using red onion (do it!), layer a few slices on top. Grind some pepper and maybe a bit of salt.
- Top with the other slices of bread, butter-side up. Actually, if you assembled with the butter sides in, just flip those suckers in the pan—life’s too short to stress over symmetry.
- Cook for 3-4 minutes each side, pressing gently with a spatula. Don’t wander too far! The cheese melting test: I poke it with the spatula. If things ooze, we’re close. If it burns, well, extra flavor—I say it’s “toasted.”
- Remove and let them hang out for a couple of minutes. This is when I sneak a taste and, nine times out of ten, regret not letting it cool, tongue-wise.
- Slice on the diagonal—because it’s fancier, I guess? Serve while still oozy and melty.
Notes: Stuff I Learned the Hard Way
- Pressing too hard with the spatula squashes all the cheese out. (Ask me how I know.)
- Mayo browns up faster than butter, so keep an eye out if you go down that road.
- If you forget the mustard/horseradish, it’s still fine, but kind of…meh.
Variations that Mostly Work (and one odd miss)
- Swiss cheese is lovely too, though not as bold. Or try smoked provolone if you’re feeling European.
- For a spicy twist, I once used jalapeños instead of onion. Loved it, but my kids? Not so much…
- Used gluten-free bread once—bit crumbly, but the flavor still smacked.
- Once tried cranberry sauce on this. Regret. Let’s not speak of it.
Equipment (But Don’t Stress It)
- Frying pan or skillet - Cast iron is dreamy but I usually use non-stick, less fuss. Don’t have one? Try a grill pan or even a sandwich press (if your kitchen isn’t as compact as mine).
- Butter knife or spoon for spreading – or, honestly, just your fingers. (I won’t judge.)
- Spatula for flipping – though I used tongs in a pinch, which was, um, exciting.


Can You Save These? (Storage thoughts that might sound familiar)
Honestly, in my house, these sandwiches never make it past the first sitting. If you do end up with leftovers, wrap ‘em in foil and pop them in the fridge—good for 24 hours. They warm up ok in the toaster oven (not the microwave, unless you love soggy bread), but I always think they taste better straight from the pan.
On the Side: Serving Ideas I Keep Coming Back To
We usually go with a pickle spear and a handful of crisps (chips, for my American mates). If it’s cold out, a mug of tomato soup is a killer combo. Sometimes, just some baby greens tossed with whatever vinaigrette is hiding in the back of the fridge—so you don’t feel too guilty after all that cheese.
Little Pro Tips (Learned the long way around)
- Don’t stack the pan too full—the heat won’t circulate and you’ll end up with cold, unmelted cheese disasters. I once tried doing two at once to “save time”—big, sad, soggy mistake.
- Actually, waiting a minute before cutting makes the melted cheese stay put, instead of running all over the plate. (Yes, impatience is my downfall.)
FAQ (Real Questions, Real Answers)
- Can I make this in a toaster?
Not really—unless you want a mess. If you don’t have a pan, maybe try an oven broil, but keep a close eye. Learned that the hard way, trust me. - What if I only have American cheese?
Go for it. It melts extra gooey, just maybe use one slice less or you’ll have a cheese river situation (which isn’t the worst, come to think of it). - Is horseradish sauce a must?
I think so, but some folks in my family would disagree—try a little and see what you like. But start small… it packs a punch! - Any good sides?
This sandwich loves a simple salad or a handful of crisps. Tomato soup is top tier, in my opinion. By the way, Serious Eats has a good tomato soup guide too. - Where can I get good roast beef?
If you’ve got a decent deli, use them; otherwise, I order mine online on occasion—try Zingerman's (not sponsored, just impressed). Failing that, any grocery store version works in a pinch.
Not sure if I’ve covered every angle, but honestly, the best advice is just to give it a whirl and see where your taste buds take you. And if you discover a wild twist, write me—I promise to try (almost) anything once.


Ingredients
- 8 slices of crusty sandwich bread
- 1 pound sliced roast beef
- 8 slices sharp cheddar cheese
- 4 tablespoons unsalted butter, softened
- 1 small red onion, thinly sliced
- 4 tablespoons creamy horseradish sauce
- 1 tablespoon Dijon mustard
- Salt and pepper to taste
Instructions
-
1Preheat a skillet or griddle over medium heat. Spread a thin layer of butter on one side of each slice of bread.
-
2In a small bowl, mix horseradish sauce and Dijon mustard. Spread the mixture on the unbuttered side of half the bread slices.
-
3Layer roast beef, cheddar cheese, and red onion on the prepared bread. Season with salt and pepper. Top with the remaining bread slices, butter side out.
-
4Place sandwiches on the skillet. Cook for 5-6 minutes per side, pressing lightly, until the bread is golden brown and the cheese has melted.
-
5Remove sandwiches from the pan, slice in half, and serve hot.
Approximate Information for One Serving
Nutrition Disclaimers
Number of total servings shown is approximate. Actual number of servings will depend on your preferred portion sizes.
Nutritional values shown are general guidelines and reflect information for 1 serving using the ingredients listed, not including any optional ingredients. Actual macros may vary slightly depending on specific brands and types of ingredients used.
To determine the weight of one serving, prepare the recipe as instructed. Weigh the finished recipe, then divide the weight of the finished recipe (not including the weight of the container the food is in) by the desired number of servings. Result will be the weight of one serving.
Did you make this recipe?
Please consider Pinning it!!