
The Story: How Cake Pops Stole My Valentine's Day
So let me just say, I never thought I'd be a cake pop person. Cake, yes. Pops? Eh, felt too trendy. But last Valentine's Day, after the store-bought chocolates vanished (and yep, my kids totally sniffed out my chocolate stash!), I gave these red velvet cake pops a go. Turns out, sticking cake on a stick and drowning it in chocolate is basically irresistible. Now they're kinda my thing for February—I've even caught my husband sneaking them at midnight. Funny how life tosses these little surprises your way—I guess there are worse family legacies?


Why You'll Love This (Or at Least Why I Keep Making Them)
I whip these up when I want to look like I've gone to heaps of effort (spoiler: I mostly haven't). My family goes bonkers for them because they're bite-sized and a little fancy looking; plus, they're the right kind of messy to make with kids. If I over-bake the cake or the frosting's a bit odd—no one's noticed yet. Actually, I think they like the not-too-perfect look. Someone always asks "did you really make these?" and I just wink. Also, they're great for using up leftover cream cheese lurking in the fridge.
What You'll Need: Ingredients (With a Few Swaps I Actually Use)
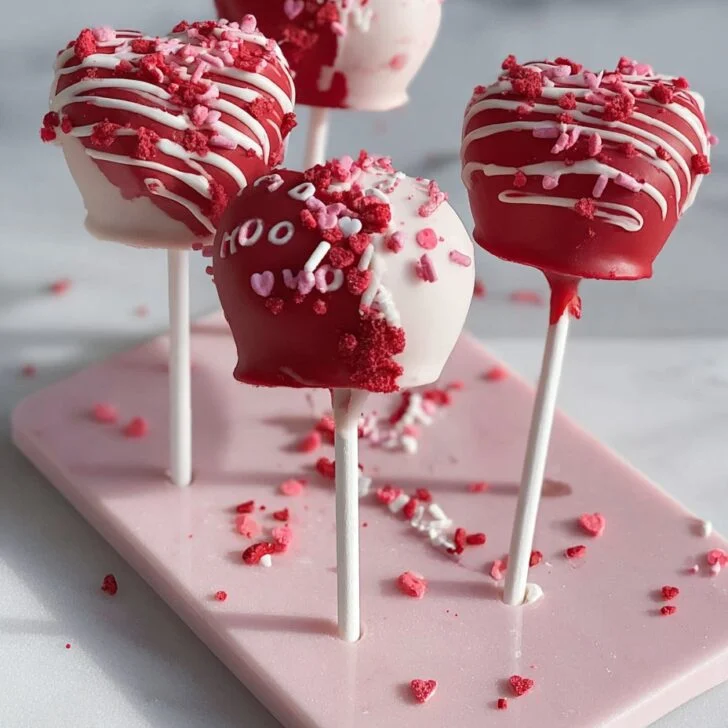
- One baked red velvet cake (boxed or homemade, both work—when in a dash, I grab Duncan Hines or whatever's cheapest. My aunt swears by Betty Crocker but honestly, it all gets crumbled up anyway.)
- 1 tub (about 1 ½ cups) cream cheese frosting (store-bought is fine, or if I’m feeling ambitious, I’ll make it from scratch—half the time, it’s store-bought.)
- About 300g (10 oz) white chocolate or candy melts (sometimes I use dark chocolate, but the white looks cute with Valentine’s sprinkles. Use what you’ve got—I've even done half white, half milk choc once.)
- Valentine’s themed sprinkles (or mismatched ones—the kids really don’t care!)
- Lollipop sticks (honestly, I’ve used paper straws cut in half before. Worked almost as well.)
Let's Make 'Em: Directions (With a Few Side Notes for Real Life Cooks)
- Crumble: Let your cake cool completely. Crumble it up with your hands into a big bowl—my youngest LOVES this part, though it’s a bit messy, I won't lie.
- Mix in Frosting: Scoop in your frosting, a few spoonfuls at a time. I just use my (clean) hands, so it’s well combined and kinda like playdough. If you add too much frosting, the mixture gets mushy—so go slow. This is where I usually sneak a taste. For quality control. Obviously.
- Shape into Balls: Pinch off bits (size of a walnut-ish) and roll them between your palms. Place on a baking sheet lined with parchment. If it gets sticky, wash your hands and keep going. Sometimes I get 22 pops, other times 28—math’s not my strong suit here.
- Chill: Stick 'em in the fridge for 1-2 hours or the freezer for half an hour if you want to speed it up (I usually forget and leave them longer—no harm done, just extra cold hands when you work with them).
- Melt Chocolate: Zap your candy melts or chocolate in a microwave-safe bowl in 20 second bursts, stirring each time. (If I overdo this and it seizes up, a splash of coconut oil sometimes fixes it, sometimes not, honestly. No science here.)
- Stick and Dip: Dip one end of each lollipop stick into the melted chocolate, then press into each cake ball about halfway. The chocolate glue helps it stick. Once they’re all "stabbed" (my kids’ word), chill for 10 more minutes so the stick sets.
- Dunk and Decorate: Now, coat each cake pop in melted chocolate—spoon over the top if dunking is tricky. Tap the stick gently on the side to shake off drips. Quickly add sprinkles (if you wait, they won’t stick—learned that the hard way).
- Dry: Stick the pops into a block of foam or a big mug to set upright, or just lay them on parchment if you’re feeling chill about flat spots.
Bits I've Learned Along the Way (Notes)
- If the cake’s a little overdone or dry, the frosting actually saves it. On the flip side, too much frosting = cakey goo disaster.
- I sometimes forget to chill the pops after adding sticks, but really, that’s when half of them fall off into the chocolate. Oops.
- Melting white chocolate is a bit of a diva—if it looks thick, add a dab of oil. Or just call it “rustic style” when the coating is bumpy.
Other Things I’ve Tried (Variations, Including That Total Flop)
- Swapped red velvet with chocolate cake: still good, but doesn’t look as festive for Valentine’s.
- Made a batch with lemon cake and white chocolate—honestly, didn’t love it. Something felt off, maybe too tart?
- Tried rolling in crushed freeze-dried strawberries before the chocolate set—actually, amazing.
- Once I dunked the pops in multi-color sprinkles. Utter chaos. The kids adored it but the kitchen looked like a confetti parade.


Do You Really Need These Gadgets? (Equipment Talk)
- Mixing bowl: Big one, for mashing and mixing.
- Baking sheet + parchment: Stops your pops sticking everywhere—though I once used a pizza box lid. Worked fine, don’t judge.
- Microwave or stovetop: For melting chocolate. Stove works better sometimes, especially if your microwave is dodgy.
- Lollipop sticks: If you don’t have them, toothpicks work (just, not great for little ones).
- Someplace to stick the pops upright: Foam block, mug with raw rice, or a colander upside down. Or just lie them flat, no one’s coming over with a measuring stick, right?
Keepin’ Them Fresh: Storage Stories
Stick these in an airtight container in the fridge—they’ll last 3 or 4 days, or up to a week (supposedly), but honestly, in my house, they disappear overnight. If you make 'em ahead, let them sit at room temp for 10 minutes before sharing—peoples’ teeth will thank you.
Serving: How I Like to Deliver the Goods
I prop them up in a big glass vase with shredded red paper (leftover form last year’s gift wrap mess). At our house, we write silly messages on tiny tags and tie them to each pop. My sister likes serving them with hot cocoa, but I’m more the “hand out straight from the tray” type. There’s no wrong way.
If You’re Like Me: Pro Tips (Learned the Hard Way)
- Don’t rush the chilling step for the cake balls. I once did and half ended up on the kitchen floor because the sticks slid out—sad, but edible.
- Use a tall, narrow mug for dipping! I tried a wide bowl once, total chaos—wasted tons of chocolate.
- If your chocolate looks chalky, a tiny spoonful of oil makes it glossy; just don’t pour in a ton, or you’ll have a runny mess. Trust me.
FAQ: Honest Answers to Real-Life Questions (Some I’ve Actually Gotten at Parties)
- Can I use cake mix? Oh absolutely. I do half the time. From scratch if you’re feeling fancy, boxed if you’ve got things to do and a pile of laundry.
- What if I don't have lollipop sticks? Try toothpicks or paper straws. Or skip the stick—just serve as cake balls. Still tastes lovely.
- How do I stop the cake pops from falling apart? Chill them well and don’t drown them in frosting. And make sure the stick's glued in with chocolate before dipping; otherwise, you'll be fishing cake from melted chocolate (I speak from experience).
- Can I freeze them? Sure, but take 'em out before serving so they’re not tooth-breakingly cold. Never lasts long enough in my freezer…but you might have more willpower than me!
- Do they have to be red velvet? Nope. Try chocolate, vanilla, anything you like. But for Valentine's—I mean, red just looks the part.
Now go on, get messy, and enjoy. And if the chocolate takes over half your kitchen, well, it’s just proof you gave it some heart! (By the way, anyone else constantly lose their favorite mixing spoon? Because mine seems to be conspiring with the Tupperware lids again...)
Ingredients
- 1 ¼ cups all-purpose flour
- ½ cup granulated sugar
- ¼ cup unsweetened cocoa powder
- ½ teaspoon baking soda
- ¼ teaspoon salt
- ½ cup buttermilk
- ½ cup vegetable oil
- 1 large egg
- 1 tablespoon red food coloring
- 1 teaspoon vanilla extract
- ½ cup cream cheese frosting
- 12 ounces white candy melts
- Assorted Valentine's Day sprinkles
- 18 lollipop sticks
Instructions
-
1Preheat the oven to 350°F (175°C). Grease and flour an 8-inch round cake pan.
-
2In a large bowl, whisk together the flour, sugar, cocoa powder, baking soda, and salt.
-
3Add the buttermilk, oil, egg, red food coloring, and vanilla extract to the dry ingredients and mix until well combined. Pour the batter into the prepared pan.
-
4Bake for 25 minutes or until a toothpick inserted into the center comes out clean. Let the cake cool completely, then crumble it into fine crumbs in a large bowl.
-
5Mix in the cream cheese frosting until the mixture holds together. Shape into 18 balls and place on a baking sheet lined with parchment paper.
-
6Melt the candy melts according to package instructions. Dip each lollipop stick into the melted candy before inserting into each cake ball. Freeze cake pops for 15 minutes, then dip each cake pop fully in the melted candy coating. Decorate immediately with sprinkles and allow to set before serving.
Approximate Information for One Serving
Nutrition Disclaimers
Number of total servings shown is approximate. Actual number of servings will depend on your preferred portion sizes.
Nutritional values shown are general guidelines and reflect information for 1 serving using the ingredients listed, not including any optional ingredients. Actual macros may vary slightly depending on specific brands and types of ingredients used.
To determine the weight of one serving, prepare the recipe as instructed. Weigh the finished recipe, then divide the weight of the finished recipe (not including the weight of the container the food is in) by the desired number of servings. Result will be the weight of one serving.
Did you make this recipe?
Please consider Pinning it!!