
Alright, friend, let me just say up front—these Peanut Crunch Bars have been responsible for more sticky fingers and happy sighs at my kitchen counter than just about anything else I make. The first time I threw them together, it was honestly because I’d run out of patience waiting for cookies to chill (waiting is not my spiritual gift). Now, every family picnic, I get these squinty looks—like, "You did bring the crunchy bars, right?" Oh, and I've even caught my neighbor, Carol, sneaking an extra square in her purse. (If you’re reading this, Carol—I know!)
Why I Keep Making These
I pull this recipe out when I basically need a win (and when the snack cupboard is looking sad). My kids go full goblin for these bars, probably because they're both crunchy and sticky—the peanutty kind of sweet that leaves bits in your teeth, but you don't even mind. Once or twice the bars turned out extra chewy 'cause I got distracted by my cat trying to eat a rubber band; honestly that wasn’t even a dealbreaker—just a different sort of good. And if you’ve ever been frustrated by recipes that use like three bowls for no reason, you’ll like this; the clean-up’s just a breeze (well, mostly—I still lost a spatula once… don’t ask).
Ingredient Notes: Use What You’ve Got (Mostly)
- 1 cup (about 250g) smooth peanut butter (I use Skippy most times, but I’ve tried generic brands; works fine. Sometimes I’d go crunchy if it’s what’s in the cupboard.)
- ½ cup (about 120ml) honey or golden syrup (honey feels a bit posher, doesn’t it? You can swap for corn syrup, but it’s a bit sweeter, so maybe use less.)
- ⅓ cup white sugar (or brown sugar, if you like your bars with a bit of moodiness. Honestly, I've mixed both once.)
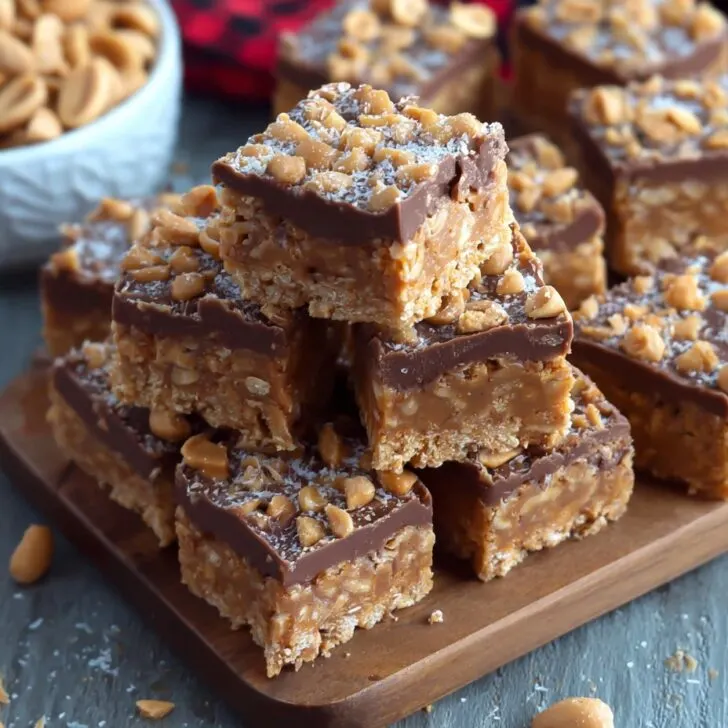
- 3 cups Rice Krispies (or, as my aunty insists, any puffed rice cereal. Coco Pops in a pinch? Did that once. Regretted it—maybe you’re braver.)
- 1 cup roasted, salted peanuts, roughly chopped (I skip the chopping when I’m lazy. My grandma always said, “Salted only!” but really—plain works too.)
- 1 teaspoon vanilla (optional, but I vote yes)
- Pinch of flaky salt for the top (makes you feel like a chef; skip if your peanuts are plenty salty)
How I Like to Make 'Em (And Where I End Up Tasting... Oops)
- Line a square baking dish (8x8 inches or thereabouts—sometimes I use my battered brownie tin) with parchment. You could just grease if you’re feeling lived-in.
- In a big-ish saucepan, toss in your peanut butter, honey (or syrup), and sugar. Stir over low-ish heat—like, don’t wander off—to melt it all together. Tip: It’ll look weirdly separated at first, but keep going. (This is the bit where I sneak a taste and feel guilty but not really.)
- Once it’s looking smooth like good gravy, take the pan off the heat. Quickly dump in vanilla, Rice Krispies, and peanuts. Stir with a wooden spoon, or, honestly, anything that hasn’t melted—sometimes I just use a spatula with a chewed handle (dog life).
- Scoop the whole sticky mess into your prepared tin. Press it down—gently, not like you’re squishing a bug. I usually oil my fingers a little. Or use the back of a spoon, but fingers work better if you’re not afraid of getting messy.
- Sprinkle on a pinch of flaky salt, if using. Seriously, it adds a little magic.
- Let it cool—on the counter if you’re patient, or chuck it in the fridge (I do this only if I’m in a hurry, which is...often). Once it's set, slice into bars or squares—triangles if you’re feeling fancy.
Stuff I Wish I’d Known Earlier (A Few Notes)
- Once I forgot to line my pan. Getting those bars out? Like trying to get a stubborn sticker off a new plate… so, yeah, use parchment.
- Actually, microwaving the peanut butter and honey together if you’re in a rush works, but do it in short bursts or the sugar crystallizes weird.
- Pressing the mixture down too hard makes the bars tough. Like, jaw workout tough. Gentle wins the race here.
Variations I’ve Tried (Plus One Fiasco)
- Drizzled melted chocolate over the top—total game changer. I use plain dark chocolate. Sally’s recipe gave me the idea.
- Added a handful of chopped dried cranberries once for a bit of zing—it looked festive, honestly.
- Tried swapping in granola for the Rice Krispies, thinking I was clever. Result: bars that totally crumbled (maybe I did something wrong, but they made great ice cream toppers!).
Do You Really Need Fancy Equipment?
I mean, a good saucepan helps, but I’ve used a frying pan in a pinch—just keep stirring. Don’t fuss if you don’t have a parchment-lined pan; a silicon mat works. Or just grease the pan properly and serve right from it (spoon bars, anyone?).


How I Store Peanut Crunch Bars (For the Short Time They’re Around)
Honestly, these bars never last long in my house. But, store them in an airtight container at room temp (away from direct sun or a clingy cat) up to 4 days. If it’s hot, fridge is fine, but the bars’ll be a little firmer.
Serving It Up: When and How
I like to serve these just as they are, but my little one likes theirs with cold milk. My uncle swears they taste better after a night in the fridge (he’s not wrong—sometimes, though, I can’t wait that long). Might even cut them bite-size for a lunchbox treat.
What I’d Tell My Past Self (Pro Tips!)
- Don’t rush the melting step. (I once cranked the heat, impatient, and ended up with a half-burnt, half-grainy goop. Lesson learned!)
- Let it cool fully before you cut, even if you’re itching to try. Otherwise you get a stringy, sticky mess instead of neat bars.
- If you want really defined bars, chill before slicing. Use a hot knife—learned that one form King Arthur Baking.
Questions I’ve Actually Gotten (or Wished Someone Asked)
- Can I use almond butter instead of peanut butter? You totally can; flavor changes a bit, but it’s lush. Sunflower butter if you want it nut-free (that stuff’s pricy though).
- Is it gluten-free? If your cereal is, then yeah. Check this gluten-free guide to be sure.
- How sticky should the mix be? Pretty sticky. If you can’t press it in the pan, add a dash more cereal; if it crumbles, a bit more syrup should help. On second thought, maybe add in stages until it looks right.
- What do I do if my bars are too soft? Fridge time! Or maybe you went a little heavy on the syrup—happens to me, too. Next time, try a smidge less.
- Can dogs eat these? Eh, probably not. Dogs and sugar/salt/peanuts aren’t usually a great mix. I’d stick to dog treats for your furry pals.
Side note: last time I made these, I got distracted by a rerun of the Great British Bake Off (don’t judge me) and let the mix cool too long before pressing into the pan. Ended up with what I’ll kindly call a 'deconstructed dessert'—still tasty, but next time I’ll stick to the plan!
Let me know how yours turn out—send pics if you’re proud, or, honestly, even if you’re not. Every kitchen adventure deserves a celebration in my book.


Ingredients
- 1 cup unsalted roasted peanuts
- 1 ½ cups crispy rice cereal
- ½ cup creamy peanut butter
- ½ cup honey
- ¼ cup brown sugar, packed
- 1 teaspoon vanilla extract
- ¼ teaspoon salt
- ½ cup semi-sweet chocolate chips (optional for topping)
Instructions
-
1Line an 8x8-inch baking pan with parchment paper and lightly grease.
-
2In a saucepan over medium heat, combine honey and brown sugar. Stir and heat until the mixture begins to bubble, about 2 minutes.
-
3Remove from heat and stir in the peanut butter, vanilla extract, and salt until smooth.
-
4Add roasted peanuts and crispy rice cereal to the mixture. Stir until all ingredients are well coated.
-
5Press the mixture evenly into the prepared pan. If desired, sprinkle chocolate chips on top and press lightly.
-
6Let cool at room temperature for at least 1 hour before slicing into bars and serving.
Approximate Information for One Serving
Nutrition Disclaimers
Number of total servings shown is approximate. Actual number of servings will depend on your preferred portion sizes.
Nutritional values shown are general guidelines and reflect information for 1 serving using the ingredients listed, not including any optional ingredients. Actual macros may vary slightly depending on specific brands and types of ingredients used.
To determine the weight of one serving, prepare the recipe as instructed. Weigh the finished recipe, then divide the weight of the finished recipe (not including the weight of the container the food is in) by the desired number of servings. Result will be the weight of one serving.
Did you make this recipe?
Please consider Pinning it!!