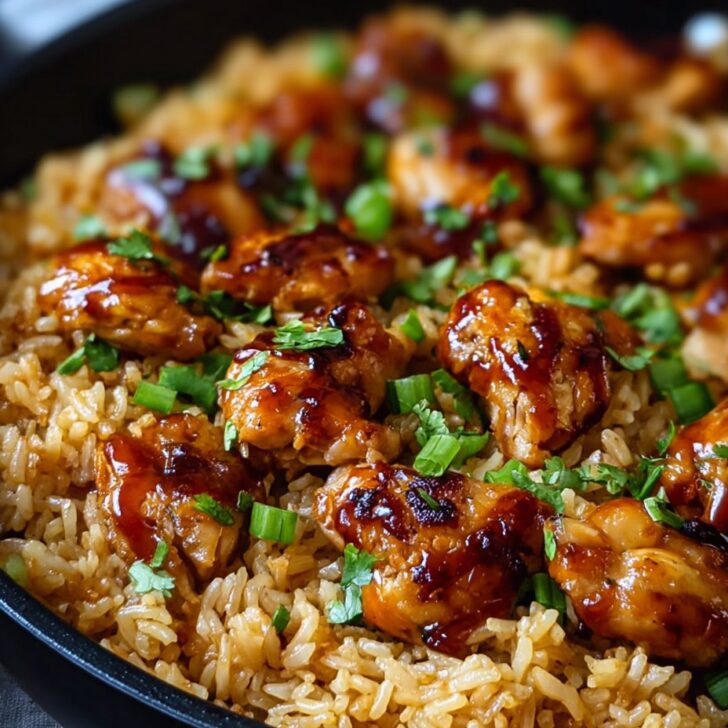

Let's Talk About This One-Pan Wonder (and Why My Dishwasher Thanks Me)
Alright, let me paint this picture for you: It's Tuesday night, I'm already running behind because, well, the cat wanted a cuddle at the worst possible moment, and honestly, the last thing I want is to tackle a mountain of pans. Enter One-Pan Honey BBQ Chicken Rice. This dish was born out of a mix of desperation and sudden cravings for smoky, saucy chicken with rice that soaks it all up. The first time I made it, I genuinely thought it would be a one-and-done, but – no joke – my partner asked for it again the next night. And my youngest? I don't want to say he licked the pan, but... let's just say he's thorough.
Why You’ll Actually Want This In Your Weekly Lineup
I make this when I've already lost my will to make anything fussy (which is more often than I care to admit). My family goes crazy for this because it covers all the important bases: saucy BBQ chicken, fluffy rice, sweet corn (I throw in peas if I'm feeling wild), not too spicy for picky eaters. I used to grumble about one-pan recipes that still make you use a bowl for mixing – this one, nope. Everything straight in, and even if the rice clumps a bit, nobody seems to notice. Plus? The leftovers are somehow tastier the next day (if there are any – big 'if').
Your Shopping List (and a Few Lazy Substitutions)
- 2 boneless skinless chicken breasts (could totally swap for thighs – juicier, tbh. Or leftover rotisserie if that's all you've got)
- 1 cup long-grain rice (Basmati is my usual; Grandma swears by Uncle Ben's, but whatever is in the cupboard works. Short grain gets a bit sticky, though.)
- 1 ½ cups chicken stock (Bouillon cube and water does the trick in a pinch, or veg stock if that's what you've got)
- 1 cup frozen corn (canned corn works, I sometimes throw in a handful of peas or bell peppers too)
- ½ cup BBQ sauce (any brand, really, but Sweet Baby Ray’s is a house favorite. Once I tried a Korean BBQ sauce and—actually, not bad!)
- 2 tablespoons honey (in a rush, maple syrup works—just a bit different. Golden syrup is, um, weirdly delicious here)
- 1 small onion, diced (skip it if you can’t be bothered or try green onions for speed)
- 2 cloves garlic, minced (full honesty, I’ve used pre-minced from a jar—life's too short sometimes)
- 1 tablespoon olive oil (but veg oil, or even a little butter, is fine; it changes the flavour a bit but not in a bad way)
- Salt and pepper, to taste (though the BBQ sauce is usually salty enough)
- Optional: chopped fresh parsley for a bit of colour, shredded cheese for the top, chili flakes if you like a kick
How To Actually Throw This Together (Without Losing Your Mind)
- Preheat your oven to 400°F (200°C), unless, like me, you forget until you’re done chopping (it’s fine, just wait to bake a moment).
- Grab your biggest oven-safe skillet or, honestly, any pan with a lid (foil will do if you can't find the lid—I once used a pizza tray, don’t recommend but it worked). Warm up the olive oil on medium, toss in the onion, and sauté until it looks a bit soft and you can actually smell it. Garlic goes in next. If you burn the garlic here, don’t panic, just keep going (a bit of char isn’t the end of the world).
- Dice the chicken into bite-sized bits, season with a bit of salt and pepper, and add it to the pan. Brown it a touch—it doesn’t have to be fully cooked through; it'll finish in the oven. This is where I usually sneak a taste. Also, don’t worry if bits stick; this is the good stuff for flavour later.
- Stir in the rice (yep, dry), then pour in the chicken stock, corn, and give it a good mix. Smells pretty decent already. Drizzle in the BBQ sauce and honey, and if you want to get fancy, swirl it a bit so you’ve got streaks of saucy gorgeousness atop the rice. Don’t overthink it.
- If you’re a cheese person, sprinkle some over now or just before it comes out—you decide. Cover the pan; into the oven it goes for about 25 minutes. Check it at 20 if your oven is aggressive (the rice at the edges cooks faster in my old gas oven for some reason).
- Take the lid off, give everything a little stir—don’t be alarmed if the top looks a bit dry, the underneath will be plenty saucy. Back in for another 5-10 minutes so the top gets sticky and beautiful. Worth the little extra wait.
- Scatter with some parsley if you’ve got it, and let it sit for about 5 minutes before you dig in (otherwise it’ll scald your tongue—a lesson I learn the hard way every.single.time).
Random Notes (Don’t Skip These: They’re Hard-Earned)
- If you use brown rice, add more stock and be prepared for a longer bake (I keep underestimating this).
- Pre-shredded chicken is a good cheat; you might need less cook time, though—it dries fast.
- Don’t use instant rice. Just... trust me. Mush city.
- I tried doubling this in a smaller pan once and the rice didn’t cook. Go wide, not deep.
If You’re The Experimental Sort: Variations (Some Great, Some Less So)
- Swap BBQ for teriyaki, skip the honey, add a little ginger—new flavor but still weeknight friendly.
- Add pineapple chunks; my partner swears it’s "Hawaiian-inspired", I think it’s just candy in dinner, but hey, to each their own.
- Once tried black beans and cheddar—tasted fine, looked... like something from a student house.
- Veggie version with mushrooms in place of chicken is pretty good (but it’s not quite as popular here, just warning you).
What If I Don’t Have the Proper Pan?
If you don’t have an oven-safe pan, just sauté on the stove and transfer to a casserole dish before baking. Actually, you can even make it stove-top only, just watch the liquid and don’t wander off to check your messages like I did once (scraped rice off the bottom for days after that).


Saving For Later (Theoretically, If It Lasts That Long)
Fridge: Keeps for up to 3 days, airtight container. Though honestly, in my house it never lasts more than a day!
Freezer: Freezes fine (portion it out first for easy grabs). Rice can get a little grainy when thawed, but if you zap it with a sprinkle of water and cover, it’s alright.
How We Serve It (And How You Might Want To)
We always plop big spoonfuls in bowls and top with a squeeze more BBQ or a sprinkle of hot sauce. Green salad on the side if someone’s feeling virtuous. When my brother visits, he insists on dipping chips in it—your mileage may vary.
Pro Tips Learned The Messy Way
- Don’t rush browning the chicken. I once skipped this and the dish tasted... flat. Give it a few minutes, the flavor’s worth it.
- If your rice isn’t cooked through after baking, just add a splash more stock and let it sit, covered, for 5-10 minutes off the heat. It always catches up.
- Stir after baking, not before, or the cheese layer will vanish (unless you want it mixed in—totally your call).
FAQ: The Actual Questions I Get (Plus a Random Tangent)
- Can I make this ahead of time?
- Honestly, yes! I think it tastes better the next day (something about all the flavors mingling in the fridge). But it’s best to reheat covered so the rice doesn’t dry out.
- Is this spicy?
- Not as written—but you can use a spicy BBQ sauce or slip in chili flakes if you're feeling daring. My kids are spice-wimps, so I rarely do.
- What's the best BBQ sauce for this?
- Personal preference, but I usually grab Sweet Baby Ray’s or Stubbs (here’s their official list). Or try making one yourself (I like this one from Simply Recipes if you’re feeling ambitious).
- Can I make it vegetarian?
- Yep – swap chicken for mushrooms or tofu. Just keep an eye on moisture. Mushrooms drop a lot of water, you may want slightly less stock.
- Tangent: What's my favorite thing to cook besides this?
- Honestly, probably a really lazy oven baked mac and cheese. But that’s a tale for another day (remind me, I’ll send you the link sometime).


Ingredients
- 2 large boneless, skinless chicken breasts, cut into bite-sized pieces
- 1 cup long-grain white rice, rinsed
- 2 tablespoons olive oil
- 1 cup honey BBQ sauce
- 1 tablespoon honey
- 2 cups low-sodium chicken broth
- 1 red bell pepper, diced
- 1 small yellow onion, finely chopped
- 1 teaspoon garlic powder
- Salt and black pepper to taste
- 2 tablespoons chopped fresh parsley (optional, for garnish)
Instructions
-
1Heat the olive oil in a large skillet or deep pan over medium heat. Add the chicken pieces and season with salt, black pepper, and garlic powder. Cook for 4-5 minutes until golden brown on all sides.
-
2Add the diced onion and red bell pepper to the pan. Sauté for an additional 3-4 minutes until vegetables begin to soften.
-
3Stir in the rice, making sure it is coated in the pan juices and vegetables.
-
4In a small bowl, whisk together the honey BBQ sauce, honey, and chicken broth. Pour the mixture over the rice and chicken in the pan.
-
5Bring to a gentle boil, then reduce the heat to low. Cover and simmer for 20-25 minutes, or until the rice is tender and liquid is mostly absorbed.
-
6Remove from heat and let stand, covered, for 5 minutes. Fluff with a fork, garnish with chopped parsley if desired, and serve warm.
Approximate Information for One Serving
Nutrition Disclaimers
Number of total servings shown is approximate. Actual number of servings will depend on your preferred portion sizes.
Nutritional values shown are general guidelines and reflect information for 1 serving using the ingredients listed, not including any optional ingredients. Actual macros may vary slightly depending on specific brands and types of ingredients used.
To determine the weight of one serving, prepare the recipe as instructed. Weigh the finished recipe, then divide the weight of the finished recipe (not including the weight of the container the food is in) by the desired number of servings. Result will be the weight of one serving.
Did you make this recipe?
Please consider Pinning it!!