
If there’s one thing I make when I’m craving something indulgent but too lazy (erm, I mean busy!) for the oven, it’s these no-bake caramel cheesecake bars. The first time I tried to make them, I forgot to buy cream cheese—don’t do that. But you know, we live and learn. My sister loves these so much she’s actually hidden some in the vegetable drawer just so my dad wouldn’t find them (spoiler: he did). And the best part? The oven stays off, which is a blessing when it’s sweltering outside, or honestly, any Tuesday when life’s just too much. I honestly think these bars are the dessert version of putting on your comfiest socks and binge-watching your favorite show. Plus, they're an absolute doddle—no fancy degrees or unicorn tears required.

Why I’m Obsessed With These (Besides the Obvious!)
I make this whenever I want to impress someone but don’t have time for the whole pro-baker routine. My family loses their marbles over these bars because they’re super creamy and that caramel swirl on top just feels so extra (in the best way). I’ve had caramel disasters in the past—burnt pans, sticky fingers, the lot—but honestly, cheating with good quality store-bought caramel sauce is life-changing. And, here’s the real kicker: you only need to dirty one bowl and a pan, so cleanup doesn’t make me cry. Also, I think these taste even better the next day—if you have that kind of willpower. (I don’t.)
Here’s What You’ll Need (and My Not-So-Secret Swaps)
- 200g digestive biscuits (or graham crackers in a pinch… or honestly, any boring old cookie works if you’re in a real jam)
- 90g unsalted butter, melted (sometimes I swap in salted for a bit of drama – my mum swears by it)
- 400g cream cheese (full-fat is best, but I’ve gone rogue and used half-fat – still solid)
- 120g powdered sugar (icing sugar, for the fellow Brits; I once ran out and used granulated, it just needs more mixing)
- 1 teaspoon vanilla extract (I love the real deal, but no one’s judging the imitation stuff here)
- 250ml double cream (aka heavy cream—if you only have single or “light” cream, it’ll work but won’t set up as firm, just FYI!)
- 150ml thick caramel sauce (I usually buy it, but homemade is even better if you’re feeling fancy or procrastinating something real)
- A pinch of sea salt (if you’re into that salty-sweet vibe; sometimes I forget and it’s fine)
How I Put These Bad Boys Together
- Bash the digestive biscuits (or whichever cookies you decided on) in a ziplock bag with a rolling pin, or use a food processor, whatever’s handier. You want fine crumbs, not gravel. Tip them into a bowl, then pour in that lovely melted butter. Stir it up till it looks like clumpy sand.
- Press the biscuit mixture into the bottom of a lined 8x8 inch (20cm) square pan. Get it as flat as you can—sometimes I use the base of a glass to really squash it down. Pop that in the fridge to chill while you get everything else sorted.
- In a big mixing bowl, beat the cream cheese until it’s smooth—I use an electric mixer but, you know, elbow grease works too if you’re feeling strong. Add the powdered sugar and vanilla, beat again till silky.
- Pour in the double cream, then whip everything together until you get fairly stiff peaks (honestly don’t stress if it’s a little softer… the fridge helps). This is where I usually sneak a taste and immediately regret finishing the last of the caramel corn the night before.
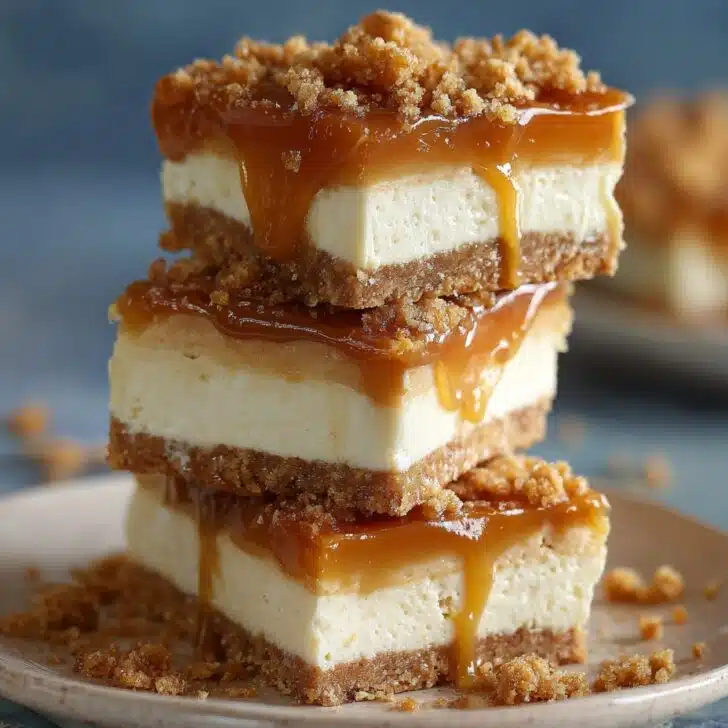
- Spoon half the cheesecake mixture over the chilled base and smooth it out. Drizzle a generous amount of caramel sauce over, then swirl gently with a butter knife. Top with the rest of the cheesecake mixture and give it another gentle smooth. Finish with more caramel on top and, if you fancy, a light sprinkle of sea salt.
- Pop the whole pan in the fridge for at least 4 hours (overnight is dreamy if you can wait). Don’t be tempted to rush—trust me, I tried once and ended up eating cheesecake soup.
- Slice into bars once it’s firm enough (or triangles, or squares, whatever shapes you’re into today) and enjoy each one like you have a secret.
Stuff I’ve Learned (the Honest Notes Section)
If you’re heavy-handed with the caramel, you might end up with a bit of a gooey mess; actually, sometimes that’s what you want, but it does get tricky to slice. Using parchment paper to line your tin means less pan-scraping later (I once forgot this step, and, well, there were tears).
And weirdly, I think these bars taste even better after a solid night in the fridge, almost like the flavors have had a little sleepover and really bonded. Don’t stress if your swirls aren’t perfect—no one ever complains.
The Experiments: Variations That (Mostly) Worked
- I once swapped out the caramel with dulce de leche—rich, fantastic, 10/10 would repeat.
- Tried a chocolate ganache swirl instead; honestly, it was good, but the caramel just wins for me.
- Did a ginger snap crust once—bit too spicy for my crowd, but if your crew likes a kick, go for it!
- For lemon lovers, a spoonful of zest in the cheesecake mixture gives a citrus buzz—but, erm, caramel and lemon are a love-it-or-hate-it combo.


What You’ll Need in Your Kitchen (but Don’t Panic)
- A square 8x8 inch (20cm) pan—if you only have a round one, go wild, pie slices are just as tasty
- Mixing bowls—one big, one medium. Or just give it a quick rinse between steps if you’re like me and hate extra washing up
- An electric mixer or a sturdy whisk plus arm power. (If you want a workout, hand-whisk, but don’t blame me tomorrow.)
- Something to crush biscuits—food processor, rolling pin, or even, once, a can of beans in a tea towel (that was a weird day)
Storing These Beauties (if That’s Even Necessary)
Just pop the bars in an airtight container and keep them in the fridge. They’re happy in there for 3-4 days. Though honestly, in my house it never lasts more than a day! I tried once to freeze them, and they were okay, just a bit icier—so, not my first choice.
How I Love Serving Them (It’s a Thing)
I’ve been known to scatter a handful of toasted nuts over the top, or pair these bars with coffee (strong!) for breakfast on a rogue Saturday. My niece likes them with a blob of whipped cream (she’s an overachiever). Everyone fights for the corner pieces, so sometimes I cut them all into corners—problem solved.
Things I Wish I’d Known (Pro Tips, Sort Of)
- Don’t skip the fridge time! I once tried to cut these too early and just made a mess of my pan—and my ego.
- Use cold cream cheese or it gets way too runny. Learned this one the hard way.
- Actually, let the bars sit on the counter for five minutes before you cut them; makes things less crumbly.
- If your caramel’s stubborn, warm it a tiny bit so it’s easy to drizzle. If you microwave it too much, though, you’ll have caramel lava (ask me how I know...)
Got a Burning Question? (Let’s Do This FAQ Thing)
- Can I make these bars gluten-free?
Yep, just grab gluten-free cookies! Done it a few times—works a treat. - What if I don’t have caramel sauce?
I once used honey and a pinch of brown sugar; totally different vibe, but honestly pretty tasty. - How do I make them set faster?
If you’re in a real hurry, pop ’em in the freezer for 45 min—just don’t forget them, or you’ll need a chisel. - Do I need to use full-fat cream cheese?
Nah, but I think it tastes better. Lower fat versions work—texture’s just a wee bit softer. - Why does my base go crumbly?
Might be not enough butter. Or, maybe the fridge time was too short. On second thought, sometimes it’s just a mystery—roll with it! - Can I double this recipe?
Absolutely—just use a bigger pan and maybe serve to people you really like because you’ll want leftovers.
And that’s the long and winding road to no-bake caramel cheesecake bars—possibly my favorite low-effort treat. Now, before I forget: if you end up with a lopsided pan because you ate all the toppings first, just cover it in extra caramel and carry on. No one’s perfect around here.
Ingredients
- 200g digestive biscuits (or graham crackers in a pinch… or honestly, any boring old cookie works if you’re in a real jam)
- 90g unsalted butter, melted (sometimes I swap in salted for a bit of drama – my mum swears by it)
- 400g cream cheese (full-fat is best, but I’ve gone rogue and used half-fat – still solid)
- 120g powdered sugar (icing sugar, for the fellow Brits; I once ran out and used granulated, it just needs more mixing)
- 1 teaspoon vanilla extract (I love the real deal, but no one’s judging the imitation stuff here)
- 250ml double cream (aka heavy cream—if you only have single or “light” cream, it’ll work but won’t set up as firm, just FYI!)
- 150ml thick caramel sauce (I usually buy it, but homemade is even better if you’re feeling fancy or procrastinating something real)
- A pinch of sea salt (if you’re into that salty-sweet vibe; sometimes I forget and it’s fine)
Instructions
-
1Bash the digestive biscuits (or whichever cookies you decided on) in a ziplock bag with a rolling pin, or use a food processor, whatever’s handier. You want fine crumbs, not gravel. Tip them into a bowl, then pour in that lovely melted butter. Stir it up till it looks like clumpy sand.
-
2Press the biscuit mixture into the bottom of a lined 8x8 inch (20cm) square pan. Get it as flat as you can—sometimes I use the base of a glass to really squash it down. Pop that in the fridge to chill while you get everything else sorted.
-
3In a big mixing bowl, beat the cream cheese until it’s smooth—I use an electric mixer but, you know, elbow grease works too if you’re feeling strong. Add the powdered sugar and vanilla, beat again till silky.
-
4Pour in the double cream, then whip everything together until you get fairly stiff peaks (honestly don’t stress if it’s a little softer… the fridge helps). This is where I usually sneak a taste and immediately regret finishing the last of the caramel corn the night before.
-
5Spoon half the cheesecake mixture over the chilled base and smooth it out. Drizzle a generous amount of caramel sauce over, then swirl gently with a butter knife. Top with the rest of the cheesecake mixture and give it another gentle smooth. Finish with more caramel on top and, if you fancy, a light sprinkle of sea salt.
-
6Pop the whole pan in the fridge for at least 4 hours (overnight is dreamy if you can wait). Don’t be tempted to rush—trust me, I tried once and ended up eating cheesecake soup.
-
7Slice into bars once it’s firm enough (or triangles, or squares, whatever shapes you’re into today) and enjoy each one like you have a secret.
Approximate Information for One Serving
Nutrition Disclaimers
Number of total servings shown is approximate. Actual number of servings will depend on your preferred portion sizes.
Nutritional values shown are general guidelines and reflect information for 1 serving using the ingredients listed, not including any optional ingredients. Actual macros may vary slightly depending on specific brands and types of ingredients used.
To determine the weight of one serving, prepare the recipe as instructed. Weigh the finished recipe, then divide the weight of the finished recipe (not including the weight of the container the food is in) by the desired number of servings. Result will be the weight of one serving.
Did you make this recipe?
Please consider Pinning it!