If you’ve ever found yourself day-dreaming about a brain-freeze in a cup, lean in, friend—because, wow, do I have a treat for you. The Ninja Slushi recipe is something I first sort of, well, bumbled into on a sticky July afternoon, when my kids stormed in chanting for something cold (and honestly, I was desperate to cool off, too). So I dusted off my Ninja blender—cue the triumphant music—and started tossing in whatever fruity bits and juice I could find. My first go was a mess; I used way too much ice (imagine a gloppy snowbank) but we powered through, giggling the whole time. These days, I've nailed a version that hits the spot every single time, and you don't need a PhD in blending to enjoy it—thank goodness.

Why You'll Love This Slushi (Trust Me!)
I make this when the sun’s doing that thing where it practically cooks you through the window. My family goes a bit wild for it, especially if I toss in a handful of berries or sneak in mango for that tropical kick—though, once, someone (naming no names) tried adding spinach and, uh, let's just say no one asked for seconds. But if you've ever craved something frosty, fruity, and a little slapdash (because hey, perfection is overrated), this is the recipe you’re going to want taped to your fridge. Plus, I love that I don’t have to run to the corner shop for fancy stuff—just rummage in the freezer and go. And honestly, I like that you can clean up in less time than it takes to cool off!
What You’ll Need: Ingredients (with Shortcuts)
- 2 cups frozen mixed fruit (mango, strawberries, and pineapple are my favorites, but use what you've got; peaches work, or even just plain old frozen berries)
- 1 cup fruit juice (I use pineapple juice most times, but apple or orange are also winners; my grandmother swore by fresh OJ but boxed works fine)
- ½ to 1 cup of ice cubes (or skip if your fruit is really frozen solid – sometimes I forget I already froze the fruit, oops)
- 2 tablespoons simple syrup (or honey, or honestly, a good squeeze of agave if that's what's hiding in your cupboard)
- 1 tablespoon lemon or lime juice (I never stress if I run out, just extra splash of juice and it’s fine!)
- Optional: pinch of salt (sounds odd, but trust me, it wakes up the flavors)
How to Make a Ninja Slushi (My Way)
- Chuck your frozen fruit into the Ninja blender. You don’t really need to measure like you’re in a lab; just eyeball about 2 cups. (This is where I sometimes snack on a few—occupational hazard!)
- Pour in the fruit juice and lemon/lime juice. Don’t worry if it fizzes a bit. That’s just the universe telling you this’ll be epic.
- Add half a cup of ice cubes. If you want it super frosty, add the full cup. If your fruit’s so frozen it could chip a tooth, maybe leave the ice out entirely.
- Squeeze in your simple syrup (or whatever sweetener you scrounged up). Give it a little swirl, then add a teeny pinch of salt if you feel bold.
- Clamp the lid down—trust me, I’ve made the mistake of not double-checking—and blend on high until everything looks like a glorious avalanche of slush. I usually give it a taste after 30 seconds. Sometimes at this stage it looks a bit icy-weird, but a quick scrape and another blitz sorts it out.
- Pour into glasses, stick in a straw (or a spoon, because sometimes it’s more fork than drink), and serve ASAP before someone swipes your glass.

Notes from My Kitchen (aka, Things I Wish I’d Known Sooner)
- I once tried overfilling the blender in a mad rush—bad move. Keep room at the top unless you like “Ninja snow” on your counters.
- Tastes sharper after chilling in the fridge for 10-15 minutes, but you might not make it that long. I rarely do.
- If it ends up too runny, just add more frozen fruit and blend again. Too thick? More juice fixes it quickly.
Variations I’ve Tried (and a Flop or Two)
- Boozy: A splash of rum or vodka for the adults. (Tried once with tequila—not my thing, but maybe you’ll love it?)
- Green Slushi: I snuck in spinach once. Regrets.
- Coconut Twist: Swap half the juice for canned coconut milk. That’s a tropical vacation right there.
- Popsicle Style: Pour leftovers into molds. Freeze. Ninja slushi becomes Ninja pops. Kids think I’m a genius.

Equipment (But Seriously, Improv is Fine)
- Ninja blender (or honestly, any sturdy blender will do—at my brother’s, we used a hand blender and some elbow grease; just takes more coaxing)
- Measuring cup (or a coffee mug, if your clean cups are all in the dishwasher)
- Tall glasses for serving. Mason jars are trendy but any cup works!
How to Store (If You Have Leftovers, Ha!)
Technically, you can keep leftovers in an airtight container in the freezer for up to a week, then blitz 'em again when you're ready. But in all honesty, in my house, it never ever survives more than a day. If you do freeze it, let it thaw a few mins or splash in more juice before reblending—it gets suuuuuper hard otherwise.
Serving Up: My Family’s Favorite Way
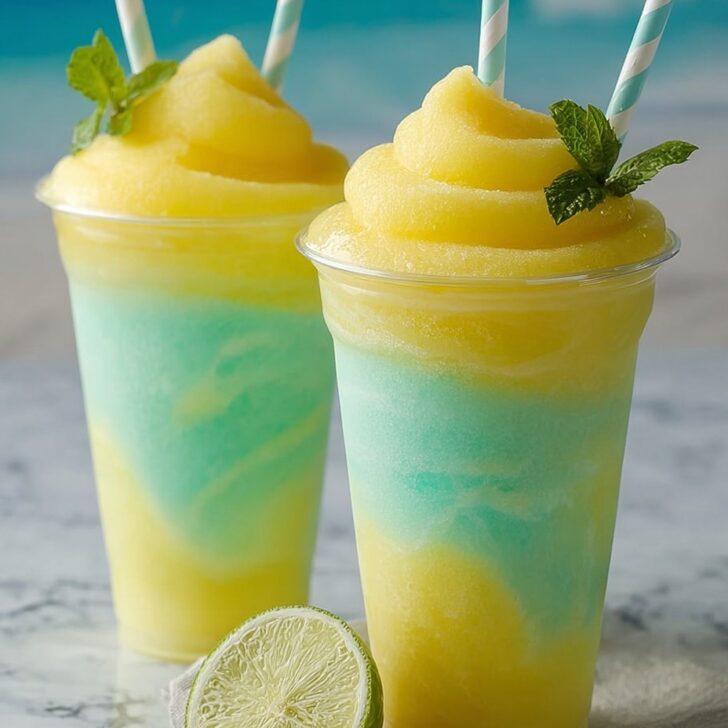
We usually top ours with extra fruit chunks or a little drizzle of honey. My youngest likes sprinkles (go figure), so sometimes we end up with a rainbow slushi situation. For backyard BBQs, I pour them into plastic cups and stick in little cocktail umbrellas—makes you feel like you’re on holiday, promise.
Things I’ve Learned the Hard Way
- Don’t rush the blending—one time I got impatient and ended up with weird icy lumps, which taste like disappointment. Give it the full 45 seconds or so.
- If you forget the pinch of salt, it’s fine, but with it, the flavors are, I dunno, brighter? Hard to explain but definitely worth a try.
- Always taste before serving—sometimes my fruit seems sweeter, sometimes not, and the sweetener helps you dial it in.
Frequently Asked (or Shouted From the Kitchen) Questions
- Can I use fresh fruit instead of frozen?
Yeah, totally, but throw in plenty of ice or freeze your fruit awhile before blending. Not quite as thick if it’s all fresh, but still tasty. - What if I don’t have a Ninja blender?
No biggie. Any powerful blender will do, but you might need to pulse a bit longer or stop and shake things up. And actually, I find it works better if you layer liquids at the bottom and frozen bits on top! - Can I skip the sweetener?
For sure. Sometimes I do when my fruit is already really ripe and sweet. Taste as you go—honestly, that’s half the fun. - Is this ok for little kids?
Yep, just watch out for brain freeze! Maybe let it sit a minute before handing over the glass. - Do I have to use pineapple juice?
Nope. Use whatever is handy. I’ve tried grape (too sweet for me), apple, and even coconut water when I was in a pinch. All good—well, except the grape for my taste. - Why did mine turn out so icy?
I’ve had that happen, too. Usually it’s too much ice or not enough juicy stuff. Try adding extra juice next time, or blend longer.
Oh, and random aside—I once tried to make Ninja Slushi after midnight as a study snack (don't recommend unless you want your household startled awake by the blender, ha). Moral of the story: best enjoyed during daylight hours—unless you’ve got super understanding neighbors.
Ingredients
- 2 cups frozen mixed fruit (mango, strawberries, and pineapple are my favorites, but use what you've got; peaches work, or even just plain old frozen berries)
- 1 cup fruit juice (I use pineapple juice most times, but apple or orange are also winners; my grandmother swore by fresh OJ but boxed works fine)
- ½ to 1 cup of ice cubes (or skip if your fruit is really frozen solid – sometimes I forget I already froze the fruit, oops)
- 2 tablespoons simple syrup (or honey, or honestly, a good squeeze of agave if that's what's hiding in your cupboard)
- 1 tablespoon lemon or lime juice (I never stress if I run out, just extra splash of juice and it’s fine!)
- Optional: pinch of salt (sounds odd, but trust me, it wakes up the flavors)
Instructions
-
1Chuck your frozen fruit into the Ninja blender. You don’t really need to measure like you’re in a lab; just eyeball about 2 cups. (This is where I sometimes snack on a few—occupational hazard!)
-
2Pour in the fruit juice and lemon/lime juice. Don’t worry if it fizzes a bit. That’s just the universe telling you this’ll be epic.
-
3Add half a cup of ice cubes. If you want it super frosty, add the full cup. If your fruit’s so frozen it could chip a tooth, maybe leave the ice out entirely.
-
4Squeeze in your simple syrup (or whatever sweetener you scrounged up). Give it a little swirl, then add a teeny pinch of salt if you feel bold.
-
5Clamp the lid down—trust me, I’ve made the mistake of not double-checking—and blend on high until everything looks like a glorious avalanche of slush. I usually give it a taste after 30 seconds. Sometimes at this stage it looks a bit icy-weird, but a quick scrape and another blitz sorts it out.
-
6Pour into glasses, stick in a straw (or a spoon, because sometimes it’s more fork than drink), and serve ASAP before someone swipes your glass.
Approximate Information for One Serving
Nutrition Disclaimers
Number of total servings shown is approximate. Actual number of servings will depend on your preferred portion sizes.
Nutritional values shown are general guidelines and reflect information for 1 serving using the ingredients listed, not including any optional ingredients. Actual macros may vary slightly depending on specific brands and types of ingredients used.
To determine the weight of one serving, prepare the recipe as instructed. Weigh the finished recipe, then divide the weight of the finished recipe (not including the weight of the container the food is in) by the desired number of servings. Result will be the weight of one serving.
Did you make this recipe?
Please consider Pinning it!