
If You've Never Tried These Low Carb Stuffed Peppers, You're Missing Out (Probably!)
Alright, friend, let me tell you—stuffed bell peppers are an old standby in my kitchen. I still remember the first time I tried to make them in my college apartment; I had zero clue what I was doing, but a craving is a craving, right? I made a huge mess (rice everywhere, peppers rolling off the counter), but somehow, the finished dish was a total hit at my little dinner party. These days, I go for a low carb version, mostly because I don't want to nap for two hours after dinner, but honestly—they taste even better this way. Plus, less rice to clean off the floor. Win-win.
Why I Keep Coming Back To This Recipe
I make this when I want something filling that won’t knock me into a carb coma (which, for me, is like...weekly). My family goes a bit bonkers for it—my youngest actually picks out the peppers and just eats the insides, which used to drive me nuts, but, hey, whatever works. It’s also perfect because you can toss in whatever you’ve got lingering in the fridge: sometimes I use leftover taco meat, or even that one weird sausage that’s somehow survived three grocery shops. And if you hate chopping onions, well, join the club! But it really is worth it here.
What You’ll Need (and a Few Swaps I’ve Tried!)
- 4 bell peppers (any color, but red's my favorite; green can be a bit bitter, but they're usually cheaper)
- 1 lb (about 450g) ground beef (turkey totally works, or even crumbled tofu if you’re feeling adventurous)
- 1 small onion, diced (sometimes I just use a big handful of pre-chopped frozen onion when I'm in a hurry)
- 2 cloves garlic, minced (if you love garlic, just add more. Live a little!)
- 1 cup riced cauliflower (fresh or frozen; my grandmother always insisted on making it herself, but honestly, the store stuff is fine)
- 1 can diced tomatoes, drained (about 14 oz; sometimes I use fire-roasted for more flavor)
- 1 cup shredded cheese (cheddar, mozzarella, or whatever you’ve got. Or skip it if you’re dairy-free—I often do)
- 1 teaspoon Italian seasoning (or just a random shake each of dried basil, oregano, thyme... you get the picture)
- Salt and pepper to taste (I never measure, but maybe you do?)
- Olive oil, for sautéing (or butter, or whatever's handy)
How I Actually Make These (With a Few Odd Steps)
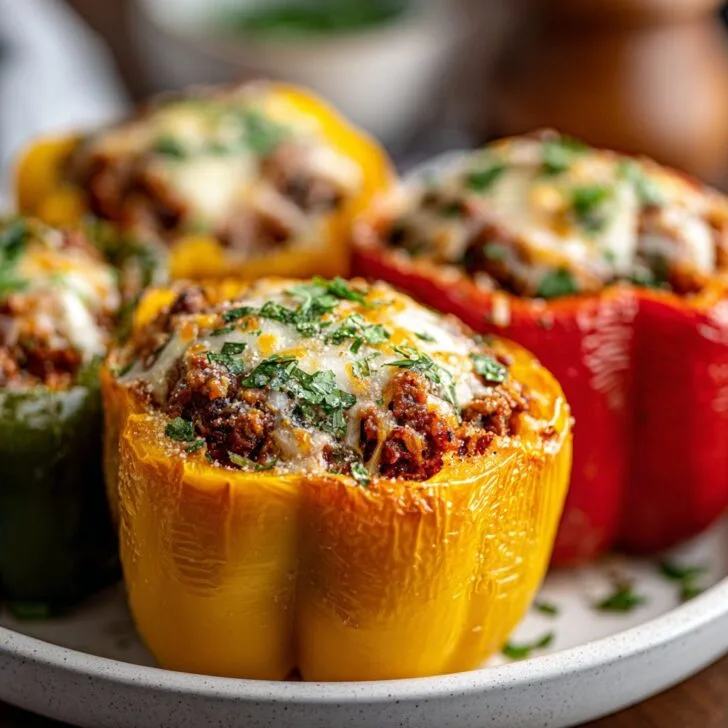
- Prep your peppers: Slice off the tops, pull out the seeds and the white bits. I rinse them because, well, who knows what was in there? Place them cut side up in a baking dish. If they wobble, just slice a tiny bit off the bottom (not too much or you'll have Swiss cheese peppers).
- Pre-bake the peppers: I like to bake the empty peppers for about 10 minutes at 375°F (190°C); they cook more evenly this way. Sometimes I skip this if I'm really hungry, but they stay crunchier (not always in a good way).
- Make the filling: Heat a splash of olive oil in a big skillet. Chuck in your onion and garlic. Cook till soft—this is when I usually sneak a taste of the onions, even though they're hot. Add the ground beef, break it up with a spoon, cook till it’s no longer pink (don’t forget a bit of salt and pepper). Toss in the riced cauliflower and tomatoes. Sprinkle in Italian seasoning, give it all a good stir, let it bubble for about 5 minutes or so. At this point, it looks like a weird stew—I always second-guess myself, but it sorts itself out.
- Stuff the peppers: Pile that filling into each pepper (don’t worry if it overflows, just squish it in). Top with cheese (if using). I usually go overboard here, because why not?
- Bake: Pop in the oven, uncovered, for about 25 minutes. Then, if you want it super golden on top, flip the broiler on for a minute or two. But watch like a hawk—cheese can go from golden to tragic so fast.
A Few Genuine Notes (Learned the Hard Way)
- If your peppers tip over in the pan, just wedge a bit of crumpled foil around them—it’s not fancy, but it works.
- Sometimes the filling makes more than your peppers can hold. Leftovers are great in a lettuce wrap or, honestly, just eaten off a spoon while standing at the counter.
- Actually, I find it works better if you let the peppers cool for 5 minutes before serving. They hold together more and don’t burn your tongue off.
Variations (Some Winners, One Flop)
- I once swapped the ground beef for chorizo—spicy, but super tasty.
- Veggie version: skip the meat, add black beans and corn (though, technically, not super low carb, but hey, I like it for a change).
- Tried stuffing with quinoa once. Tasted...fine, but it got kind of mushy. Wouldn’t rush to do that again.
Equipment—Or, What You Can Get Away With
- Baking dish (any old roasting tray works—once I used a cake pan and it was fine)
- Sharp knife (but I’ve used a steak knife in a pinch when the good ones are all dirty)
- Skillet or frying pan
- Mixing spoon (or, heck, a spatula or even a fork—been there!)


How I Store (Or, Don’t Store) These Peppers
Supposedly, they keep in the fridge for up to three days in an airtight container, but honestly, in my house, they never last more than a day. If you’re somehow more restrained, just reheat them in the oven (covered) or microwave, but the oven keeps them from getting soggy. I think they taste even better the next day—like pizza, you know?
What To Serve With Them (If You Want To Go All Out)
I love these peppers with a simple green salad or a dollop of sour cream. My sister insists on garlic bread, which kind of defeats the low carb thing, but I just let her live her truth. Sometimes I’ll serve with cauliflower mash—honestly, this recipe from Wholesome Yum is top-notch (and super easy). Or if you’re feeling rebellious, just have two peppers and call it dinner.
Pro Tips (AKA: How I Messed Up And Fixed It)
- I once tried rushing the pre-bake step and, wow, those peppers were like eating a raw apple with taco meat inside. Not ideal.
- If the cheese starts burning before the peppers are done, just tent a bit of foil over the top. Learned that one after a smokey oven incident.
- On second thought, always check the bottom of the peppers—they can get soggy if you use too much tomato. Drain them well!
FAQ—Stuff People Actually Ask Me
- Can I freeze these? Totally. I just wrap them up and freeze, but the peppers do get a bit softer when reheated. Not a dealbreaker.
- What if I hate cauliflower? First, I get it. You can skip it or use a bit less, or try chopped mushrooms (my friend swears by it, though I’m still not convinced).
- Do I have to cook the filling first? I mean, technically you could try stuffing them raw, but the texture just isn’t right. Trust me, I tried—once. Never again.
- Can I make this ahead? Sure can. I sometimes stuff the peppers in the morning, cover, and bake whenever I get home. Super handy on busy days.
- Where do you get your cheese? I usually just grab whatever’s on sale, but if you want fancy, Sargento shredded cheeses are pretty great. Not sponsored, just sayin’.
And, well, if you give these a go, let me know how it turns out! I love hearing about other people’s experiments—especially the disasters. Those are always the funniest stories, aren’t they?


Ingredients
- 4 large bell peppers, tops cut off and seeds removed
- 1 lb ground beef
- 1 cup cauliflower rice
- ½ cup shredded cheddar cheese
- ½ cup diced tomatoes
- ¼ cup chopped onion
- 2 cloves garlic, minced
- 1 teaspoon Italian seasoning
- ½ teaspoon salt
- ¼ teaspoon black pepper
- 1 tablespoon olive oil
Instructions
-
1Preheat oven to 375°F (190°C). Lightly grease a baking dish.
-
2Heat olive oil in a skillet over medium heat. Add onion and garlic, sauté for 2-3 minutes until fragrant.
-
3Add ground beef to the skillet and cook until browned, breaking it up with a spoon. Drain excess fat.
-
4Stir in cauliflower rice, diced tomatoes, Italian seasoning, salt, and black pepper. Cook for 5 minutes until heated through.
-
5Stuff each bell pepper with the beef mixture and place them in the prepared baking dish. Top with shredded cheddar cheese.
-
6Bake for 30-35 minutes, or until peppers are tender and cheese is melted. Serve hot.
Approximate Information for One Serving
Nutrition Disclaimers
Number of total servings shown is approximate. Actual number of servings will depend on your preferred portion sizes.
Nutritional values shown are general guidelines and reflect information for 1 serving using the ingredients listed, not including any optional ingredients. Actual macros may vary slightly depending on specific brands and types of ingredients used.
To determine the weight of one serving, prepare the recipe as instructed. Weigh the finished recipe, then divide the weight of the finished recipe (not including the weight of the container the food is in) by the desired number of servings. Result will be the weight of one serving.
Did you make this recipe?
Please consider Pinning it!!