If Life Gives You Limes...Make Ice Cream Bars!
Alright, let me set the scene: last summer, it was hotter than a welder's armpit outside, and I was desperate for something—anything—cold, creamy, and bright. I remembered these Key Lime Ice Cream Bars my aunt used to whip up at her beach house (she called them her secret weapon against cranky kids and adults alike). Honestly, I think she just liked that no one could bother her while she was "testing" the filling. Anyway, after a few tries and more than a couple of sticky counter mishaps (pro tip: don't try to zest limes after two glasses of lemonade), I finally nailed my own version. And let me tell you, they're now a go-to whenever I need a little sunshine in dessert form.
Why You’ll Love Making These (Or, When I Actually Make Them)
I make these when I want to impress people with almost zero effort, or when my cousin is visiting and insists he's "off gluten" again (these are - if you use the right cookies, anyway). My family goes crazy for this because it's tart, creamy, and honestly, tastes like a frozen key lime pie on a stick. Plus, you don’t have to fire up your oven, which is a lifesaver in July. A mild heads-up: the waiting-for-them-to-freeze part is the hardest because everyone keeps "checking if they're done." (Honestly, who can blame them?)
Here’s What You’ll Need (And What I Swap In a Pinch)
- 1 cup heavy cream (I sometimes use coconut cream for my dairy-free pal, tastes great)
- ½ cup sweetened condensed milk (grandma swore by Eagle Brand, but store brand does the trick)
- Zest of 2-3 key limes (or regular limes, if you can't scare up the tiny ones—no biggie)
- ¼ cup freshly squeezed key lime juice (bottled is fine, but I prefer fresh when I'm feeling fancy)
- Pinch of salt (don't skip this—makes all the difference)
- 8-10 graham crackers, crushed (or those gluten-free vanilla cookies for the GF folks)
- 2 tablespoon melted butter (I once used coconut oil in a pinch; it was...okay)
- Optional: White chocolate chips, for dipping or drizzling
How I Actually Put These Together
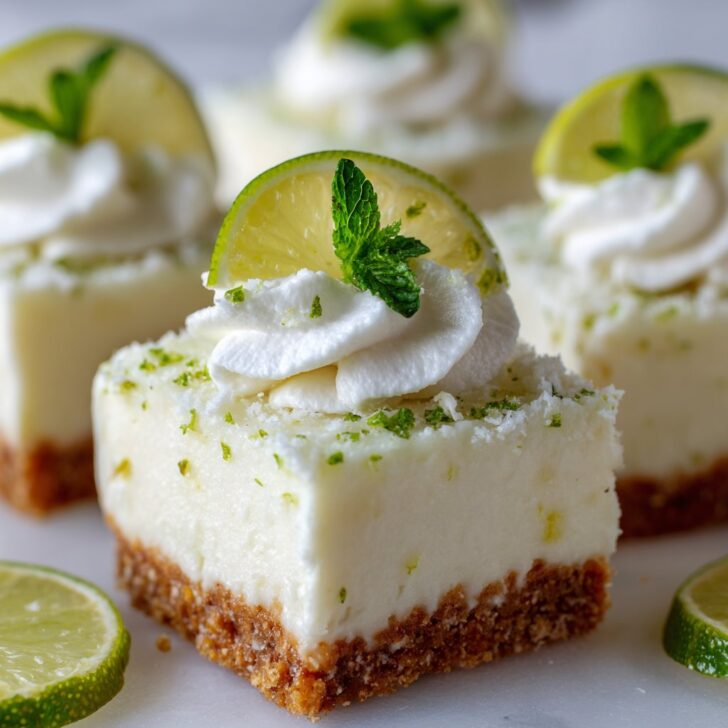
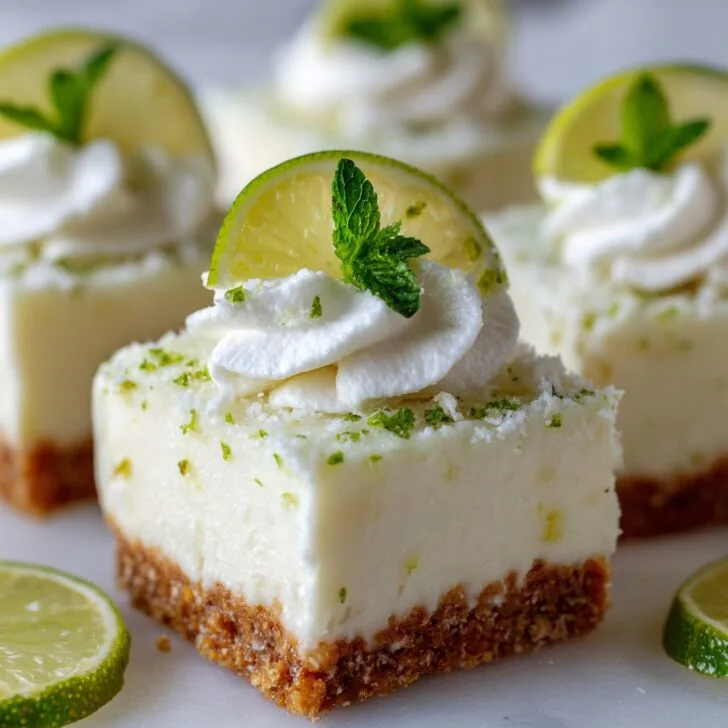
- Line a square baking pan (8x8 or thereabouts—I once used a loaf pan and they were thick but nobody complained) with parchment, letting it hang over the sides for easy lifting later.
- Mix the crushed graham crackers and melted butter together in a bowl until it looks like wet sand. Press this into the bottom of your pan. Honestly, I usually use my hands at this stage, just easier. Pop it in the freezer to firm up while you whip the filling.
- In a big bowl, whip the cream till it holds soft peaks. I use a hand mixer, but sometimes I just get a bit of an arm workout with a whisk—up to you.
- Fold in the sweetened condensed milk, lime juice, zest, and salt. This is where I usually sneak a taste—just to, you know, check for quality. It’ll look a bit loose but don’t stress.
- Spread this creamy goodness over your crust, trying not to eat it all right then and there. Smooth the top, cover with plastic wrap (I sometimes just use foil because I always lose the plastic wrap), and freeze for at least 6 hours, but overnight is best. Or until you can’t stand the waiting.
- If you want to get fancy, melt the white chocolate chips and drizzle over the bars after you slice them—makes ‘em look store-bought, but they taste a heck of a lot better.
- To serve, lift out using the parchment, slice into bars, and watch them disappear. (And on second thought, maybe hide one for yourself.)
Notes from My Many Attempts
- That crust? Sometimes I double it because I just love the crunch. You do you.
- The filling gets tangier after a day in the freezer, which I kinda love. If you’re not a big tart fan, add a touch less lime juice.
- I once forgot the salt—never again. It just makes everything sing.
Ways I’ve Tweaked This (And One That Flopped)
- Swapped in crushed gingersnaps for the crust—delicious, a bit spicy
- Mango puree swirl—good idea, but it froze kind of icy, so stick to a drizzle on top if you try it
- Coconut flakes in the filling—actually, I find it works better if you toast them first, otherwise they go weirdly chewy
What You’ll Need (And How I Improvise)
- 8x8 baking pan (but honestly, a loaf pan or even a round cake pan works in a pinch—just cut the bars funny, who cares?)
- Hand or stand mixer, or a trusty whisk if you’re feeling energetic
- Parchment paper (foil works, but it’s a nightmare to peel off when frozen, just saying)
- Sharp knife—once tried with a butter knife, would not recommend


Storing These (If They Last)
Keep ‘em in an airtight container in the freezer. They’ll stay good up to a week, though honestly, in my house they never last more than a day! If they get a little frosty on top, just brush off the ice crystals. Or eat them as is—no one’s judging.
Serving ‘Em Up
We usually eat these with our hands straight from the freezer—barefoot on the porch is optional but highly recommended. My cousin likes his with a little dollop of whipped cream and a lime slice, which looks cute (but I’m happy with just the bar, honestly).
A Few Pro Tips I Learned the Hard Way
- Don’t try to rush the freezing process. I once tried serving after just 2 hours; they were more like Key Lime Soup Bars. Lesson learned.
- If you overwhip the cream, don’t panic. Just fold extra gently and all will be forgiven.
- Don’t skip the parchment, or you’ll be chiseling bars out of the pan. Ask me how I know.
Real Questions I Get (And Honest Answers)
- Can I make these vegan? Totally! Use coconut cream and a plant-based condensed milk, like this recipe here. The crust works with coconut oil, too.
- What if I can’t find key limes? No drama—regular limes are just fine. Maybe a touch less tart, but still delish.
- Do I really need a mixer? Not really; I used a big whisk that one time my hand mixer was on the fritz. It was a workout, but it worked!
- Can I use low-fat ingredients? You could, but the texture’s not quite the same. I tried it once (for science), and it was a bit icy. Full-fat is your friend here.
- Where do you get your graham crackers? I usually grab Honey Maid, but Trader Joe’s are good too, or make your own with this recipe if you’re feeling ambitious.
- Is this basically frozen key lime pie? Pretty much, but easier to eat on the go. And less likely to fall in your lap at a picnic (not that I’d know...)
If you give these a try, let me know how it goes. Or, if you’re like me and get distracted halfway through, at least enjoy the mess. Either way, you can’t go too far wrong with cream, limes, and a bit of crunchy crust, can you?


Ingredients
- 1 ½ cups graham cracker crumbs
- ¼ cup unsalted butter, melted
- 2 cups heavy cream
- 1 can (14 oz) sweetened condensed milk
- ½ cup fresh key lime juice
- 1 tablespoon key lime zest
- 1 teaspoon vanilla extract
- ¼ teaspoon salt
Instructions
-
1Line an 8x8-inch baking pan with parchment paper, leaving an overhang for easy removal.
-
2In a medium bowl, combine graham cracker crumbs and melted butter. Press the mixture firmly into the bottom of the prepared pan to form an even crust. Freeze for 15 minutes.
-
3In a large bowl, whip the heavy cream until stiff peaks form.
-
4In another bowl, whisk together sweetened condensed milk, key lime juice, key lime zest, vanilla extract, and salt until smooth.
-
5Gently fold the whipped cream into the lime mixture until fully combined. Pour the filling over the chilled crust and smooth the top.
-
6Freeze for at least 6 hours or until firm. Lift out of the pan using the parchment overhang, cut into bars, and serve chilled.
Approximate Information for One Serving
Nutrition Disclaimers
Number of total servings shown is approximate. Actual number of servings will depend on your preferred portion sizes.
Nutritional values shown are general guidelines and reflect information for 1 serving using the ingredients listed, not including any optional ingredients. Actual macros may vary slightly depending on specific brands and types of ingredients used.
To determine the weight of one serving, prepare the recipe as instructed. Weigh the finished recipe, then divide the weight of the finished recipe (not including the weight of the container the food is in) by the desired number of servings. Result will be the weight of one serving.
Did you make this recipe?
Please consider Pinning it!!