
So, Why Am I Always Making Homestyle Chicken and Gravy?
I can't count the number of cool nights when I've flopped down at the kitchen table (with a doorstop of a cookbook over my lap) to make this cozy chicken and gravy. It's the kind of meal that somehow tastes even better when your socks don't match and you're too tired to care. Seriously, my first try years ago was a disaster — dry chicken, gravy so lumpy you could've used it as cement. But hey, practice really does make you less terrible at some things!


My teenagers ask for it at least twice a month, especially when someone’s had a rough day — or if there’s literally nothing else in the fridge but thawed chicken and stubborn hope. Have to admit: the best bit is always that first spoonful over mashed potatoes, preferably with absolutely no witnesses (quality control, you know?).
Why You’ll Probably Love This (I Sure Do)
I make this when I want dinner to actually stick to our ribs, you know? My family goes wild for it, unless I’ve run out of biscuits — then it’s more of a mild grumble. There was a time when I tried to shortcut with instant gravy once...Won’t try that again, trust me.
Oh, and if you've dealt with picky eaters, yes, the smell alone has occasionally lured a grumpy teen out of their self-imposed room exile.
What Goes In (And What Can Swap)
- 4 chicken thighs (bone-in, skin-on is my go-to, but my neighbor swears by boneless breasts — I just think thighs have more flavor, but you do you)
- Salt and black pepper — a decent pinch, no need to get twitchy about measuring
- 2 tablespoons olive oil (sometimes I use butter, especially if I’m feeling fancy… or lazy and out of oil)
- 1 onion, diced (I use yellow, but red works too, and once I only had scallions — weird, but fine)
- 2-3 garlic cloves, minced
- 2 cups chicken broth (my grandmother insisted on homemade, but honestly, boxed works fine, or water and a bouillon cube if you’re in a pinch)
- 1 teaspoon dried thyme (fresh is lovely, but who keeps fresh thyme on hand? Not me every week, that's for sure)
- 3 tablespoons all-purpose flour (I’ve tried whole wheat, but it tasted too, uh, earthy—stick with plain flour for the smoothest gravy)
- ½ cup milk or cream (cream is more indulgent but milk is what I usually have; dairy-free? Sure, oatmilk worked once but made it a bit sweet)
- Optional: Chopped parsley or a squeeze of lemon juice at the end — not traditional, but sometimes I like to shake things up.
Let’s Make This! (Step By Step, Sort Of…)
- Pat the chicken dry (I never used to bother and didn’t see why, but it actually helps get a decent sear — who knew?), then sprinkle generously with salt and pepper.
- Heat oil in a big skillet over medium-high. You want it hot enough to sizzle but not to smoke like a house on fire. Place chicken skin side down; don’t crowd them. Leave them alone for a good 5-7 minutes. This is when I check my phone and swear not to touch them (I always do, though). Flip when brown; cook the other side for another 5 minutes. Remove chicken, but don’t clean the pan!
- Toss in the onion and garlic. Turn heat down to medium (or you’ll burn the garlic and then complain, like me); sauté till soft and smelling heavenly, about 2-3 minutes.
- Sprinkle flour over onions. Stir, and if it looks like a clumpy mess...that’s fine, it always loosens up. Stir for a couple of minutes till it goes kind of golden.
- Very slowly, pour in the broth (now’s a good time to actually whisk). Some people pour too quickly and end up with lumps—and then spend ages mashing them out, ask me how I know. Add thyme, too.
- Stir in milk or cream; slip the chicken back in (skin side up so it stays crispy-ish). Turn the heat down low, cover, and let it burble for 30-35 minutes. This is the moment I usually sneak a peek — and a taste.
- After 30 minutes, take the lid off and let it simmer another 5-10 minutes to thicken the gravy. If it’s mega thick, add a splash of water. If it’s too thin, well, just simmer a bit longer—don’t stress.
- Sling some parsley or a squeeze of lemon juice over at the end. Or don’t. Totally up to you.
Little Notes (AKA: How I Messed This Up So You Don’t Have To)
- Using cold chicken straight form the fridge? The timing’s all wonky. Let it warm up a bit first for best results.
- Boneless works in a pinch, but it’s just not as juicy. I learned that the bland way.
- One time I skipped the flour, thinking it wouldn’t matter. It did; my gravy looked like chicken soup’s sad cousin.
- If you can, use a whisk for the gravy. Forks are doable, but I always end up with that one little glue-ball of flour… you know the one.
If You Fancy Tweaking Things
Here’s where I play around, usually when I’m bored or out of something important:
- Add mushrooms — I toss in a handful after the onions sometimes for a more earthy kick. Kids are suspicious but I like it.
- Swap thyme for rosemary — nice, but can be overpowering if you use more than a pinch. Learned that the hard way, wow.
- Veggie version? Tried replacing chicken with thick tofu slices. Not bad, but the gravy clings differently — bit odd, but still tasty if you’re into that sort of thing.
- Dash of hot sauce? Sometimes, but careful; it takes over quickly.


Do You Need Fancy Equipment? Not Really
I do grab my big cast iron for the searing — but honestly, as long as your pan isn’t about to fall apart, it’ll work. Don’t have a whisk? A fork does just fine — just a bit more elbow grease. One friend used a wooden spoon and, well, it took longer, but the end result was still edible!
Storing Leftovers (If You’re Lucky Enough To Have Any)
Stick leftovers in an airtight container in the fridge; they’ll keep for up to three days. Though honestly, in my house it never survives past lunch the next day (I blame my mysterious midnight-snacker). Reheat gently with a splash more broth or water if the gravy is super thick.
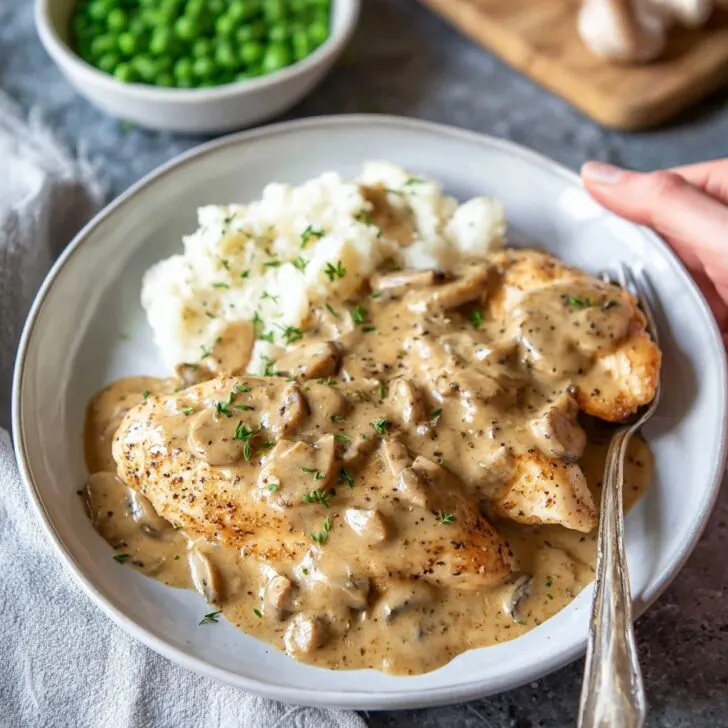
How I Like To Serve It (And Maybe You Will Too)
Mashed potatoes are the gold standard, of course. Sometimes I float it over egg noodles, or toast if we’re being real. Family tradition here is a pile of green beans on the side — don’t know why, but it just rounds things out. And once, we even tried it sandwich-style between two pieces of bread… surprisingly solid lunch option.
Things I’ve Learned The Hard Way (So You Don’t Have To)
- I once tried rushing the ‘simmer till thick’ step and poured runny gravy over everything. Just wasn’t the same; patience is your friend here.
- Don’t skip the pan sear — that browning is basically flavor magic (as my sister says, ‘don’t be beige about it’).
- Taste as you go — gravy can surprise you, sometimes it needs more salt, other times it’s spot on. Only way to know is, well, eat a spoonful.
FAQ (Real Questions I’ve Heard More Than Once!)
- Can I use rotisserie chicken? Yep, I’ve done that once or twice. Just skip the searing, shred it up, and let it gently heat in the gravy. Not quite the same but still good enough for a Monday.
- How do I fix lumpy gravy? Don’t panic! Keep whisking, smash the big ones with the back of a spoon, and if all else fails, strain it. On second thought...sometimes lumpy is just rustic, right?
- Can I make it ahead? Oh, totally. Actually, I tend to think it tastes even better the next day (the flavors just settle in together like old friends).
- Is it freezer-friendly? Mostly, but the gravy’s texture gets a bit weird. I do it sometimes but be ready for a bit of splitting; just keep stirring when you reheat.
- Do I have to use chicken thighs? Not at all — breasts or drumsticks work, but thighs are juicier in my opinion. Or mix and match; nobody’s policing your chicken.
- What if I don’t have milk? Just add more stock. Won’t be quite as creamy, but still really comforting.
So there you have it: my rambling, slightly chaotic approach to homestyle chicken and gravy. If you spot the cleanest plate at the table, it’s probably mine!
Ingredients
- 4 boneless, skinless chicken breasts
- 2 tablespoons olive oil
- 1 medium onion, finely chopped
- 2 cloves garlic, minced
- 2 cups chicken broth
- 1 cup whole milk
- 3 tablespoons all-purpose flour
- 1 teaspoon dried thyme
- Salt and black pepper to taste
- Fresh parsley for garnish (optional)
Instructions
-
1Season both sides of the chicken breasts with salt, black pepper, and dried thyme.
-
2Heat the olive oil in a large skillet over medium-high heat. Add the chicken and cook for 5-6 minutes on each side, until golden brown and cooked through. Remove chicken and set aside.
-
3In the same skillet, add the chopped onion and cook until softened, about 3 minutes. Add the minced garlic and cook for another minute.
-
4Sprinkle the flour over the onions and garlic. Stir and cook for 2-3 minutes until the flour is lightly browned.
-
5Gradually whisk in the chicken broth and milk, scraping up any brown bits. Continue stirring until the gravy thickens, about 5-7 minutes.
-
6Return the chicken to the skillet and simmer in the gravy for an additional 10 minutes. Garnish with parsley if desired, and serve hot.
Approximate Information for One Serving
Nutrition Disclaimers
Number of total servings shown is approximate. Actual number of servings will depend on your preferred portion sizes.
Nutritional values shown are general guidelines and reflect information for 1 serving using the ingredients listed, not including any optional ingredients. Actual macros may vary slightly depending on specific brands and types of ingredients used.
To determine the weight of one serving, prepare the recipe as instructed. Weigh the finished recipe, then divide the weight of the finished recipe (not including the weight of the container the food is in) by the desired number of servings. Result will be the weight of one serving.
Did you make this recipe?
Please consider Pinning it!!