
Let's Make Hibachi Fried Rice with Garlic Butter—My Kitchen's Crowd-Pleaser
You know that fried rice they make right in front of you at those hibachi grills? The one that makes you want to lick the plate and maybe ask for seconds (or thirds)? Well, I finally caved and tried to make it myself after a very rainy Friday night when no one wanted to go out and, honestly, I was too lazy to put on proper pants. It worked! Well, mostly—the first time was a bit of a sticky mess, but who's counting. Now it's on regular rotation at my house, especially when we want something that tastes like going out, but with less fuss (and, let's be real, fewer awkward onion volcanoes).
Why I Keep Coming Back to This Fried Rice
I make this when my kids are acting like they're auditioning for a drama series and I need dinner to distract them. Or when my partner's had one of those "meetings that could've been an email" kind of days. This rice is just... comforting. My family goes wild for it because it's buttery, garlicky, and honestly, it soaks up soy sauce like a sponge. (Also, it reheats pretty well, though my youngest once microwaved it so long it turned into a crunchy science experiment. Oops.)
What You'll Need (and What You Can Swap)
- 3 cups cooked white rice (day-old is best. But, if I'm in a rush, I use freshly cooked and just cool it on a baking tray for ten minutes. Jasmine works too!)
- 2 big eggs, lightly beaten (sometimes I add a third if I want it extra eggy)
- 2-3 green onions, sliced (spring onions, scallions—whichever you call 'em)
- 1 cup mixed frozen veggies (peas and carrots are classic; sometimes I throw in corn or edamame just for fun)
- 3 tablespoon unsalted butter (or whatever's in the fridge, though my grandma always swore by Kerrygold, but I just grab whatever's on sale)
- 4 cloves garlic, minced (or more. I don't judge.)
- 2 tablespoon soy sauce (Tamari works if you want gluten-free)
- 1 tablespoon sesame oil (I've left it out and honestly, it's fine but less toasty)
- A pinch of salt, pepper to taste
- Optional: 1 tablespoon mirin or a splash of sake (sometimes I skip it, but it's nice if you have it)
- A squeeze of lemon (which I forget at least half the time)
How I Actually Make It (With the Occasional Shortcut)
- First, gather everything. Seriously. I always think I'm organized until I realize the soy sauce is behind the pancake mix.
- In a small bowl, mash together 2 tablespoon butter and all the garlic. This is your garlic butter. You could use pre-chopped garlic but, eh, it just doesn't hit the same. Set aside.
- Heat a big nonstick skillet or wok over medium-high heat. Add a little oil (or butter if you’re feeling wild). When it’s shimmering, toss in your eggs. Quick scramble, then slide them out to a plate—don’t stress, they'll look messy.
- Splash in a bit more oil. Add the veggies and half your green onions. Stir-fry till everything's bright and smells amazing—about 2 minutes.
- Now the rice. Break up any clumps (it's easier with day-old, but fresh works if you spread it out a bit first). Add to the pan and stir like you mean it. Rice will pick up all the bits stuck to the pan, which is good.
- Scoot the rice aside and plop in your garlic butter. Let it melt, then mix it through everything. This part smells so good, I usually sneak a taste and burn my tongue. Every. Time.
- Pour in soy sauce, sesame oil, and mirin (if using). Keep tossing so every bit of rice gets glossy and brown.
- Stir the eggs back in. Add the rest of the green onions, and season with salt, pepper, and a squeeze of lemon if you remember (I rarely do, but when I do, it’s great).
- Serve piping hot, straight from the pan. Or eat it cold at midnight. Zero judgment here.
A Few Notes from My Not-So-Perfect Kitchen
- If your rice gets a bit sticky, just spread it out and let it fry longer. It crisps up eventually. Or, y'know, just embrace the stickiness. Tastes great either way.
- I once tried using brown rice—didn't love it, but my friend swears by it. You do you.
- Don't panic if your eggs look like yellow confetti. That's how it always looks in my pan.
- Too much garlic? Not possible. But you can scale back if you want to actually talk to people after dinner.
What Else I've Tried (And What Flopped)
- Chicken: Leftover rotisserie chicken is a win—just chop and toss it in.
- Bacon: Adds saltiness (and my uncle won't eat it any other way now).
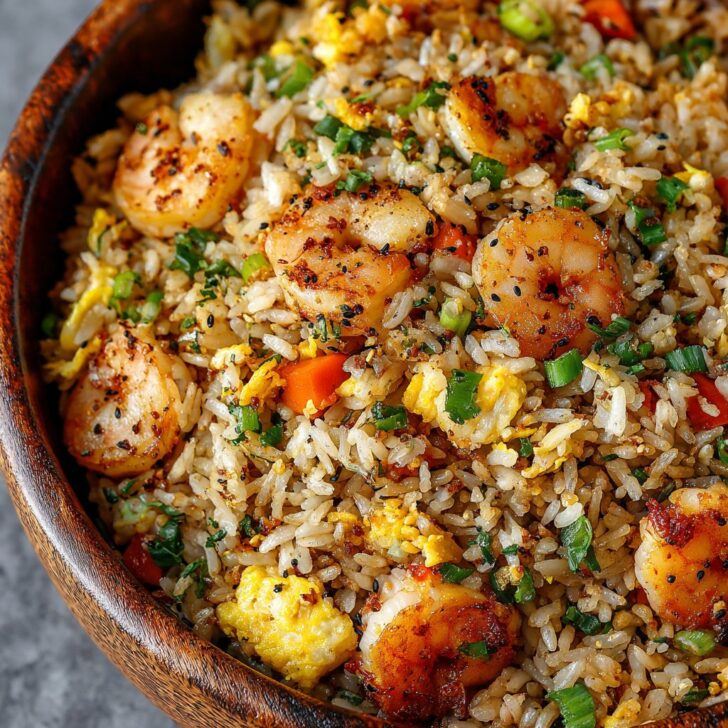
- Shrimp: Quick-fry before you add rice. Fancy!
- Cauliflower rice: I wanted to like it. Maybe it's me, but... no thanks. (If you love it, though, I salute your commitment!)
Equipment—And My Lazy Day Hacks
I love my battered old wok, but a big frying pan works just fine. If you only have a tiny skillet, just make it in batches. (Or in a pinch, I've used my electric griddle and, weirdly, it was pretty fun.) If you want to see how the pros flip rice, you should check out this guide from Just One Cookbook—so impressive.


Storing It (Though It Rarely Lasts That Long)
Honestly, leftovers disappear fast in my house. But if you manage to save some, just pop it in an airtight container and fridge it for up to 3 days. Reheat in a skillet for best texture (microwave works too, but watch out for crunchy edges). I think it tastes even better the next day, but maybe that's just me.
How I Like to Serve It
This is a meal in itself (especially when I can't be bothered with anything else), but sometimes I serve it with teriyaki chicken or a crisp salad on the side. Or if I'm feeling extra, maybe a drizzle of homemade yum yum sauce. And if I'm solo, I eat it straight from the pan—don't tell anyone.
Stuff I Learned the Hard Way (A.K.A. My Fried Rice Pro Tips)
- Don't rush the garlic butter step. I once tried to speed things up and ended up with burnt garlic. Regretted it instantly.
- Day-old rice is way easier to work with. But if you forget (like I do), spreading fresh rice on a tray and sticking it in the fridge for 30 mins works pretty well.
- Be generous with the butter—it's not diet food, but it's happy food.
Questions Real People Have Asked Me (Yes, These Actually Came Up)
- Do I have to use leftover rice? Nope! But it does help the rice fry up nicely. Fresh will do in a pinch, just cool it down first.
- Can I skip the garlic butter? You could. But then it's just regular fried rice, not hibachi magic.
- Can I make this vegetarian? Absolutely. Skip the meat add-ins, and use veggie-friendly butter. I do it all the time.
- Why does my rice clump up? Probably too much moisture. Or maybe your pan was a bit crowded. I just use a wooden spoon to gently break it up, no biggie.
- Can I freeze this? Eh, you can, but the texture gets weird. I usually just make enough to last a couple days.
And before I forget, if you're into cooking Japanese-style at home, the blog Chopstick Chronicles has some pretty nifty tips—worth a peek!
Anyway, hope you give this a try. Even if it's not perfect, it's always delicious (and honestly, a little kitchen chaos just adds flavor, right?).


Ingredients
- 3 cups cooked jasmine rice (preferably day-old)
- 2 tablespoons unsalted butter
- 1 tablespoon garlic, minced
- 2 large eggs, beaten
- ½ cup frozen peas and carrots, thawed
- 2 tablespoons soy sauce
- 1 tablespoon sesame oil
- 2 green onions, sliced
- Salt and black pepper to taste
Instructions
-
1Heat 1 tablespoon of butter in a large skillet or griddle over medium-high heat. Add the minced garlic and sauté for 1 minute until fragrant.
-
2Push the garlic to the side and pour the beaten eggs onto the skillet. Scramble the eggs until just set, then mix with the garlic.
-
3Add the peas and carrots to the skillet and cook for 2-3 minutes until heated through.
-
4Add the cooked rice to the skillet. Drizzle with soy sauce and sesame oil. Stir-fry everything together for 5-7 minutes, breaking up any clumps of rice.
-
5Stir in the remaining tablespoon of butter and sliced green onions. Season with salt and black pepper to taste. Serve hot.
Approximate Information for One Serving
Nutrition Disclaimers
Number of total servings shown is approximate. Actual number of servings will depend on your preferred portion sizes.
Nutritional values shown are general guidelines and reflect information for 1 serving using the ingredients listed, not including any optional ingredients. Actual macros may vary slightly depending on specific brands and types of ingredients used.
To determine the weight of one serving, prepare the recipe as instructed. Weigh the finished recipe, then divide the weight of the finished recipe (not including the weight of the container the food is in) by the desired number of servings. Result will be the weight of one serving.
Did you make this recipe?
Please consider Pinning it!!