Let's Talk Ground Beef Baked Tacos (A Little Story)
Alright, this one takes me right back to Tuesday nights at my mum's house, everyone fighting over the last crispy taco. You'd think I would've learned to double the batch, but no. Anyway, if you're looking for something that's equal parts cozy, tasty, and just the right kind of messy, these ground beef baked tacos are it. Plus, they're forgiving if you get distracted by, I don't know, the cat doing something weird. I can literally smell the kitchen as I write this—spiced beef, melty cheese, that almost-burnt edge of a shell (honestly, that's the best part). Bonus points if you've got a cold soda nearby.

Why You'll Love Making These Tacos
I make this whenever I want dinner on the table fast but still crave that "I actually tried" vibe. My family goes nuts for these because they're crunchy and gooey at the same time—which sounds like it shouldn't work, but it really does (especially with that sneaky extra cheese on top, shhh). I'm not saying it's magic, but I do sort of channel my inner taco wizard with this one. And, confession: I used to dread browning ground beef because it splatters everywhere, but baking the tacos at the end somehow makes me forgive my stovetop for being a mess. I swear these disappear faster than I can assemble them.
Here’s What You’ll Need (And What You Can Sub In!)
- 500g ground beef (sometimes I swap in ground turkey when I’m feeling virtuous…or out of beef, which is more likely)
- 1 onion, diced (my gran swore by yellow onions—but red onions work fine, or even shallots for fanciness)
- 2 cloves garlic, minced (I’m guilty of using the jar stuff on a lazy day—no shame)
- 1 packet taco seasoning (or make your own with chili powder, paprika, cumin, and a sprinkle of sugar if you’re feeling fancy, but the packet is honestly easiest)
- ¼ cup water
- 12 crunchy taco shells (those boxed ones from the store do the trick; soft tortillas technically work but just aren’t the same here)
- 2 cups shredded cheddar cheese (Monterey Jack works, or half and half—sometimes I raid the cheese drawer, whatever’s left, gets thrown in)
- 1 cup shredded lettuce (I use iceberg because it’s classic, but romaine will do in a pinch)
- 1 tomato, diced (or a handful of cherry tomatoes if that’s what you’ve got—sometimes I skip it altogether, to be honest)
- ¼ cup sour cream (Greek yogurt also hits the spot, and sometimes even better for my waistline)
- Salsa, for serving (homemade, store-bought, or sometimes just a splash of hot sauce when I can’t be bothered)
How I Like to Make Ground Beef Baked Tacos
- First things first: Preheat your oven to 400°F (200°C) because we want those shells to get just a little toasty, not sad and soggy. And if you ever forget, don’t stress—just start the oven whenever you remember; they always seem to finish about the same time anyway.
- Heat a big skillet—medium-high heat works—then throw in the ground beef. Break it up with a spoon or, honestly, a potato masher works superbly (strange but true). Cook till browned and crumbly; drain excess fat if you want, or leave a little for flavor (I won’t tell).
- Add diced onions and cook for 3-4 minutes till soft; then stir in garlic for the last 30 seconds or so. If the onions stick a bit, just scrape up the little brown tasty bits—that’s flavor.
- Now, sprinkle in the taco seasoning and add the water. Mix it all up and let simmer for 2-3 min until it thickens. This is where I usually sneak a taste—can’t help it.
- While the beef is chilling out (well, actually, simmering), line up your taco shells in a baking dish—snug side by side so they stay upright. If you only have a small pan, do ’em in batches or just lean them up against each other. They’ll survive, promise.
- Spoon a bit of cheese into the bottom of each shell (my secret to preventing a soggy bottom—oh, the drama if you forget), then pack in the beef mixture. Don't be stingy here.
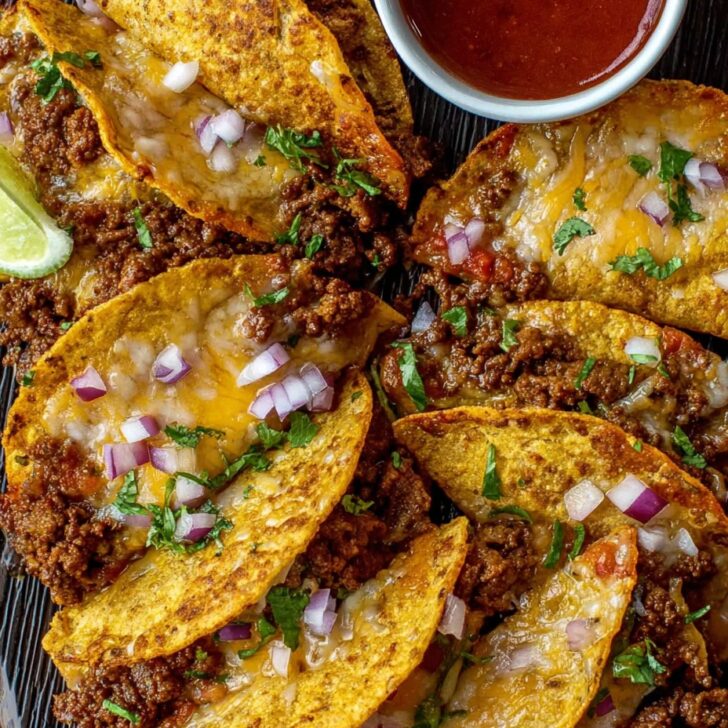
- Top each taco generously with the rest of your cheese—don’t be shy, the cheesier the better. Into the oven they go for 8-10 min, or until the cheese bubbles and the shells get crisp. Sometimes the ones on the edge get a little more toasty, and those are the ones I fight my brother for.
- Let the tacos cool for a minute so you don’t burn every tastebud you have—ask me how I know. Then pile on the lettuce, tomato, sour cream, and as much salsa as your heart desires.

A Few Notes I Learned the Hard Way
- If you fill the tacos too much, they might flop over in the oven. I once tried to stand them up with a wad of foil, and it kinda worked? Not the prettiest, though.
- I sometimes season the beef with a splash of hot sauce if I’m feeling spicy.
- You can mix up the cheese, but the stretchy ones (like mozzarella) don't crisp as nicely, so I tend to stick with cheddar or a blend.
- Tomatoes go on just before serving or they make the shells soggy—trust me, learned the hard way after leaving them in too long.
Variations I've Dabbled With (For Better or Worse)
- I’ve tried these with refried beans mixed into the beef, and it makes it heartier—good if you’re feeding a pack of teenagers.
- Sometimes I swap the beef completely for cooked lentils (my cousin was visiting and she’s vegetarian). Actually, it was a hit, much to my surprise.
- Tried stuffing them with leftover pulled pork once—delicious, but it made the shells a bit greasy. Maybe not my finest moment but worth a shot if you’re all about flavor.
- Once tried adding pineapple; honestly, not for me, but you do you!

Don’t Sweat the Equipment
I usually use a 9x13-inch baking dish because it fits a full box of taco shells, but you can absolutely use two smaller pans, or even arrange them on a rimmed baking sheet (although they might do a domino effect if you’re not careful). No skillet? A heavy saucepan works, just might take a minute longer to brown the beef. Improvisation is the spice of life, yeah?
How to Store ’Em (If You Have Leftovers... Ha!)
Okay, on paper, you can store these in an airtight container in the fridge for up to 2 days, but honestly, in my house, they barely make it to the next morning. If you do have leftovers, reheat in the oven at 350°F for about 10 min—they crisp up again, sort of. Microwave works but, I'm warning you now, they get limp (still tasty though).
How We Serve Ground Beef Baked Tacos (AKA Taco Night Rituals)
I like to serve these straight out of the baking dish, family-style, extra napkins on the side because, well, things get messy. Sometimes I put out bowls of jalapeños, pickled onions, or even crushed tortilla chips for crunch (my youngest insists on this, and I pretend it was my idea). A little bowl of guac never hurts, either. Sometimes, on cold days, we have these with a mug of tomato soup—sounds odd, but it works. Or just heap on extra salsa and call it dinner.
Things I Wish I'd Known (Pro Tips Form Real Life)
- I once tried rushing the cheese melting step—ended up with barely-melted cheese and a burnt corner. Actually, I find it works better if you watch the oven like a hawk the last three minutes.
- Don’t fill the shells too early or they’ll get soggy waiting around for the oven. Assembling last minute is your friend here.
- Let everyone pile on their toppings at the table—otherwise, folks will grumble about soggy lettuce or not enough tomato. Seriously, family harmony depends on self-serve style.
FAQ (A Few Things People Have Actually Asked Me)
- Can I make these ahead? Sorta. You can prep the beef mix ahead of time and stash it in the fridge, but always assemble and bake just before eating or the shells go limp.
- Is it possible to freeze them? Oddly enough, yes, but don’t expect crispy shells out of the freezer. Reheat from frozen in the oven for best results, but they’ll be a bit chewier.
- What’s the best cheese? Cheddar all the way, but I’ve used mozzarella (melts great but a little bland) and even pepper jack for a kick. Use up whatever you’ve got—no one’s judging.
- Can I use soft tortillas? You can, in a pinch, but they turn more into mini burritos after baking. Not a bad thing but definitely not the iconic crunch you expect—it’s a whole different (but tasty) experience.
- How spicy is this? The packet seasoning is fairly mild, so throw in extra chili flakes or hot sauce if you’ve got heat fiends around. Or not—it’s your kitchen after all!
And if you’re wondering, yes—it tastes even better the second day. But don’t quote me, because it probably won’t last that long!
Ingredients
- 500g ground beef (sometimes I swap in ground turkey when I’m feeling virtuous…or out of beef, which is more likely)
- 1 onion, diced (my gran swore by yellow onions—but red onions work fine, or even shallots for fanciness)
- 2 cloves garlic, minced (I’m guilty of using the jar stuff on a lazy day—no shame)
- 1 packet taco seasoning (or make your own with chili powder, paprika, cumin, and a sprinkle of sugar if you’re feeling fancy, but the packet is honestly easiest)
- ¼ cup water
- 12 crunchy taco shells (those boxed ones from the store do the trick; soft tortillas technically work but just aren’t the same here)
- 2 cups shredded cheddar cheese (Monterey Jack works, or half and half—sometimes I raid the cheese drawer, whatever’s left, gets thrown in)
- 1 cup shredded lettuce (I use iceberg because it’s classic, but romaine will do in a pinch)
- 1 tomato, diced (or a handful of cherry tomatoes if that’s what you’ve got—sometimes I skip it altogether, to be honest)
- ¼ cup sour cream (Greek yogurt also hits the spot, and sometimes even better for my waistline)
- Salsa, for serving (homemade, store-bought, or sometimes just a splash of hot sauce when I can’t be bothered)
Instructions
-
1First things first: Preheat your oven to 400°F (200°C) because we want those shells to get just a little toasty, not sad and soggy. And if you ever forget, don’t stress—just start the oven whenever you remember; they always seem to finish about the same time anyway.
-
2Heat a big skillet—medium-high heat works—then throw in the ground beef. Break it up with a spoon or, honestly, a potato masher works superbly (strange but true). Cook till browned and crumbly; drain excess fat if you want, or leave a little for flavor (I won’t tell).
-
3Add diced onions and cook for 3-4 minutes till soft; then stir in garlic for the last 30 seconds or so. If the onions stick a bit, just scrape up the little brown tasty bits—that’s flavor.
-
4Now, sprinkle in the taco seasoning and add the water. Mix it all up and let simmer for 2-3 min until it thickens. This is where I usually sneak a taste—can’t help it.
-
5While the beef is chilling out (well, actually, simmering), line up your taco shells in a baking dish—snug side by side so they stay upright. If you only have a small pan, do ’em in batches or just lean them up against each other. They’ll survive, promise.
-
6Spoon a bit of cheese into the bottom of each shell (my secret to preventing a soggy bottom—oh, the drama if you forget), then pack in the beef mixture. Don't be stingy here.
-
7Top each taco generously with the rest of your cheese—don’t be shy, the cheesier the better. Into the oven they go for 8-10 min, or until the cheese bubbles and the shells get crisp. Sometimes the ones on the edge get a little more toasty, and those are the ones I fight my brother for.
-
8Let the tacos cool for a minute so you don’t burn every tastebud you have—ask me how I know. Then pile on the lettuce, tomato, sour cream, and as much salsa as your heart desires.
Approximate Information for One Serving
Nutrition Disclaimers
Number of total servings shown is approximate. Actual number of servings will depend on your preferred portion sizes.
Nutritional values shown are general guidelines and reflect information for 1 serving using the ingredients listed, not including any optional ingredients. Actual macros may vary slightly depending on specific brands and types of ingredients used.
To determine the weight of one serving, prepare the recipe as instructed. Weigh the finished recipe, then divide the weight of the finished recipe (not including the weight of the container the food is in) by the desired number of servings. Result will be the weight of one serving.
Did you make this recipe?
Please consider Pinning it!