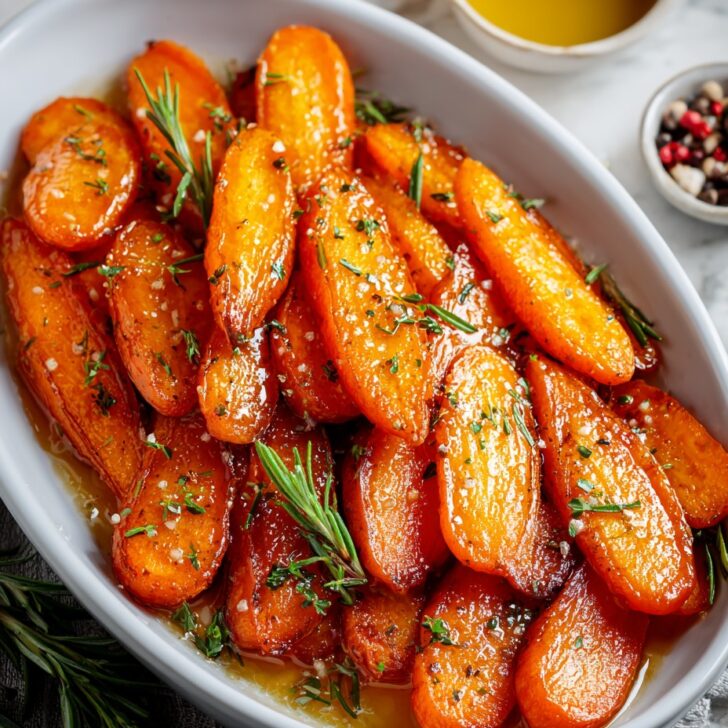

If there’s one thing my lot expects on Christmas Day—besides arguing over whose turn it is to pull a cracker—it’s these sticky-sweet glazed carrots. The first time I made them, I forgot to buy butter and ended up raiding my neighbour's fridge on Christmas Eve (true story). Now, these carrots are our tradition, butter and all. Sometimes I make an extra tray just for snacking, if you can believe it. Honestly, glazed carrots are my kind of holiday: a bit shiny, a touch sweet, and never quite as polished as you planned.
But Why Are We All Mad for These Anyway?
I make this whenever we’ve got a roast going (Christmas or just a lazy Sunday), and my family goes slightly mad fighting over the crispy, caramel bits—my youngest picked them all off the tray once. Also, these carrots know how to keep secrets. You can add orange if Aunt Sue is visiting (she swears by it), or make them a tad boozier for a more grown-up crowd, and nobody’s the wiser. The trickiest bit: not eating half of them straight from the pan. Oh, and there used to be this thing where my glaze would burn if I looked away for a second at the Queen’s speech—but I’ve got that sorted, finally.
What’s in ’em? AKA The Ingredients
- About 700g (1.5 lbs) carrots, peeled and cut however you like—big chunks if you’re feeling lazy, or fancy sticks for the overachievers
- 3 tablespoons butter (or, honestly, sometimes I just use olive oil when we’re out; it’s different, not bad)
- 2 tablespoons brown sugar—sometimes I use maple syrup for a twist, or just whatever’s lurking in the cupboard
- 1 tablespoon honey (grandma always said local honey is magic, but I just use shop stuff most times)
- A hefty pinch of sea salt
- Couple twists of black pepper
- Optional: zest of one orange, splash of orange juice, sprinkle of cinnamon, or even a dash of brandy (for festive bravery!)
This is How I Do It (Mostly)
- First, whack the oven on to 200°C (about 400°F, give or take—I’ve cooked these at slightly lower temps and they still work out, just take a bit longer).
- Throw all your cut carrots onto a baking tray or shallow roasting pan. Spread them about so they’re mostly in one layer, but do I stress if there’s overlap? Not really. Just don’t pile ’em five deep.
- Now, melt the butter in a jug (microwave for 20 seconds usually does it). Stir in the brown sugar, honey, salt, pepper, and anything else festive you fancy.
- Pour your sweet buttery mix all over the carrots and give ’em a proper toss—hands work best, but a spatula saves greasy fingers.
(This is where I normally pinch a carrot to see if the glaze tastes right. Sometimes I add more honey. Or I just eat the carrot, who’s judging?) - Slide the tray into the oven, set a timer for 25 minutes. Halfway through, pull them out and give them a stir. Don’t panic if things look too wet—give it time, the glaze thickens up. Sometimes I swear it looks a mess at this point, but it sorts itself out.
- At around 35-40 minutes, when the carrots are shiny and a little golden at the edges (you know, the good sticky bits), fish one out to taste. If it’s soft and the glaze is clinging, you’re done.
Some Notes I Learned the Hard Way
- I tried using parsnips once (don’t bother, they don’t glaze well at all in my opinion—too woody)
- If you double the batch, use two trays, or you’ll end up steaming them and lose the sticky magic
- Actually, I find a little extra salt makes everything pop more—I was scared of oversalting but it’s worth it
If You Fancy Tweaking (Here’s What’s Worked, and What Hasn’t)
- Add a glug of orange juice for a citrus vibe (lovely with turkey, but don’t go overboard or it’ll take over—speaking from experience)
- I once tried a tablespoon of soy sauce. Tasted a bit too much like a stir fry for Christmas, but it was…interesting?
- Maple syrup instead of honey and sugar is ace. Makes cleanup easier, too.
- Splash of whisky for grown up nights (careful not to add too much or you’ll taste nothing else!)
Gear I Use (Or Don’t…)
I love my battered old roasting tin for this, but I’ve used a plain ceramic dish in a pinch. If you don’t have a proper zester, a cheese grater on the fine side works (just don’t zest your knuckles, like I did last year—extra protein though, eh?). Tongs? I just use my hands. Though, actually, tongs do save some mess for once.


How to Store—If You Even Have Leftovers
Technically, these carrots keep for up to 3 days in a sealed tub in the fridge; honestly, in my house it never lasts more than a day! If you must reheat, pop them in a hot oven for ten minutes—they get their shine back better than in the microwave, trust me.
How We Dish ’em Up in My House
I serve these straight from the tray, usually to save on washing up. Sometimes we sprinkle some toasted pecans on top if they’re knocking about, which started as a happy accident. Or at Christmas lunch, these always sit right next to the roast potatoes (battle for “best side” is ongoing). Everyone gets a spoonful...or three. Oh! They also show up in leftover sandwiches sometimes—my uncle swears by it with turkey and stuffing, though I side-eye him for that.
Dodgy Pro Tips Learned in the Trenches
- Don’t wander off and let the glaze burn. I once tried answering an email halfway through—bad idea. Burnt sugar = ruined carrots.
- Carrots cut too thin get mushy. It sounds obvious, but I’ve made that mistake more than once (doesn’t stop me eating them, mind…)
- If the tray starts looking dry, just splash in a little water—maybe a spoonful at a time. That’ll help ‘em not weld to the tin.
Questions I Get All the Time
- Can I make these ahead of time?
- Yep! They reheat surprisingly well. Actually, I think they taste better the next day. But, if you want ‘em super glossy, add a tiny bit more glaze before reheating.
- Do I have to peel the carrots?
- Nope — just scrub ‘em well. I’ve even left the tops on for, you know, rustic vibes. Works just fine.
- What’s the best sugar?
- I usually use soft light brown—honestly, regular brown or even dark muscovado works, but it gets really sticky. In a good way.
- But won’t the honey burn?
- It can, if you wander off. But if you stir part way and keep an eye out, you’ll be grand.
- Can I freeze them?
- I’d say don’t bother—the texture isn’t right after freezing. Eat fresh if you can!
A Slight Digression About Carrot Origins
Did you know carrots used to be purple? Sorry, I just find that wild. There’s a great article on the BBC Food site about it. (Okay, back to the recipe.)
If you’re after carrot inspiration, this post from Spend With Pennies has some sneaky extra tips on getting the glaze just right.
Well. That’s my glazed carrots for Christmas, with every imperfect (and highly edible) detail included. If you give it a go, let me know if your tray mysteriously empties itself too.


Ingredients
- 1 pound carrots, peeled and sliced diagonally
- 3 tablespoons unsalted butter
- 3 tablespoons brown sugar
- 1 tablespoon honey
- ¼ teaspoon ground cinnamon
- ¼ teaspoon salt
- ⅛ teaspoon ground nutmeg
- 1 tablespoon fresh parsley, chopped (for garnish)
Instructions
-
1In a large pot, bring salted water to a boil. Add peeled and sliced carrots and cook for 6–8 minutes until just tender. Drain and set aside.
-
2In a large skillet over medium heat, melt the butter. Stir in brown sugar, honey, cinnamon, salt, and nutmeg until the mixture is smooth and bubbling.
-
3Add the cooked carrots to the skillet and toss to coat them evenly with the glaze. Cook for an additional 3–4 minutes, stirring occasionally, until carrots are glossy and heated through.
-
4Transfer glazed carrots to a serving dish and garnish with chopped fresh parsley. Serve immediately.
Approximate Information for One Serving
Nutrition Disclaimers
Number of total servings shown is approximate. Actual number of servings will depend on your preferred portion sizes.
Nutritional values shown are general guidelines and reflect information for 1 serving using the ingredients listed, not including any optional ingredients. Actual macros may vary slightly depending on specific brands and types of ingredients used.
To determine the weight of one serving, prepare the recipe as instructed. Weigh the finished recipe, then divide the weight of the finished recipe (not including the weight of the container the food is in) by the desired number of servings. Result will be the weight of one serving.
Did you make this recipe?
Please consider Pinning it!!