
Let Me Tell You About These Frozen Greek Yogurt Peanut Butter Bites
If you’d told me last summer that my freezer would be overrun with little bites of peanut butter-y Greek yogurt goodness, I’d have laughed (and then probably eaten one anyway). But, here we are. I actually stumbled on this recipe while trying to keep my nephew distracted — and quiet — during a heat wave. He was bouncing off the walls and I was already melting, so, in a moment of inspired desperation, I grabbed what I had and made these. Now, they’re a staple. Funny how chaos sometimes leads to genius snacks, right?
Also, I’m not above bribery. If I say there are frozen peanut butter bites for dessert, suddenly everyone’s helping clear the dinner plates. Go figure!
Why I Keep Making These (And Maybe You Will Too)
I make this when I want something cold, sweet, and not totally guilt-inducing. My family goes crazy for this because it’s basically a peanut butter cup that pretends to be healthy. (And, okay, sometimes I make a double batch just for myself and hide it in the freezer behind the peas — sneaky, huh?)
Oh, and you know those afternoons when you want just a little pick-me-up, but not the full-on sugar crash? Yeah, these. And if you’re feeling fancy, you can drizzle a bit of melted chocolate on top, but honestly, I’m usually too impatient.
Gather These Ingredients (Swaps Welcome!)
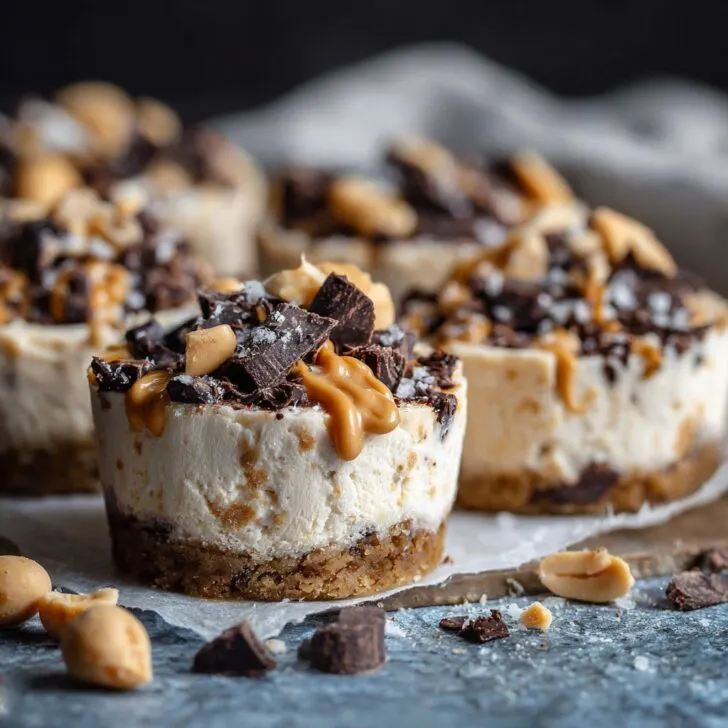
- 1 cup plain Greek yogurt (I’ve used vanilla in a pinch; it’s sweeter, but not bad. My friend swears by FAGE, but I grab whatever’s on sale, honestly)
- ¾ cup peanut butter, creamy or chunky (I use Skippy, but I’ve tried with almond butter too — that works if you’re feeling adventurous)
- 2–3 tablespoon honey or maple syrup (If the yogurt is already sweetened, go lighter. Sometimes I just eyeball it, shhh.)
- Pinch of salt (optional, but I think it pulls the flavors together)
- Mini chocolate chips or chopped dark chocolate — a small handful (optional, but my niece will stage a protest if I forget these)
- ½ teaspoon vanilla extract (if you’re into that, but no biggie if you skip)
Here’s What You Do (Don’t Sweat the Small Stuff)
- In a bowl, plop in your Greek yogurt, peanut butter, honey (or syrup), the vanilla, and a pinch of salt. Stir it up! It’ll look a little lumpy at first, but keep going; it’ll get creamy. This is where I usually sneak a taste — for quality control, of course.
- If you want chocolate in every bite, stir in your chips or chunks now. Or, sprinkle them on top later — up to you. No judgment.
- Now, grab a mini muffin tin (silicone ones are magic here, but regular works too) and line it with mini paper liners. Or — and I’ve done this — just plop little spoonfuls directly onto a parchment-lined plate if you don’t have a tin. A bit rustic, but who cares?
- Spoon the mixture into each cup, filling them up. I usually get about 12–16, depending on how generous I’m feeling (and how much I ate during step 1).
- Sprinkle extra chocolate on top if you saved some. Press them in a bit so they stick.
- Pop the tray in the freezer for at least 2 hours. Or longer. (I once forgot them overnight and, honestly, they tasted better the next day.)
- Once they’re frozen solid, just pop them out and try not to eat the whole batch immediately.
A Few Notes From My Many Attempts
- If you use natural peanut butter, things might get a bit runny; let it firm up in the fridge before scooping (learned that the messy way).
- Don’t overdo the honey — too much and the texture gets weird. Then again, maybe you like weird? No judgment.
- Actually, I find it works better if you let them sit for a minute or two out of the freezer before eating. Not required, but worth it.
Fun Experiments (Some Worked, Some Not So Much)
- Tried swirling in some raspberry jam once — looked amazing, tasted like a PB&J ice cream. Highly recommend.
- Once tried with sunflower seed butter. It, uh, didn’t quite hit the spot. Maybe you’ll have better luck?
- If you’re daring, sprinkle a little flaky sea salt on top before freezing. Delish.
If You Don’t Have the Right Equipment…
I say mini muffin tins are best, but honestly, a regular spoon and some parchment paper work just as well. I’ve even used an ice cube tray in a pinch, though it’s a little fiddly getting them out (pro-tip: run some warm water on the bottom).


How I Store These (They Barely Last)
Keep them in an airtight container in the freezer. They’ll hold up for a week or so, but — real talk — in my house, they never make it past day two. If you somehow have leftovers, you can individually wrap them in a bit of wax paper for easy grabbing.
Favorite Ways to Serve (Or, How We Eat Them)
Honestly, I just hand them over straight from the freezer. But if it’s Saturday and I’m feeling fancy, I’ll pile a few in a bowl and drizzle a little extra honey overtop. Once, my sister sandwiched one between two graham crackers and called it a ‘frozen whoopie’ — I didn’t argue.
The ‘Oops, Learned the Hard Way’ Pro Tips
- I once tried to freeze them in big muffin tins… don’t. You’ll need a chisel to get them out.
- Rushing the freeze means they stay kinda soft in the middle. Not a disaster, but a bit messy for little hands.
- Don’t skip the liners unless you’re feeling brave or just love washing sticky muffin tins.
Questions I Actually Get About These
- Can I use non-dairy yogurt?
Yep! I’ve tried with coconut yogurt (So Delicious is a good one) and it worked fine, just a little less tangy. - How sweet are these, really?
Depends on the honey and yogurt. Taste before you freeze! If you want them sweeter, add a bit more, but start slow. - What if I don’t have muffin liners?
No stress. Just grease the tray a little or use parchment — they might be a bit sticky, but still tasty. - Do they work with crunchy peanut butter?
Oh, absolutely! Adds a nice texture, actually — just be ready for a bit more arm workout while you stir. - Any flavor add-ins you love?
I like a pinch of cinnamon, or even a tiny bit of espresso powder if I’m making a ‘grown-up’ batch.
Oh, and since I’m always looking for new kitchen gadgets, I found this round-up of silicone muffin pans super helpful. If you’re new to freezing snacks, Sally’s tips on freezing desserts are worth a peek too. And if you want to get a bit more creative, Minimalist Baker’s peanut butter yogurt dip is a great riff on these flavors (but not frozen — unless you want to try, who knows?).
So, there you have it — my not-so-secret Frozen Greek Yogurt Peanut Butter Bites Recipe. Whether you use it to bribe your kids, reward yourself after a long day, or sneak a snack at midnight (guilty), it’s a winner. Happy freezing, mate!


Ingredients
- 1 cup plain Greek yogurt
- ½ cup creamy peanut butter
- 2 tablespoons honey
- ¼ cup mini chocolate chips
- ¼ teaspoon vanilla extract
- Pinch of sea salt
- 2 tablespoons chopped roasted peanuts (optional)
- 1 tablespoon coconut oil (optional, for smoother texture)
Instructions
-
1Line a mini muffin tin with paper liners or use a silicone mold.
-
2In a medium bowl, mix together the Greek yogurt, peanut butter, honey, vanilla extract, and sea salt until smooth and well combined.
-
3Fold in the mini chocolate chips and chopped roasted peanuts (if using).
-
4Spoon the mixture evenly into the prepared muffin tin or molds, filling each about three-quarters full.
-
5Freeze for at least 2 hours, or until the bites are firm and fully set.
-
6Remove from the freezer and let sit for a few minutes before serving. Store any leftovers in an airtight container in the freezer.
Approximate Information for One Serving
Nutrition Disclaimers
Number of total servings shown is approximate. Actual number of servings will depend on your preferred portion sizes.
Nutritional values shown are general guidelines and reflect information for 1 serving using the ingredients listed, not including any optional ingredients. Actual macros may vary slightly depending on specific brands and types of ingredients used.
To determine the weight of one serving, prepare the recipe as instructed. Weigh the finished recipe, then divide the weight of the finished recipe (not including the weight of the container the food is in) by the desired number of servings. Result will be the weight of one serving.
Did you make this recipe?
Please consider Pinning it!!