
Let's Talk Peanut Butter Cups (and How I Can't Stop Making Them)
Alright, so there's this thing I do whenever I've had one of those days: I head straight for the freezer and grab a chocolate peanut butter cup. Not the store-bought kind, mind you, but the ones I make at home. They're easier than you'd think, and—honestly—I started because I kept finding wrappers under the couch (thanks, kids). Now, they’ve become my late-night snack and my let’s-impress-the-neighbors treat. Is this my proudest achievement? Well, maybe.
Why You’ll Love This Frozen Chocolate Peanut Butter Cup Recipe
I make these when I want to feel like a domestic genius without actually turning on the oven. My family goes absolutely bananas over them—my partner usually tries to hide the last one (spoiler: it never works). And if you’ve ever wrestled with getting the filling just right (too runny, too stiff, who knows?), don’t worry; I’ve made every mistake possible so you don’t have to.
What You’ll Need (and Some Personal Substitutions)
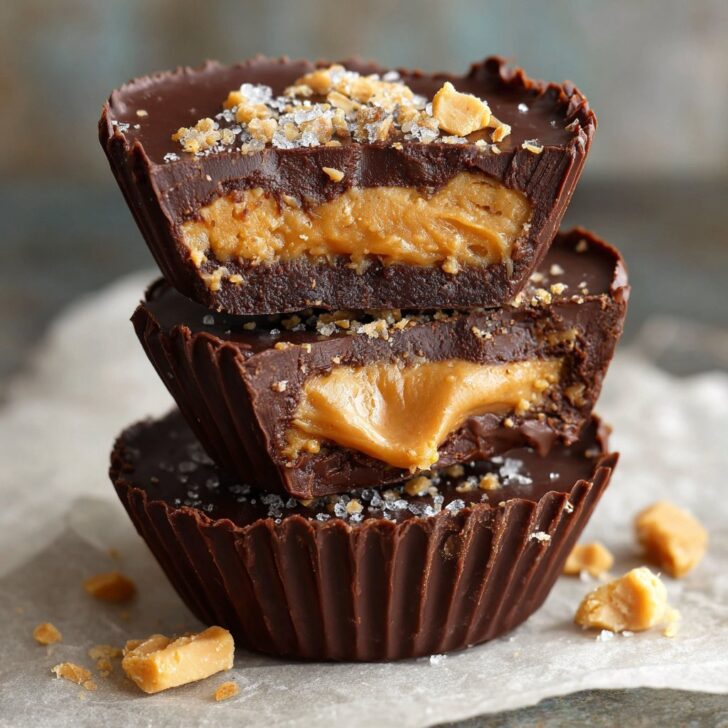
- 200g (about 1 ¼ cups) chocolate chips – I flip-flop between dark and milk, or honestly whatever’s left in the pantry. Grandma swears by Ghirardelli, but store brand works fine.
- ½ cup peanut butter – Creamy or crunchy, doesn’t matter. I sometimes use almond butter if it’s hanging around.
- 3 tablespoon powdered sugar – Hershey’s or generic; sometimes I just use a smidge less so it’s not too sweet.
- 2 tablespoon coconut oil (optional, but I like the shine)
- A pinch of salt – Flaky sea salt if you want to feel fancy
- Paper mini muffin liners – Or silicone, but I lost half my set last year (don’t ask)
How To Make Frozen Chocolate Peanut Butter Cups (It’s Actually Easy)
- Prep your pans: Line a mini muffin tin with the paper liners. If you don’t have one, just pop the liners on a cookie sheet. Half the time, I do it this way because my muffin tin is always in use for, well, muffins.
- Melt the chocolate: Toss the chocolate chips and coconut oil (if using) into a microwave-safe bowl. Nuke it in 20-30 second bursts, stirring each time, until smooth. If you’re a double boiler purist, go for it, but honestly, who has the patience? (This is where I usually sneak a taste.)
- Make the peanut butter filling: Mix the peanut butter, powdered sugar, and salt in another bowl. If it’s too stiff, add a tiny splash of milk or a little more peanut butter. Too runny? Just toss it in the fridge for a few minutes.
- Assemble: Spoon about 1 teaspoon of melted chocolate into each liner, tilt the pan a bit so it covers the bottom. Pop it in the freezer for 5 mins so it hardens a bit—unless you’re in a rush, then just wing it.
- Add peanut butter: Plop a small dollop (about ½ tsp) of the peanut butter mixture in the center of each cup. Don’t worry if it looks a bit lumpy; once the top chocolate goes on, it’s all hidden.
- Finish with more chocolate: Cover the peanut butter with another layer of chocolate. Occasionally I run out and have to melt a few more chips, so don’t stress if that happens.
- Freeze: Sprinkle a pinch of flaky salt on top if you’re feeling extra. Freeze for at least 20 minutes, or until firm. (Honestly, I never wait the whole 20. Impatience is my superpower.)
A Few Notes From Trial and Error
- Once I tried using natural peanut butter—y'know, the kind you have to stir—and it was a slippery mess. Stick with the regular stuff unless you love chaos.
- If your chocolate gets lumpy, just add an extra dab of coconut oil and zap it again. Works like a charm.
- Bonus: These are way better if you let them sit at room temp for 5 minutes before eating. I think the flavors mellow out a bit.
- Oh, and don’t use cupcake liners—the minis are key; otherwise, it’s basically a chocolate hockey puck.
Variations I’ve Tried (and One That Flopped)
- I swapped in Biscoff spread for peanut butter once—here’s what I mean—and it was dangerously good.
- Almond butter works, if that's your jam (pun intended), but I always go back to classic peanut.
- Tried white chocolate once. Looked pretty, but tasted... just okay. I probably wouldn’t repeat unless someone specifically asks for it.
- My friend adds crushed pretzels in the center for crunch. Haven’t tried it yet, but sounds wild.
What You Need (But Improvise If You Must)
- Mini muffin tin (though, like I said, you can get away with just the liners on a tray in a pinch)
- Mixing bowls
- Microwave or stovetop (if you’re feeling “cheffy”)
- Spoons (or a fancy little scoop if you’re professional; I just use the smallest one from my drawer)


Storage (But Don’t Expect Them to Last!)
Pop them in an airtight container and stash in the freezer. They’ll keep for a month, supposedly, though honestly, in my house it never lasts more than a day! Sometimes I hide them behind the frozen peas... just a thought.
How I Serve 'Em (and a Family Quirk)
I usually let them sit out for a few minutes so they’re not rock solid. My sister dunks hers in coffee (which is, frankly, genius). Sometimes we top them with a dot of jam—don't knock it 'til you've tried it. Oh, and a scoop of vanilla ice cream on the side? Heavenly.
Lessons Learned (So You Don’t Repeat My Mistakes)
- Don’t try to skip the freezer step between chocolate and peanut butter layers—unless you like lopsided cups. I once did it and ended up with a weird swirl situation (not in a cute way).
- If you rush the melting process, the chocolate seizes and turns into what I can only describe as "grainy lava." Add coconut oil slowly and go low and slow in the microwave.
- I used to overfill the cups, which basically glued the liners on. Less is more, in this case.
Questions I’ve Actually Gotten (And Honest Answers)
- Do I really need coconut oil? Nah, it just helps the chocolate set shiny. Skip if you don’t have it; no biggie.
- Can I use chunky peanut butter? Absolutely. It’s got more texture. Actually, I find it works better if you want a little crunch.
- Will this work with sunbutter? Sure thing. My cousin’s allergic to peanuts and loves them that way. Color’s a bit funky, but who cares?
- Can you make these vegan? Yup, just grab dairy-free chocolate and plant-based nut butter. Easy peasy.
- How do you get them out of the liners? If you’re having trouble, freeze them a bit longer. Or—on second thought—just eat them with a spoon. No shame.
- Where did you get those mini liners? Amazon, actually. But if you want nicer ones, King Arthur Baking has cute options.
Anyway, if you try these Frozen Chocolate Peanut Butter Cups, let me know how it goes. Or, just send help because I can’t stop eating them!


Ingredients
- 1 cup semi-sweet chocolate chips
- 2 tablespoons coconut oil
- ¾ cup creamy peanut butter
- 2 tablespoons powdered sugar
- ½ teaspoon vanilla extract
- ⅛ teaspoon salt
- ¼ cup chopped roasted peanuts (optional)
- Mini paper cupcake liners
Instructions
-
1Line a mini muffin tin with 12 paper cupcake liners.
-
2In a microwave-safe bowl, combine chocolate chips and coconut oil. Microwave in 30-second intervals, stirring until smooth and melted.
-
3Spoon about 1 teaspoon of melted chocolate into the bottom of each liner. Gently tap the pan to spread the chocolate evenly. Freeze for 5 minutes to set.
-
4In a separate bowl, mix together peanut butter, powdered sugar, vanilla extract, and salt until smooth.
-
5Add about 1 teaspoon of the peanut butter mixture on top of the set chocolate in each liner. Flatten gently with the back of a spoon.
-
6Cover each cup with the remaining melted chocolate. Sprinkle chopped roasted peanuts on top if desired. Freeze for at least 1 hour until firm. Serve frozen.
Approximate Information for One Serving
Nutrition Disclaimers
Number of total servings shown is approximate. Actual number of servings will depend on your preferred portion sizes.
Nutritional values shown are general guidelines and reflect information for 1 serving using the ingredients listed, not including any optional ingredients. Actual macros may vary slightly depending on specific brands and types of ingredients used.
To determine the weight of one serving, prepare the recipe as instructed. Weigh the finished recipe, then divide the weight of the finished recipe (not including the weight of the container the food is in) by the desired number of servings. Result will be the weight of one serving.
Did you make this recipe?
Please consider Pinning it!!