
Okay, Let's Chat Turkey (Literally!)
So, a few years back, I volunteered (possibly under influence of a little too much mulled wine) to cook the Thanksgiving turkey. Spoiler: I had never done it before, but I was armed with optimism, an internet connection, and about a week’s worth of nervous energy. The first time was, uh, intense—my smoke alarm actually doubled as a kitchen timer that day. But honestly? I cracked the code with some trial and error, so now I'm happily the unofficial turkey wrangler. Let’s get into it before I ramble about Aunt Sheila’s kitchen mishaps again.
Why I Keep Coming Back to This Recipe
I make this Easy Roast Turkey every holiday now (plus that one random Sunday in March...don’t ask). My family basically does a little happy dance around the kitchen when I start hauling out the roasting pan. It’s just simple, classic comfort and not at all fussy—no dry brining for three days (I mean, who has the fridge space?!), and no complex herb infusions that require a botanical degree. And if you’re like me and get slightly panicked about overcooked breast meat—trust me, I’ve been there—this method is pretty forgiving.
What You'll Need (or What I Like to Use!)
- 1 whole turkey (10-12 lbs or whatever fits in your oven, really)
- 3 tablespoons olive oil or, sometimes, melted butter (I swap them depending on which is closer to hand)
- A handful of fresh herbs: thyme, rosemary, sage (Or sprinkle dry Italian seasoning if your fresh stuff looks sketchy—no judgement)
- 1 onion, quartered (Red onion gives a sweeter note, if you care about that)
- 2-3 carrots, broken in half (I often use baby carrots, just dump ‘em in)
- 2 celery sticks, same treatment as the carrots
- Salt and black pepper (My grandmother claims Maldon is best, but basic table salt does the job too)
- ½ lemon, squeezed over (if you remember—sometimes I forget and it still works out fine)
- Optional: a splash of white wine or chicken broth; maybe half a mug
How I Actually Cook It
- Start by patting the turkey dry with paper towels. This helps it brown, apparently. Sometimes I forget this step, but then I just roast a little longer.
- Rub the whole bird down with olive oil or butter. Get in there—don’t be shy! I once skipped the back, and it looked like a sunburnt tourist.
- Scatter those veggies and herbs in the roasting pan. Some people use a rack, but honestly, the veg works as a rack and adds flavor. Multitaskers unite!
- Salt and pepper everywhere. Under the skin too if you’re feeling chef-y (be careful, the skin can tear—no lie, I have made a Frankenstein turkey more than once).
- Stuff the cavity with onion bits, some lemon, and whatever herb stems are left over. Nothing fancy here.
- Pour a bit of wine or broth into the pan, just enough to cover the bottom. Or don’t. Still tasty.
- Tent the turkey with foil. Pop it in a 350F (175C) oven. As a general guide, roast about 13 minutes per pound. But start checking after 2 hours just in case—it cooks faster some days, honestly.
- Here’s where I usually sneak in a basting or two (like every 30 mins). Not sure it makes a big difference, but it feels cozy. Take the foil off for the final 40 mins so it browns up. If it starts to get too brown too fast, loosely cover it back up.
- Turkey’s done when a thermometer in the thickest bit (not touching bone!) hits 165F (74C). Or juices run clear. Or, you know, if you cut a bit off and it looks right.
- Let it rest! 20 minutes at least, tented with foil. This is the hardest part, especially if you have nosy relatives peeking in.
Notes From My Many, Many Tests
- Letting it rest is non-negotiable (I once sliced too early, and the juices ran away like water down a Yorkshire hill—tragedy).
- Using dry herbs works fine. Don’t let anyone guilt you!
- If the turkey skin sticks to the foil, it’s annoying, but honestly it still eats well.
- There’s always, always leftover veggies in the pan. Save them for soup.
Versions I've Experimented With (It's a Journey...)
- Once did an orange and maple glaze: delicious but sooo sticky. Difficult to clean up. Maybe try parchment, if you’re brave.
- Tried stuffing the bird with apples; came out a bit too sweet for me, but maybe you’ll love it. Who am I to judge?
- Skip the wine, use beer—actually, not a great plan unless you’re into a slightly strange, malty edge. Okay, not for me.
What If You Don't Have a Roasting Pan?
Honestly, I used to think a roasting pan was essential (all the celeb chefs say so), but a big baking dish works. Stack up the carrots and onions as a base to keep the bird off the bottom. No rack? No problem. I even saw someone use crumpled foil balls—I mean, why not?


Storing Leftovers Like a Normal Person
Pop any leftovers in Tupperware in the fridge, good for up to 3 days. Though honestly, in my house, it never lasts more than a day—my partner’s midnight snacking is legendary. Shred the leftover turkey for sandwiches, or, better yet, turkey noodle soup (try this one from Serious Eats). Or freeze up to 2 months; just make sure to seal well so it doesn’t taste like, well, freezer.
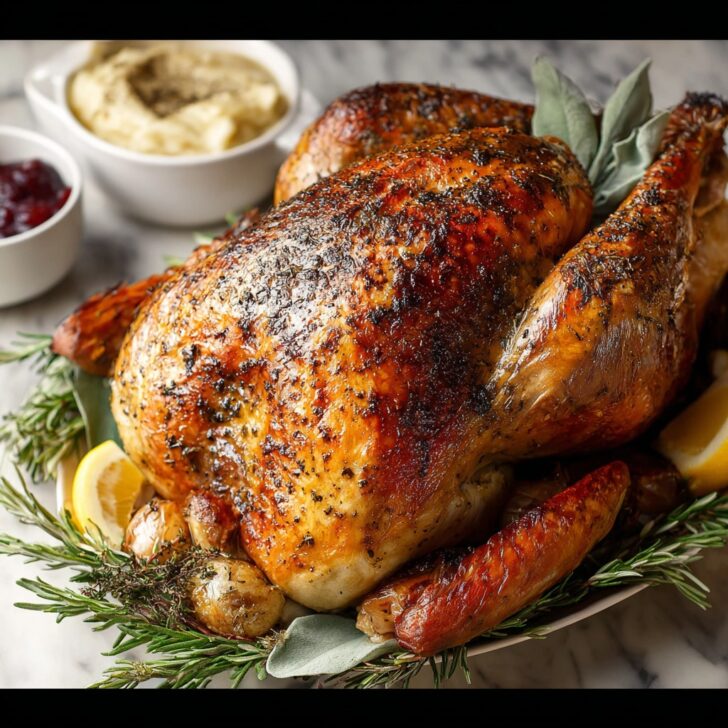
How I Like to Serve It
Honestly? I love thick slices with a puddle of quick gravy (check this simple gravy recipe). But my younger cousin dunks hers in cranberry sauce, and last Christmas, we piled everything into bread rolls for a messy, but phenomenal, next-day lunch. Also: cold turkey with a dash of hot English mustard? Surprisingly ace.
Things I Wish I'd Known
- I once tried rushing the resting stage because I was "starving"—turkey wasn’t as juicy, and the slices kinda shredded. Just wait. Drink tea or sneak bites of skin while you wait.
- Starting with a hotter oven helps brown the skin, but it cooks too fast inside. I *thought* it was clever, but nope. Don’t bother, just use 350F.
- If you tie the legs with string, it looks fancier, but forget it some years and nobody notices, honestly.
FAQ—Yes, I've Been Asked These Before!
- Q: My turkey’s too dry. What did I do wrong? — Oh, I've been there. Could just be a bit overcooked (maybe your oven runs hot?), but smother it with gravy and all will be forgiven.
- Q: Can I prep this ahead of time? — Absolutely. Rub it down the night before, let the flavors mingle. Or just wing it all the day-of like I do half the time.
- Q: Do I need to wash my turkey? — Actually, no, it just splatters germs everywhere. Skip it, that's what the heat’s for.
- Q: What if I don’t have a thermometer? — Use the old “juices run clear” test or just cut in and peek; not elegant, but it works.
- Q: Can I make it spicy? — Why not!? Toss in some chili flakes with your rub. I probably wouldn’t tell my nan, but you do you.
And, quick digression, if you want turkey sandwich inspo? I got hooked on this Turkey Club—don’t blame me if you crave it all year.
So, there it is. My not-so-perfect, honestly easy roast turkey that gets the job done and avoids kitchen drama (most of the time). Ping me if you run into trouble—or have a better trick up your sleeve, because I’m always keen for an upgrade!


Ingredients
- 1 whole turkey (10-12 pounds), thawed
- 4 tablespoons unsalted butter, melted
- 2 teaspoons salt
- 1 teaspoon black pepper
- 1 onion, quartered
- 1 lemon, halved
- 4 cloves garlic, smashed
- 1 tablespoon dried thyme
- 1 tablespoon dried rosemary
Instructions
-
1Preheat your oven to 325°F (165°C). Remove the turkey giblets and pat the turkey dry with paper towels.
-
2Place the turkey breast side up on a rack in a large roasting pan. Brush the outside of the turkey with melted butter and season generously with salt and black pepper.
-
3Stuff the turkey cavity with onion, lemon halves, garlic, thyme, and rosemary.
-
4Tie the legs together with kitchen twine and tuck the wing tips under the body.
-
5Roast the turkey for about 3 hours, basting occasionally with pan juices, until the internal temperature reaches 165°F (74°C) in the thickest part of the thigh.
-
6Remove the turkey from the oven, cover loosely with foil, and let rest for 20 minutes before carving and serving.
Approximate Information for One Serving
Nutrition Disclaimers
Number of total servings shown is approximate. Actual number of servings will depend on your preferred portion sizes.
Nutritional values shown are general guidelines and reflect information for 1 serving using the ingredients listed, not including any optional ingredients. Actual macros may vary slightly depending on specific brands and types of ingredients used.
To determine the weight of one serving, prepare the recipe as instructed. Weigh the finished recipe, then divide the weight of the finished recipe (not including the weight of the container the food is in) by the desired number of servings. Result will be the weight of one serving.
Did you make this recipe?
Please consider Pinning it!!