Let's Talk About These Easy Ice Cream Tacos
Alright, so picture this: It's a sticky-hot Saturday, you're melting faster than the ice in your lemonade, and the kids (or maybe just your inner kid) are begging for something fun. I started making these Easy Ice Cream Tacos one summer when my oven felt like the enemy and, you know, actual tacos for dessert just sounded wild enough to work. Now they're sort of a minor legend in our house—mostly because you get to eat with your hands and make a huge mess. Which, honestly, is half the fun.
One time I tried to get fancy with homemade waffle cones for these... and let’s just say, I have a newfound respect for anyone who can get those things off the iron without total chaos. I usually stick with the store-bought shells now, not gonna lie.
Why I Keep Making These (and You Might Too)
I make this when I want dessert that's actually *fun* and doesn’t require a million bowls. My family goes crazy for these because they taste like those Choco Tacos from the ice cream truck (RIP)—but you can swap in whatever you have in the freezer.
Sometimes I get a little carried away with the toppings, and the kitchen looks like a sprinkle bomb went off. But hey, it’s only dessert, not rocket science.
What You'll Need (Plus the Swaps I Use)
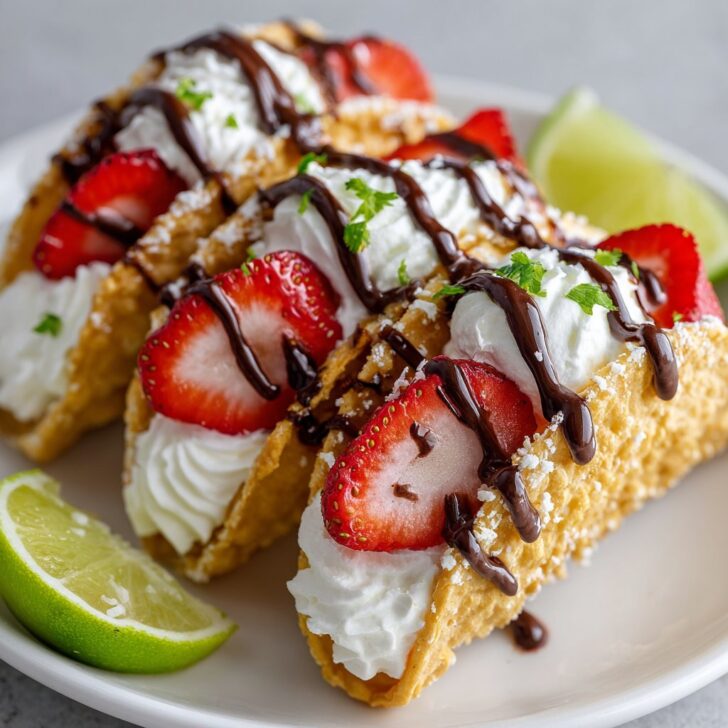
- 8 hard taco shells (I use the classic yellow corn ones, but my friend swears by the blue corn for extra crunch—go wild. If you wanna make your own, here’s a homemade shell guide, but I usually can't be bothered!)
- About 1 pint ice cream (Any flavor. I love salted caramel, but cookies and cream works. Sometimes I use frozen yogurt if I’m pretending to be healthy.)
- 1 cup chocolate chips (Or melting chocolate. My grandma always used Ghirardelli, but whatever’s on sale is fine.)
- 1 tablespoon coconut oil (Makes the chocolate shell snappier. I tried skipping it once—regretted it.)
- Toppings: Chopped nuts, crushed cookies, rainbow sprinkles, mini marshmallows, or honestly, whatever’s lurking in your pantry.
How I Actually Make These (Plus a Couple Detours)
- Freeze the Shells: Stick your taco shells in the freezer for at least 10 minutes. Trust me, they crack less when cold. If you forget, no biggie—just expect some breakage (adds character!).
- Soften Your Ice Cream: Let your ice cream sit on the counter for 5-10 minutes until scoop-able. Not too melty, though. This is where I usually sneak a taste...for quality control.
- Fill 'Em Up: Gently stuff each shell with a good scoop of ice cream. Don’t panic if it oozes out a little; that's part of the charm. Lay them on a parchment-lined tray.
- Freeze Again: Pop the tray back in the freezer for 30 minutes (or as long as you remember—sometimes I get distracted and it’s an hour; they're fine!).
- Get the Chocolate Ready: Melt your chocolate chips and coconut oil together—microwave works if you’re lazy like me; just zap 30 seconds, stir, then another 20 if needed. If you’re fancy, set up a double boiler. But honestly, who has time?
- Dip and Decorate: Dip the top of each frozen taco into the chocolate, then immediately shower with toppings so they stick. This is prime sprinkle-bomb territory; you've been warned.
- Final Freeze: Freeze another 15 minutes to set the chocolate shell (or just eat one right away—no judgment!).
Things I’ve Learned (The Hard Way, Usually)
- If your kitchen is super warm, work fast or your tacos will turn into a puddle. I once made these during a heatwave—never again without cranking the AC first.
- Don’t use thin, brittle shells—they shatter. I tried making these with those fancy organic shells one time and they just fell apart. Go for the sturdy ones.
- If your chocolate seizes up, add a splash more coconut oil. Works like a charm (most of the time).
Variations I’ve Tried (And One That Flopped)
- I sometimes use Nutella instead of chocolate for dipping. It’s messy, but so good.
- Mini tacos with those little street taco shells—adorable, but a pain to fill, so only worth it if you’re feeling patient.
- Tried a savory version with cheese and bacon ice cream. Not my finest hour—let’s just say, stick with sweet for this one.
The Gear I Use (But You Can Improvise)
- Baking sheet or big plate for freezing
- Parchment paper (or foil; honestly, wax paper probably works too)
- Microwave-safe bowl for melting chocolate (or a saucepan if you’re old-school)
- Spoon and a small offset spatula if you wanna get fancy—but a butter knife does the trick
If you don’t have a microwave, just melt your chocolate slowly on the stove. I’ve done it both ways, no major disasters yet.


Storing These (If You Even Have Leftovers)
Technically, you can freeze these in an airtight container for up to a week. Though honestly, in my house it never lasts more than a day—someone (naming no names) always sneaks the last one around midnight. If they get a little icy, just let them thaw a couple minutes before eating.
How I Serve 'Em (And How You Might)
I love plopping these on a big platter and letting everyone grab their own. Sometimes I set up a “taco bar” with tons of toppings, which gets a bit out of hand but is a hit at birthday parties. My niece dips hers in extra caramel sauce, which is a move I highly recommend. If you want more ice cream party ideas, Serious Eats has a fun guide on that.
If You Want My Best Pro Tips (Learned the Messy Way)
- I once tried to skip the second freeze—disaster. The ice cream just slides out when you dip in chocolate. Actually, I find it works better if you freeze longer than you think you need.
- Don’t overfill the tacos. More is not always better; trust me, I learned that after the "ice cream avalanche" incident of 2021.
- And, uh, taste your toppings before sprinkling. I once used some old chopped nuts—yikes.
FAQ—Stuff People Have Actually Asked Me
- Can you make these dairy free? Oh for sure! Use a coconut or oat-milk based ice cream and dark chocolate. I’ve done it for a vegan friend, and nobody complained (not even the picky eaters).
- The ice cream's melting everywhere—what gives? Yeah, it happens. Just freeze everything longer, and work in batches if you need. Or eat fast. I mean, that’s not really a problem, is it?
- Can I make these ahead? Yup, up to a week, but they’re best the day you make them. I think the shells get a tad soft after sitting overnight, but it’s not a crisis.
- Do the shells stay crunchy? Mostly! But if you overfill or let them sit too long, they soften up. Still tasty, though.
- What’s the best ice cream flavor? Oh, that’s a can of worms. I say go with whatever you like, but something with chunks (like peanut butter cup) is extra fun. Just avoid anything that melts super fast—lesson learned thanks to that one failed sorbet attempt.
And if you want more wild ice cream ideas, I've gotten great inspiration from Taste of Home's ice cream dessert collection. So, grab some shells and go make a mess—your tastebuds (and inner child) will thank you.


Ingredients
- 6 small flour tortillas
- 3 cups vanilla ice cream (or your favorite flavor)
- 1 cup semisweet chocolate chips
- 2 tablespoons coconut oil
- ½ cup rainbow sprinkles
- ¼ cup chopped peanuts (optional)
- 1 tablespoon butter
- 1 tablespoon sugar
Instructions
-
1Preheat a skillet over medium heat. Brush both sides of each tortilla with melted butter and sprinkle lightly with sugar.
-
2Place tortillas in the skillet one at a time and cook for 1-2 minutes per side until lightly golden and pliable.
-
3While still warm, fold each tortilla over a wooden spoon handle or similar object to form a taco shell shape. Let cool to set.
-
4Fill each cooled taco shell with about ½ cup of ice cream. Place filled tacos on a baking sheet and freeze for 10 minutes to firm up.
-
5In a microwave-safe bowl, melt chocolate chips with coconut oil in 30-second intervals, stirring until smooth.
-
6Dip the top of each ice cream taco in melted chocolate, then immediately sprinkle with rainbow sprinkles and chopped peanuts if desired. Return to freezer until ready to serve.
Approximate Information for One Serving
Nutrition Disclaimers
Number of total servings shown is approximate. Actual number of servings will depend on your preferred portion sizes.
Nutritional values shown are general guidelines and reflect information for 1 serving using the ingredients listed, not including any optional ingredients. Actual macros may vary slightly depending on specific brands and types of ingredients used.
To determine the weight of one serving, prepare the recipe as instructed. Weigh the finished recipe, then divide the weight of the finished recipe (not including the weight of the container the food is in) by the desired number of servings. Result will be the weight of one serving.
Did you make this recipe?
Please consider Pinning it!!