
Let's Talk Cookie Dough Cups (and my kitchen disasters)
Alright, friend, have you ever started making cookies, then just thought—hang on, what if I just eat the dough as it is? Trust me, I've had more than a few "accidents" where the cookie dough never actually made it to the oven. That's where these Easy Chocolate Chip Cookie Dough Cups come in. They're basically my favorite cheat code for a weeknight when I want something sweet and low on fuss. Plus, the first time I made these for my niece, she called me a genius (her words, not mine—flattery gets you everywhere, right?). Do I sometimes eat two or three straight from the fridge after a rough day? Sure, but who's counting.


Why You'll Love This Little Sweet Treat
I make this when craving gets the better of me and I feel way too lazy to deal with extra dishes. My family goes wild for these on movie nights (especially if you ration them out, otherwise—gone in 60 seconds). And honestly, they're forgiving if you fudge an ingredient or two—I've messed up the butter measurement more than once, and somehow they've survived. If you ever get frustrated with sticky dough, don't worry—sticky fingers are part of the charm, I promise. Actually, the stickier the dough, the sneakier I am with taste tests.
Here's What You'll Need (or what I grab from my cupboard)
- ½ cup unsalted butter (room temp is best, but I've nuked it in the microwave when I'm impatient—works fine)
- ⅓ cup brown sugar (light or dark, honestly, whatever's on hand)
- ⅓ cup white sugar
- 2 tablespoon milk (almond milk works in a pinch—I've even used strong brewed tea once, long story)
- 1 teaspoon vanilla extract (though I've been known to eyeball this, oops)
- 1 cup all-purpose flour (if you only have whole wheat, go for it, just expect a nuttier taste—my gran used to insist on self-raising, but I think she just got mixed up)
- ¼ teaspoon salt (I do a generous pinch; let's not get too fussy)
- ¾ cup mini chocolate chips (I've chopped up regular bars, or used white or peanut butter chips when supplies ran low)
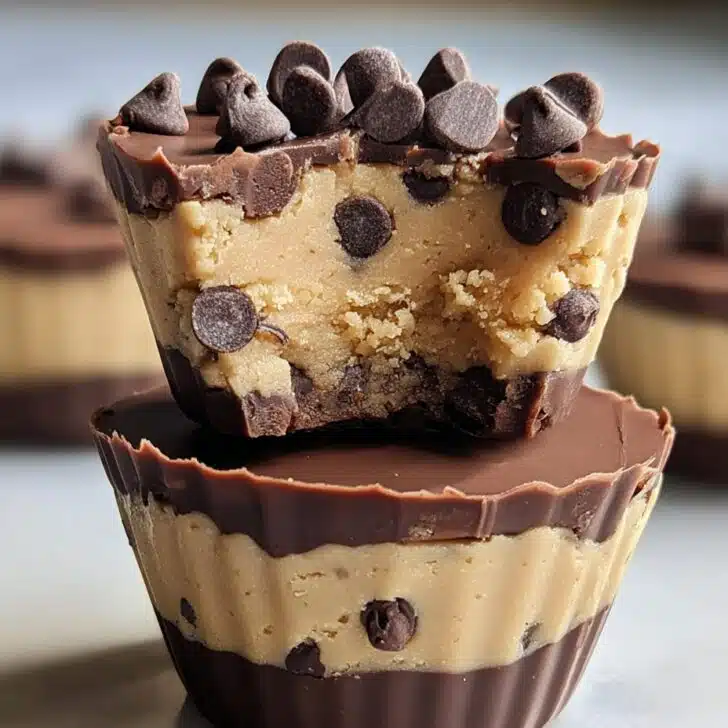
- 200g of your favorite melting chocolate or chocolate chips (to make the cup part, though sometimes I just use whatever's hiding in my baking drawer)
How I Make These (with side quests & mishaps included)
- Melt the chocolate. Grab a microwave safe bowl (I mean, who's got time for double boilers?). Melt your chocolate in 30-second bursts, stirring each time until it's smooth—don’t let it burn! It’s a pain to clean up. Spoon a bit into each mini muffin liner, then swirl it around so it coats the sides and bottom. Pop those in the fridge for about 10 minutes, or until the chocolate is set.
- Make the dough. While that’s chilling, beat together your butter and the sugars. I use a hand mixer, but a wooden spoon and a strong arm does the trick if you want the workout. Mix in milk and vanilla. Then the flour (sometimes I just dump it in all at once, no big deal), and salt.
- Time for the chips. Stir in your chocolate chips by hand—this is the stage where I always sneak a taste. You just can't help it. If you forget the salt, add it now, no harm done.
- Assemble the cups. Grab your chocolate-lined muffin liners from the fridge. Press a scoop of cookie dough into each one, gently, so the tops are kinda even (or not—rugged is charming!). Then, cover the top with a bit more melted chocolate, because why not go the extra mile.
- Chill again. Stick the whole tray back in the fridge for at least 30 minutes. Or longer if your patience allows.
- Munch away! Peel off those cupcake liners and enjoy. They look all neat, but honestly, I don't mind the occasional messy cup.
Tested—and Not-So-Perfect—Notes
- I once used coconut oil chocolate and it just melted all over my hands; maybe save that for a different recipe.
- Let the dough rest if it's too soft—mine sometimes gets sticky if my kitchen's too warm.
- If you prefer raw flour not to be raw, you can heat it in the oven (8 minutes at 350°F), but honestly, I usually just live dangerously.
Variations (and a few cookie cup fails!)
- Try white chocolate or dark chocolate for the cup. My cousin swears by a half and half swirl, but honestly, it looked a mess when I tried.
- A sprinkle of sea salt on top? Game changer.
- I tried adding chopped nuts once, but it made the dough weirdly crumbly—worth a shot if you like texture, but kinda not my favorite.


Stuff You Need (but it's fine if you improvise)
- Mini muffin tin (standard is a bit too big, but hey, go large if you fancy)
- Mini paper liners (or tear up parchment into squares; I've done that when I'm out of liners and it works alright!)
- Mixing bowls, spoons, and either a hand mixer or the trusty arm method
How to Store (kinda moot if you eat 'em all)
Pop any leftovers in an airtight container in the fridge. They should last for up to five days, though honestly, in my house it never lasts more than a day! On second thought, I've frozen a batch once and it worked—just defrost at room temp for a snack later.
The Best Way to Serve (or how we do it at home)
These are ace straight from the fridge with a cold glass of milk. For birthdays, I sometimes stick a candle in one and call it good—tiny cakes for the win. My sister likes them with coffee, but I stick with good old milk.
Things I've Learned (sometimes the hard way)
- I once tried rushing the chocolate melting step and regretted it, burned chocolate just tastes off—slow and steady wins the race here.
- Don’t overfill the cookie dough or it squishes out the sides. Not a disaster, but gets a bit messy.
- Actually, I find it works better if you let them chill properly before peeling off the liners—once I got impatient and the chocolate just lived on the paper.
FAQ (Because people really do ask!)
- Can I eat this cookie dough raw? Yep! No eggs here, plus you can toast the flour if you're nervous (I’ve definitely skipped this and lived to tell the tale!)
- What if I don’t have a mini muffin tin? No worries—just do these as blobs on a plate and pour melted chocolate over. Won’t win beauty contests, but tastes the same.
- Is it okay to freeze them? Absolutely. They’re pretty nice eaten frozen too—kind of like fudge, if we’re being honest.
- Can I make them vegan? I’ve swapped in vegan butter and plant milk, used dark chocolate, and it turned out grand—just check your chips aren’t dairy-based.
- Help! My dough is too hard/crunchy? Try adding a splash more milk, it should come round. Or, you know, just leave it out for a bit like I do (patience is not my strong suit).
- Why does my chocolate cup stick to the liner? Give it a bit longer in the fridge next time, and peel gently. Worst case, you can always eat it with a spoon.
Right, well, that’s my spiel! If you end up making these Easy Chocolate Chip Cookie Dough Cups, let me know how yours turn out—or if you discover any fridge-raiding variations. Oh, and try not to eat half the dough before it even makes it to the liners. No judgment either way.
Ingredients
- 1 cup all-purpose flour, heat-treated
- ½ cup unsalted butter, softened
- ⅓ cup brown sugar, packed
- ¼ cup granulated sugar
- ½ teaspoon vanilla extract
- ¼ teaspoon salt
- 2 tablespoons milk
- ½ cup mini chocolate chips
- 1 ½ cups semi-sweet chocolate chips (for coating)
Instructions
-
1Heat-treat the flour by microwaving it in a bowl for 1 minute or until it reaches 165°F, then let it cool completely.
-
2In a large mixing bowl, cream together the softened butter, brown sugar, and granulated sugar until light and fluffy.
-
3Mix in the vanilla extract, salt, and milk. Gradually add the cooled flour and stir until combined.
-
4Fold in the mini chocolate chips, then set the dough aside.
-
5Melt the semi-sweet chocolate chips in the microwave or over a double boiler. Scoop about 1 tablespoon of melted chocolate into each lined mini muffin cup and spread up the sides to form a shell. Place in the freezer for 5 minutes to set.
-
6Roll the cookie dough into small balls and press one into each chocolate shell. Top with extra melted chocolate if desired, then refrigerate until set. Serve chilled.
Approximate Information for One Serving
Nutrition Disclaimers
Number of total servings shown is approximate. Actual number of servings will depend on your preferred portion sizes.
Nutritional values shown are general guidelines and reflect information for 1 serving using the ingredients listed, not including any optional ingredients. Actual macros may vary slightly depending on specific brands and types of ingredients used.
To determine the weight of one serving, prepare the recipe as instructed. Weigh the finished recipe, then divide the weight of the finished recipe (not including the weight of the container the food is in) by the desired number of servings. Result will be the weight of one serving.
Did you make this recipe?
Please consider Pinning it!!